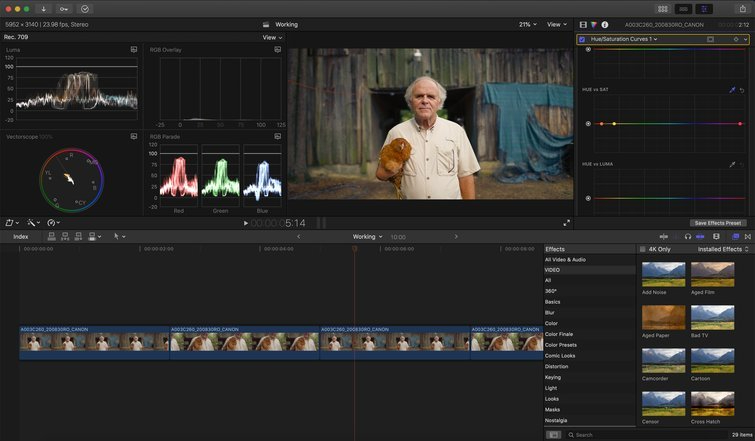
How to Give Your Footage a Cinematic Look in FCPX
Final Cut Pro X has a robust set of color tools that have vastly improved over the years. Here’s how to use them to give your video cinematic colors.
Making your palette really pop is an easy way to add production value in an instant. In this video tutorial, we’re going to look at how to create your own cinematic colors all within FCPX. Let’s jump in.
Step 1: Capture High-Quality Footage to Achieve High-Quality Color Grades
Having high-quality footage, the right codec, resolution, lighting, and awesome exposure — all of this is vital to achieving ideal cinematic colors. The footage we’re working with today is 6K Canon RAW shot in Canon Log 2. Check your current camera and see what codecs and color profiles could give you the best color grade.
Step 2: Color Corrections
Once your footage has been imported, it’s ready for the first step of color — color corrections. The process of color correction addresses any issue from conversions for LOG formats. These corrections could be exposure and white balance adjustments. Ultimately, it normalizes your footage’s color into a standard format.
Since we’re working with Canon Log 2 footage today, we’re going to convert our footage using the C-Log 2 conversion LUT in FCPX. These LOG conversion LUTS can be found in the Inspector panel and by selecting the extended function.
After we see the conversion LUT, we can make minor exposure and white balance adjustments as needed and according to the scopes we utilize.
Step 3: Color Grade
This is when the fun truly begins. We utilize a variety of curves and color masks to really fine tune our footage. Use the Color Wheels and Color Mask features to isolate and select specific colors and areas to customize your color grade.
For our purpose, we utilized color masking to give our shadows a bit more of a teal look and then another color mask to warm up our mid-tones. This resulted in a strong color contrast that really complimented our footage.
Step 4: Revisions
After you’ve completed your grade, it’s always advantageous to take a step back and really evaluate your footage as a whole. This allows you to see if you need to make any minor and final adjustments, like bringing down your highlights or bumping up your shadows a bit. Essentially, you want to give your footage a final look to make sure it’s as pristine and cinematic as possible.
For example, you may want to open your Hue/Saturation Curves to bring down the amount of red in skin tones. This adjustment could be something you may have missed had you skipped the opportunity to make final revisions of your color graded footage.
Step 5: Copy the Grade
If you have multiple clips in the scene that the grade can apply to, you can simply copy and paste the effects. Here’s how you do it.
Select the main clip you’ve graded. Once selected, press Cmd+C. Now, select the clip on the timeline that you want to paste the effects onto. Once selected, press Command+Option+V to paste the effects. If needed, you can make some minor adjustments to perfectly match the clips.
Now that you’re a cinematic color pro, keep elevating your video editing skills with this bonus FCPX content:
- Up Your FCPX Game With These Five Top Paid Plugins
- How To Export A High Resolution Movie Out of Final Cut Pro X
- 6 Must-Have FCPX Effects Presets for Video Editors
- 6 Game-Changing FCPX Keyboard Shortcut Customizations
Cover image of Blade Runner 2049 via Columbia Pictures/Kobal/Shutterstock.


