How to Create Foreign Language Subtitles in AVID
In this tutorial, we’ll show you how to prepare your foreign language content for translation and how to generate subtitles from those translations in AVID.
Subtitling a documentary is a time-consuming task. This is especially true for foreign-language documentaries with hours and hours of footage that need transcribing, translating, and subtitling. However, assistant editors using AVID Media Composer can easily ingest subtitles straight onto the timeline — which saves editors and their assistants hours of time inputting the subtitles manually.
Here’s how it’s done.
The Three Steps of the Subtitling Process
Foreign language interviews must get translated before an editor begins working with the footage. Producers, directors, and the editing team will need subtitles in order to work with and understand interview footage.
Therefore, it’s important to begin the translation/subtitling process as soon as you receive the footage.
There are three key steps to subtitling your foreign language project:
- Transcribing the interview into written text, in its original language.
- Translating the original language to the target language.
- Generating subtitles based on the translated text.
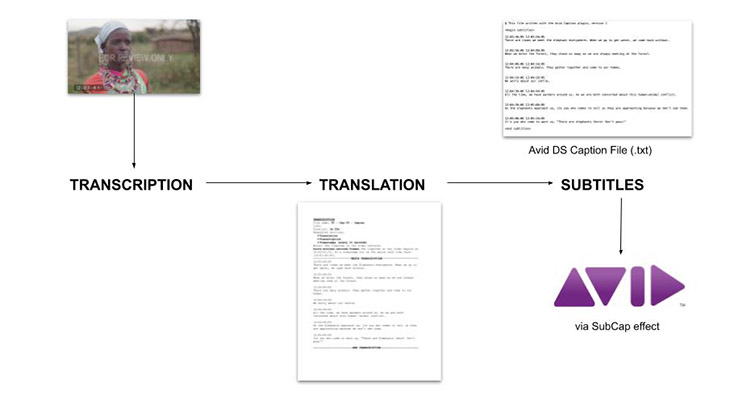
The steps to subtitling your foreign language project. (Image via Bud Simpson.)
Timecode and the Transcription Process
Your transcription team will need low-resolution copies of all interviews you want transcribed and translated.
These videos should include a timecode burn-in that’s based on your interview sequence timecode. Your interview sequence is simply a sequence that you’ve created in AVID that only includes a single interview for transcription and translation. A low-resolution, timecode-watermarked export of this sequence will suffice for the transcription team.
In order to generate subtitles from your newly transcribed and translated text, you should have your transcription team mark timecode stamps on the transcription at intervals of 5-10 seconds. These timecode stamps should match the timecode in the low-resolution video you provided the transcription team.
Transcripts without timecode stamps are virtually useless when generating subtitles. This is because you’ll need to know how the translated text syncs with the interview footage in your sequence.
The Process
Step 1: Create sequences for each interview you’d like subtitled.
A quick way to do this is by right-clicking your master clip, and selecting AutoSequence from the drop-down menu.
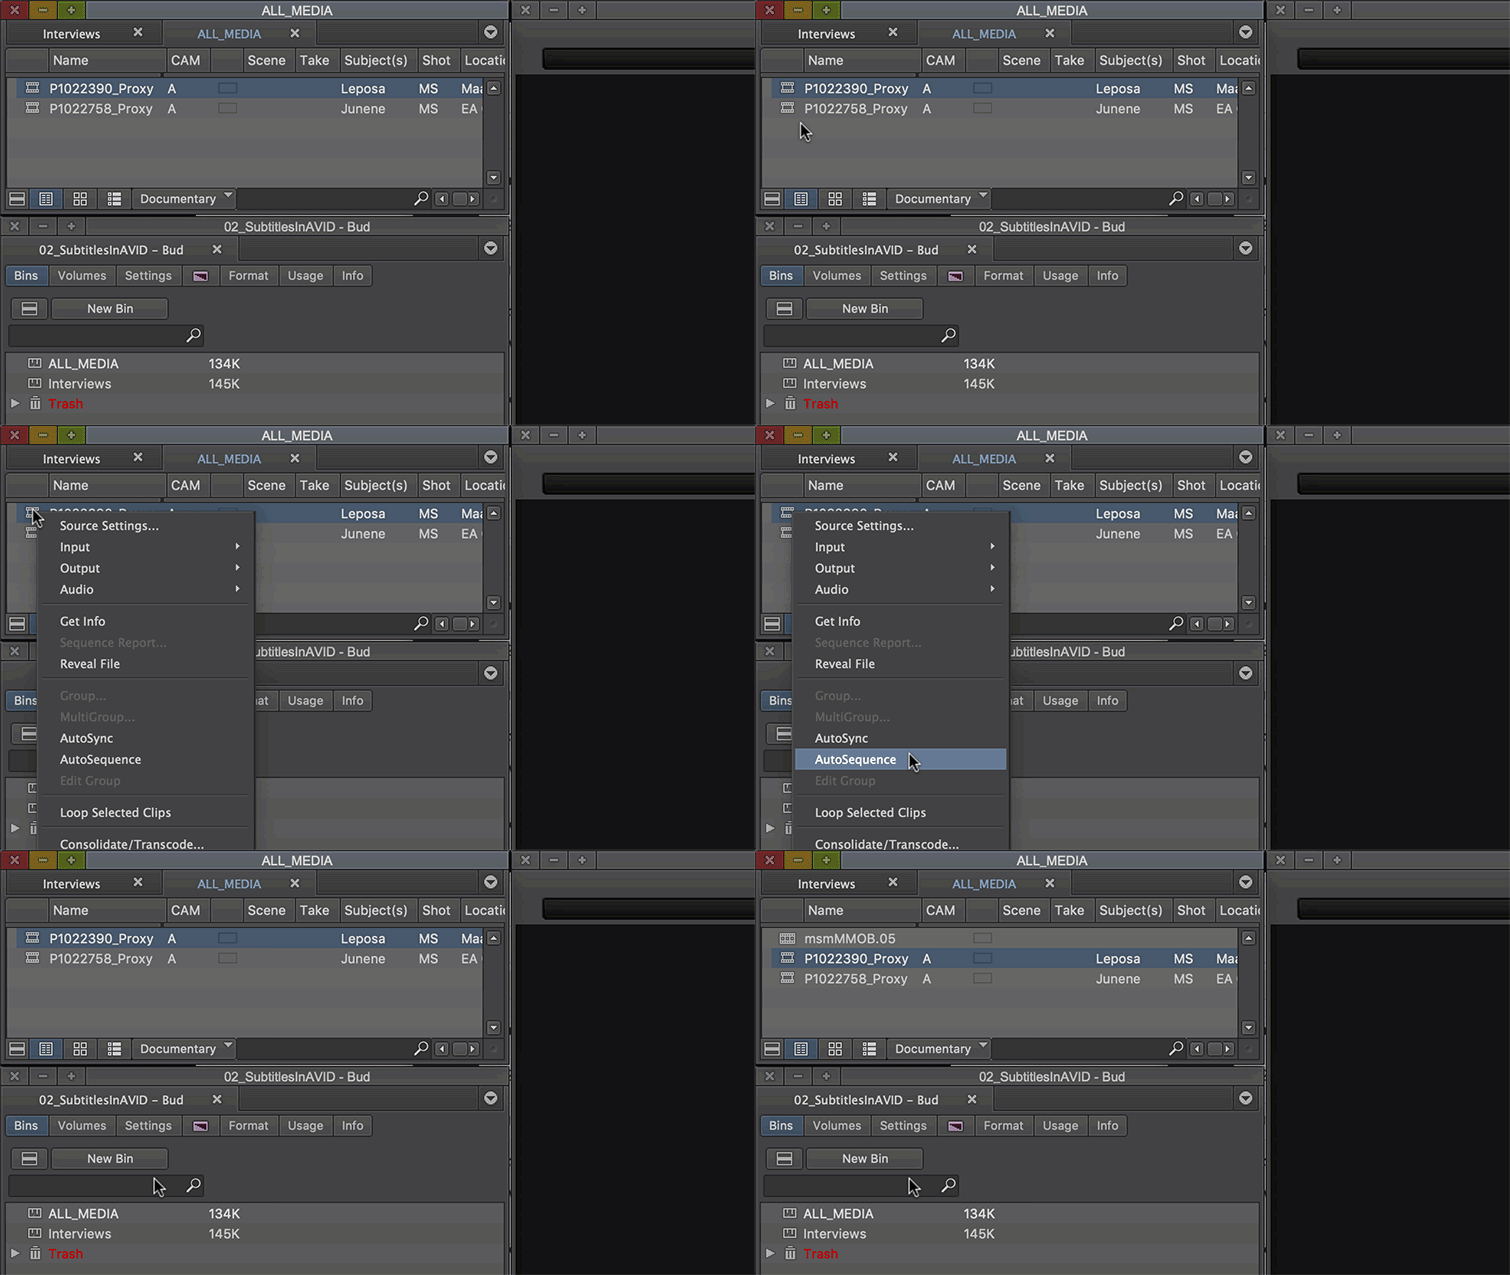
Image via Bud Simpson.
After creating sequences for all interviews that need subtitling, it’s time to prep the interview clips for export.
Step 2: Create a timecode burn-in and watermark.
Open one of your newly created interview sequences, add an additional video layer (⌘ + Y), then navigate to the Effects tab, and add the Timecode Burn-In effect to the newly created video layer.
Open the Effect Editor and adjust the size, color, position, and opacity of your timecode burn-in. Check the Text box to add a watermark.
Note: A watermark of “FOR REVIEW ONLY” will let others know that this clip is not for distribution.
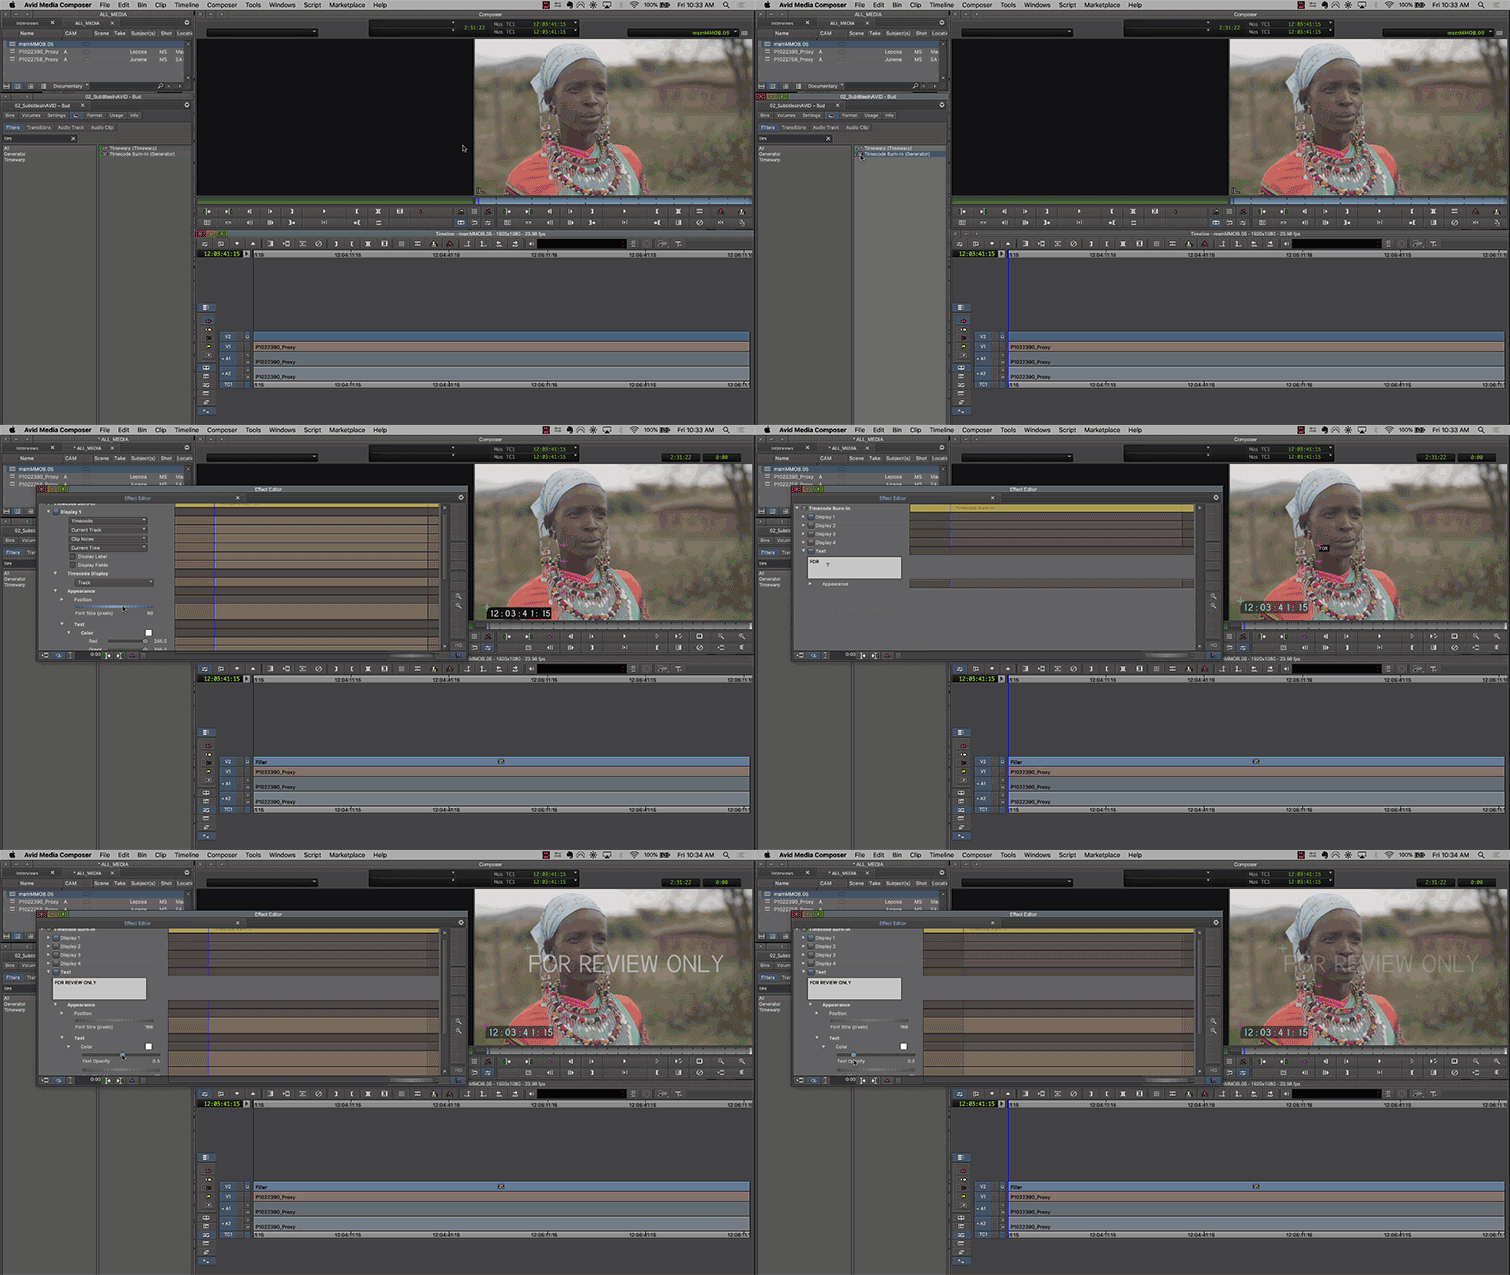
Image via Bud Simpson.
With your timecode burn-in and watermark set, it’s time to export a low-resolution version of the interview.
Step 3: Export a low-resolution version of the interview.
With your sequence bin open, right-click the sequence and select: Output > Export to File.
Set your export settings accordingly. The following settings will work for most scenarios:
- Quicktime
- h.264
- 720p or 480p resolution
Specify an export location for the files and hit Save.
Step 4: Send the interview files off for transcription [FREE TEMPLATE].
A Google search returns many options for foreign language transcription services. However, for smaller-budget productions, it’s worth checking with your producers to find someone already involved with the project who can transcribe your interviews.
Regardless of how you choose to transcribe your interviews, the transcription team will need the following:
- A low-resolution video for each of your interviews.
- Notes on how you’d like the content to be transcribed.
It’s a good idea to provide the transcription team a template for how you’d like the text to be transcribed.
You can access an example template here.
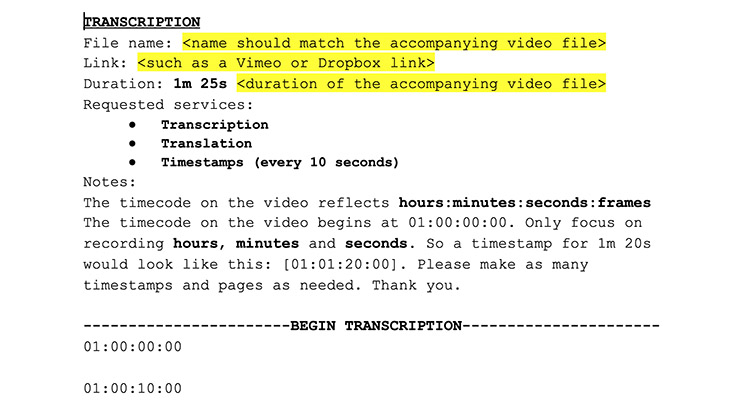
A transcription template is an important element for your team. (Image via Bud Simpson.)
Be sure to tell the transcription team to include timecode stamps. Preferably, they should place timecode stamps every 5-10 seconds.
Remember: These timecode stamps should match the timecode burn-in in the accompanying videos.
Step 5: Send the completed transcription text off for translation.
Once the transcription is complete, you may have to coordinate the hand-off between the transcription team and the translation team. In some cases, this may be the same company (or individual) doing both the transcribing and translating.
Once again, it’s important to stress that the finished translation adheres to the timecode stamps created during transcription.
Step 6: Use AVID’s SubCap effect to generate an AVID DS Caption File (.txt).
With the finished translations in hand, it’s time to generate subtitles.
To do this, you’ll need AVID’s SubCap effect. Using this effect requires you to generate and fill out an AVID DS Caption File (.txt).
Companies such as 3PlayMedia offer AVID DS Caption File transcription services. However, if budgets dictate that you do this work manually, the process is as follows.
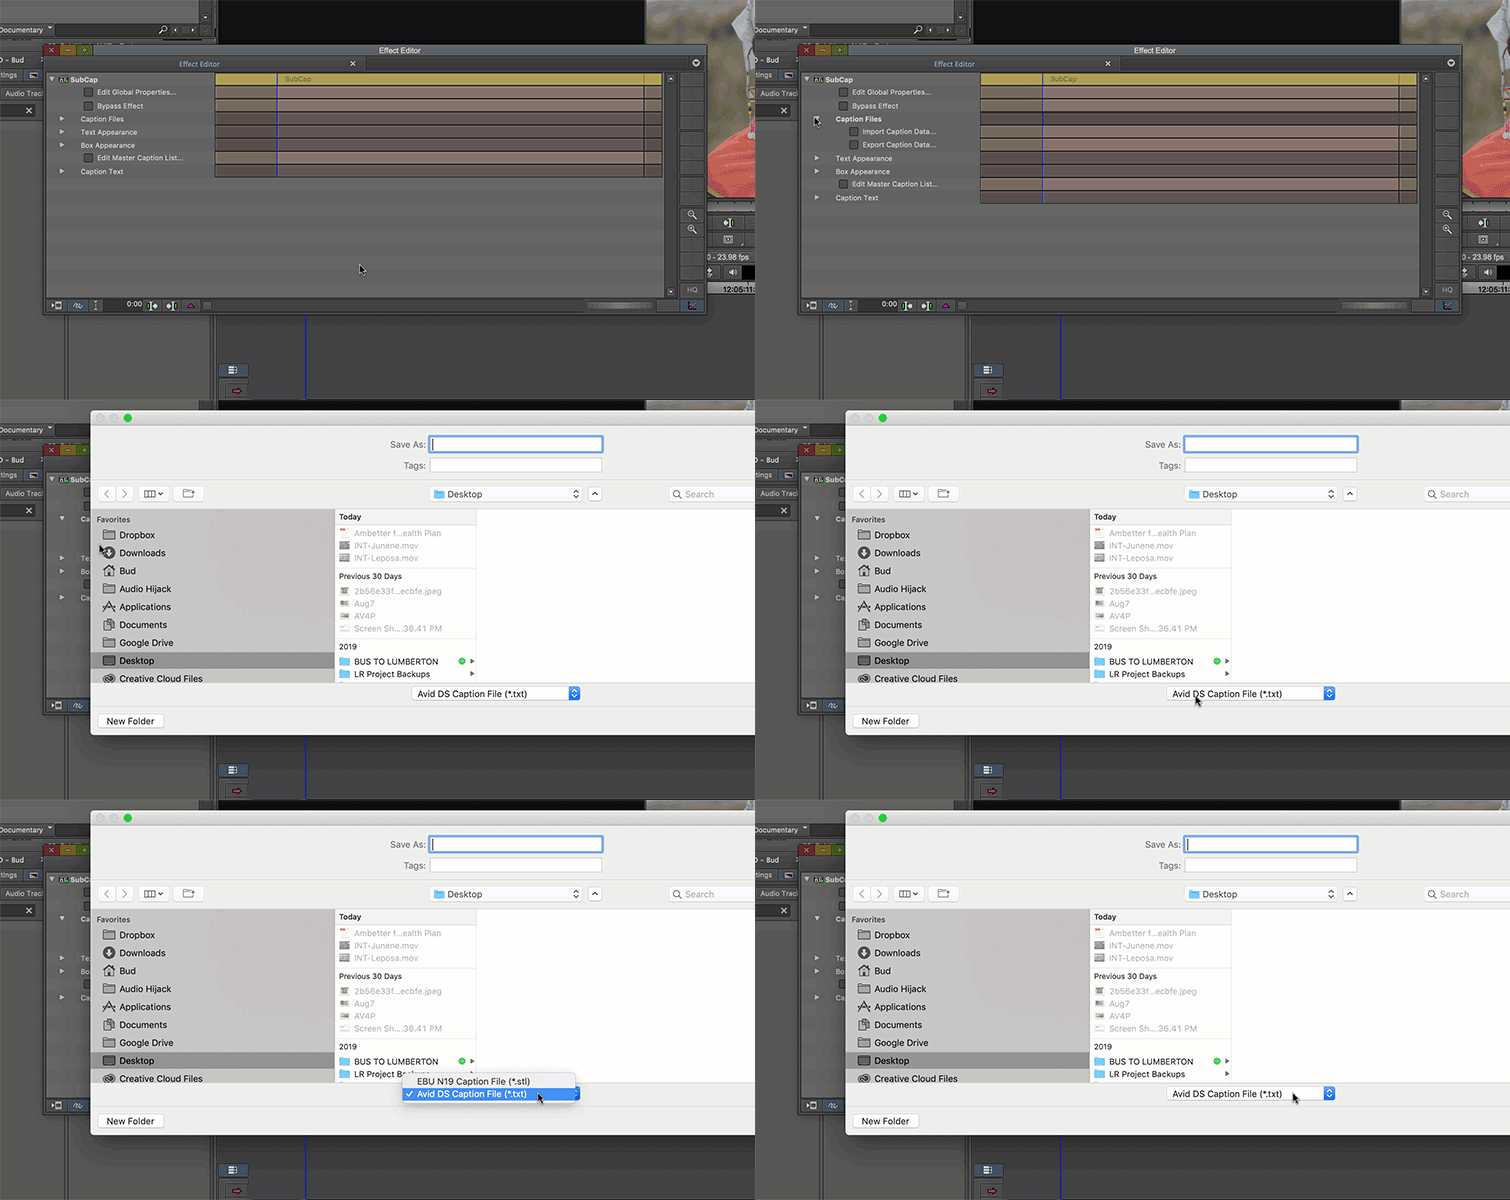
Image via Bud Simpson.
To generate an AVID DS Caption File (.txt), navigate to the interview sequence you’d like to subtitle. Mute the timecode burn-in and add an additional video layer. To this new video layer, add the SubCap effect from the AVID Effects panel.
Open the Effects Editor, and select the twirl down arrow next to Caption Files and tick the checkbox Export Caption Data. In the Save As box that opens, be sure to select AVID DS Caption File (.txt) from the drop-down menu.
Specify a location to save the file, and select Save.
Step 7: Populate the .txt file with the translated text.
Next, it’s time to fill in the appropriate subtitles — and their respective timecode — using your translated transcripts as a guide.
Filling in an AVID DS Caption File (.txt) by hand is easy but time-consuming. You can edit the .txt file in any text editing application, such as TextEdit.
The formatting of an AVID DS Caption File is very important. AVID’s SubCap effect will not import an improperly formatted .txt file.
The formatting rules for the AVID DS Caption File (.txt) are as follows:
- Create the document using plain text.
- The header should read @ This file written with the Avid Caption plugin, version 1.
- All subtitles should appear between the <begin subtitles> and <end subtitles> markers.
- A timecode range should accompany each block of subtitles.
- Timecode ranges cannot overlap (NOTE: This is the number one issue for failed imports).
- Two spaces should appear between each block of subtitles.
The image below illustrates a properly formatted Caption File:

A properly formatted AVID DS caption file. (Image via Bud Simpson.)
Once you’ve properly filled in the Caption File, it’s ready to import into AVID.
Step 8: Import the AVID DS .txt file into AVID.
Open the Effect Editor and navigate to the active SubCap effect. Under the Caption Files heading, tick the check box titled Import Caption Data. Navigate to the Caption File and select Open.
The captions should immediately appear on your timeline. If not, go back and check the formatting of your AVID DS Caption File.
Remember: The #1 formatting mistake on the caption files is overlapping timecode ranges.
It’s a good idea to duplicate this subtitled sequence as a master sequence. You can make copies from this original sequence and cut, copy, and paste accordingly.
Interested in the tracks we used to make this video?
- “Halfway Hope” by Harrison Amer
- “Lazy Sundays” by Magnetize Music
- “Straight Up & Down” by Artlss
- “Calling Beat” by Lift Music
- “Dancing Mood” by Make Music
Looking for more on filmmaking and video production?


