

Interpret Footage in After Effects

The Interpret Footage feature in After Effects is handy when you want to loop footage or change the frame rate for video shot in slow motion.

Interpret Footage lets you loop footage, change frame rate and interpret alpha channels in Adobe After Effects. It may not be the sexiest motion graphics/video editing subject – but it’s an important feature to know.
In this post we will look at these first two useful functions of Interpret Footage in AE: looping clips and changing frame rate.

Looping Footage in After Effects
Interpret footage lets you loop both video and audio clips. This a lot easier to manage than having to copy and paste clips. I use this feature often when working with music loops and animated backgrounds.
Quick note: You loop from the Project panel, not from the Timeline.
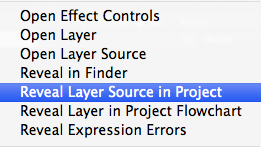
If you have a lot of footage and folders in your project panel, here is an easy way to locate your footage in the Project. From the timeline, select the layer you want to loop, right-click and choose Reveal Layer Source in Project.
With the footage selected, click the Interpret Footage icon (located at the bottom left of the Project window).
Interpret Footage Highlighted in Red:

At the bottom of the Interpret Footage window in “Other Options” is Loop. Change the number from 1 to how many times you want the footage to loop and click OK.

You will now see an outline after the end of the layer – and not the black corner (the black corner indicates media end).
Click on the end of the layer and drag to extend it the length of your Timeline. You could also move your CTI (playhead) to the end of the timeline, and use the shortcut Option + ] on Mac (or Alt +] on PC) to extend the layer. Voila, simple as that! Click images below for larger view.
Layer before looping:

Layer after looping:

Layer after looping with the layer extended to the end of the Timeline:
Changing Video Frame Rate in After Effects
Changing the frame rate of clips in After Effects is useful when you’ve shot your footage in slow motion. Affordable cameras like GoPros and DSLRs will film at rates of 60 and 120 frames per second, with high-end cameras going into the thousands.
By default, footage will play at normal speed in After Effects. To adjust this, you will have to tell AE what the frame rate should be in Interpret Footage.
Go to the Frame Rate section of the Interpret Footage window. In my example it is, by default, using the frame rate of the clip (59.94).
Select “Conform to Frame Rate” and change this to the desired frame rate. I’ve modified it to 24 fps. The duration of the footage will change and it will now play in slow motion.

If you are shooting with the Blackmagic Pocket Camera, After Effects will import the footage as a numbered image sequence. The default will be 30, so change this if shot at another frame rate like 23.98 or 24.

Do you convert your clip frame rates in After Effects or another app?
Share your thoughts, workflow tips and suggestions in the comments below!


