
5 Ways to Manipulate Time in Adobe Premiere Pro

When you’re editing video, you’re essentially playing with time. Let’s look at a few Premiere Pro tools to help you do just that.
You know, it’s called nonlinear editing for a reason. You’re moving and shifting clips around as you wish on a timeline, creating an entirely new sequence of events. Premiere Pro has a handful of tools that allow you to dive down into your footage and manipulate time on a clip level. Let’s take a look at a few.
1. The Rate Stretch Tool
One of the fastest ways to manipulate time in Premiere Pro is via the Rate Stretch tool. Simply press the R key to bring it up. Hover over the edge of a clip to watch the tooltip activate. Click-and-drag to speed up or slow down your video. The speed is displayed via a percentile in the clip name. If you can’t see it, click on the Wrench icon and activate Show Video Names.
2. Speed/Duration Controls
For more precise control over the timing of your clip, grab the layer and go to Clip > Speed/Duration. As the name implies, the Clip Speed/Duration dialogue box allows you to manually type in a specific speed or duration. Once again, speed is represented in percentile. To keep the clip In and Out points set in the same place on the timeline, simply unlink the Speed and Duration controls before making changes to the speed.

The Clip Speed/Duration can also reverse the speed of a clip, maintain the audio pitch, and activate ripple delete options. When changing speed, choose between three different interpolation methods: Frame Sampling, Frame Blending, or Optical Flow.
3. Posterize Time
The Posterize Time effect allows users to manually set a frame rate. I use this effect often to stylize my videos. For example, you can get a hand-animated or stop-motion style look by bringing the FPS down to 12-18. Or, you can get a more cinematic look by bringing 60fps footage down to 24fps.


4. Interpret Footage
To change the frame rate of a clip at the project level, use the Interpret Footage dialogue box. To open this, grab your clip in the Project panel and go to Clip > Modify > Interpret Footage. This will show you the native frame rate of the file, but also let you assume a custom frame rate.
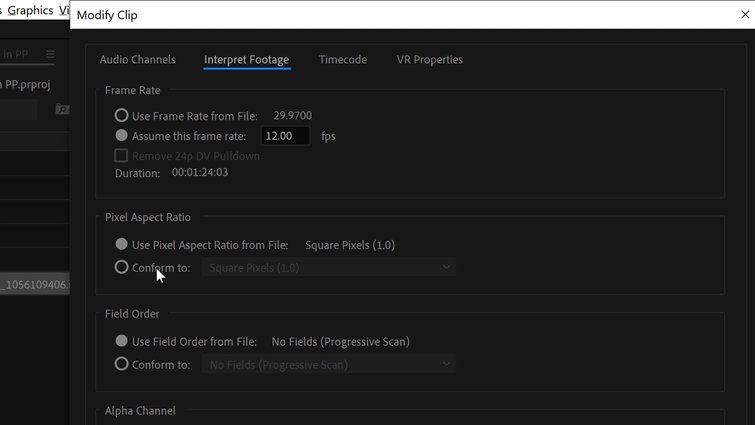
The difference between Interpret Footage and Posterize Time is that Posterize Time won’t change the duration, and it’s applied on a clip level.
This feature is especially useful when importing image sequences from other programs. Premiere Pro might be importing a clip at the wrong frame rate by default, so you can have it assume the frame rate you want.
5. Time Remapping

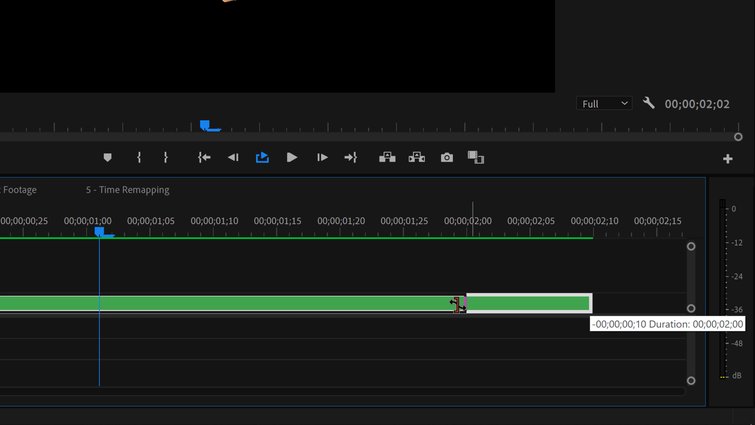
If you want to get serious about playing with time in Adobe Premiere Pro, then you’ll want to learn how to remap it. Time Remapping takes some practice to master. The easiest way to work is directly in the timeline panel.
To begin, right-click on a clip and select Show Clip Keyframes > Time Remapping > Speed. You can manually add and remove speed keyframes directly on the clip in the timeline via a Ctrl + Left Click on the horizontal line. Drag the line up to increase the speed of a section. Drag it down to decrease the speed. To ease the ramping between speed changes and smooth out the transition, drag and spread out the handles of each keyframe.
This can feel a bit clunky at first, but after a few animations, you’ll get used to the experience.


A Note on Time Interpolation
Depending on your source footage, you might have to play around with the various interpolation methods to see what looks best. In an ideal situation, you would’ve captured the footage correctly. For example, shooting at a higher frame rate gives you smooth slow motion because you have more frames to work with. The computer isn’t creating or blending frames together.
If you’d like to get serious about playing with time, you might want to jump into Adobe After Effects. This program gives you the tools to more easily comp multiple shots together, opening up a plethora of ideas. And maybe one day, after enough practice, you can create something like this:
Take another listen to the tracks used in the making of this video:
- Groove Delight by Viljami Mehto
- Funky Bounce by Boomer
- Snappy by Jonathan Boyle
Then, learn some new workflow tips and tricks with these educational articles:
- Lesson Learned: 10 Quick Tips for Backing up Footage
- How Guillermo del Toro Uses Color, Objects, and Trauma in His Films
- Top 6 Techniques on How to Write a Short Film Script
- Why Your Images Aren’t Sharp Near The Coast
- Lights, Camera, Action: How Filmmakers Frame Heroes and Villains
Cover image via DC Studio.


