Quick Lighting Tip: Carry the Lamp

Learn how to light your shot quickly and cheaply without overexposing your incandescent practical light. Let’s have a look at a basic setup to better understand the technique.
All images via David Goodman
Practical lights are visible lights in your shot that can also provide much-needed illumination while motivating the way you light your scene. Lighting your scene with practical lights can be crucial when shooting a documentary or when working quickly. The problem is that practical lights have a tendency to overexpose if you keep them in your shot.

When a practical light is overexposed, which should be obvious from the shot above, one workaround is to reframe your shot and use the illumination of the practical light while keeping the actual light out of your shot. But what if you want to keep the practical light in your shot? After all, that’s what makes the light a practical light.
The trick is to put your practical incandescent light on a dimmer and control the brightness. You can then motivate the lighting of the scene and actually supplement the practical lights with the more professional movie lights of your choice. This demonstration was shot with the affordable two-light Lowell GO Pro-Visions Kit.
Let’s go through the steps of carrying the lamp.
1. Expose for Practicals

By exposing for your practical lights, and cutting the overexposure, the rest of your image goes black. To correct for this, use your practical light as a guide. In this case, the main practical light is the lamp on the table.
2. Set Your Front Light

By placing a Lowell light behind the practical light, you can carry the lamp and provide sufficient illumination to give yourself an exposure.
3. Set Your Backlight

Once the front light is set, it’s time to think about the background of your shot. In this setup, there is already another practical lamp in the background but it doesn’t provide enough illumination to be of much use. Using the background lamp as a guide, you can motivate a backlight for the subject and the background.
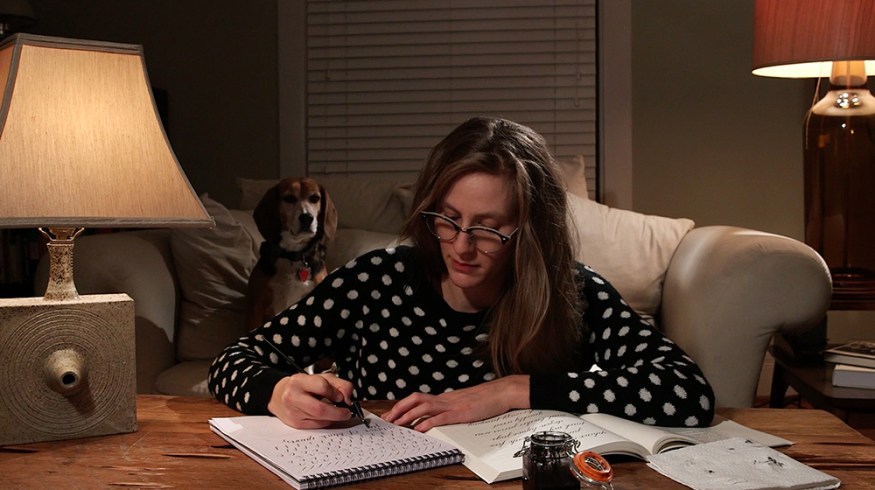
4. Front and Backlight Combined

Combined, and with the strategic placement of a background Beagle, the lighting effect produces a shot with more depth and visual interest.
5. Alter Lighting Intensity With Dimmer

The problem is that after adjusting exposure a bit for the front and backlight, the practical lamp in front is still overly bright. This is where the dimmer becomes useful. Using a very inexpensive dimmer, you can lower the intensity of your practical light and still keep the illumination of the Lowell light.
Final Results

The behind-the-scenes lighting setup is quite basic and sets the lights in a diagonal line across from one another. As you can see, the light placement allows you to motivate lighting with the position of the practical lights, while also maintaining control of the way your practical lights are exposed.
Carrying the lamp is a quick and easy lighting method that can be achieved with minimal means. It’s a good trick for any cinematographer to have up their sleeve.
Have any experience with this technique? Share your behind-the-scenes knowledge in the comments below!