
Revive Your Footage With Resolve 15’s Automatic Dirt Repair and Dust Buster Tools

The imperfections are part of the charm of archival footage. However, sometimes they can be a bit much. Resolve has the solution.
There is a refined beauty to archival footage, despite how often it’s spoiled with wear, dirt, grain, and other imperfections. Historical footage can transport us back in time more effectively than ultra-sharp 4k recreations. However, there may be a time when you’re using older material, and the imperfections are severe enough that they are detracting from the viewing experience. Thankfully, In Resolve 15, there are two revival tools can help you fix this problem.
If you tend to upgrade your software to the latest version without reading the patch notes (I’m guilty of this with all Adobe programs other than Premiere), then you may not know about two new features in Resolve 15: Automatic Dirt Removal and Dust Buster. The effects are incredibly easy to use — for both tools, and in most cases, it is simply a drag-and-drop operation. So, if you missed these new additions in the update, or are new to Resolve, you need to know what these tools can do.
(Before we proceed, it’s worth noting that while the primary purpose of these effects is to revive and remaster older footage, you can, of course, also use them for an array of problems with modern footage.)
Automatic Dirt Removal
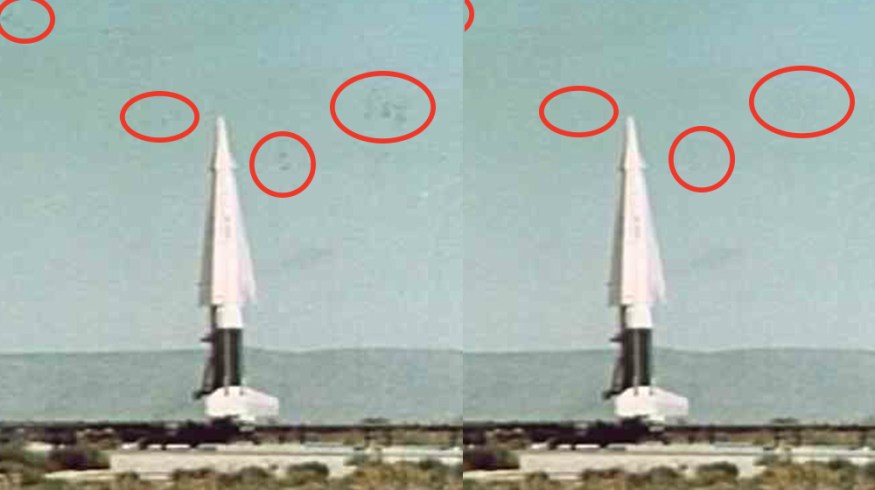
Before

After

First, let’s look at what you can do when you have too much dirt in your clip. This isn’t necessarily a noise remover like Neat Video or Resolve’s built-in noise remover; it uses optical flow technology to remove and repair elements that temporarily appear over a frame or two. So, what does that mean? Well, it’s not going to remove features that consistently appear throughout the entire shot, such as a lens smudge or a consistent scratch (as in the example above). But for dust, hair, dirt, and any other unwanted elements that appear in the shot for only a frame or two, this is the tool for the job.
As I mentioned, the Automatic Dirt Remover is ridiculously easy to use. You quite literally apply the effect to a node, and in most cases, that’s it. There are, however, a few sliders and drop-down menus you can use to enhance the quality of the effect.
The first panel is your main controls. Here you can adjust how the dirt removal tool interacts with your footage.

- Motion Estimation — You have four options: None, Faster, Normal, and Better. These will change the effect’s performance and quality.
- Neighbor Frames — This will let you choose how many frames the effect should reference when removing dirt. If you find the dirt lingers for more than a few frames, you should increase the amount. However, increasing this number will also increase the processing of the effect, which will cause slower machines to struggle.
- Repair Strength — Of course, the function is in the name. The default setting is 0.9 (with a 1.0 max). If you feel like Resolve has cleaned up too much dirt and the archival footage has lost its charm, you can reduce this number.
Dust Buster
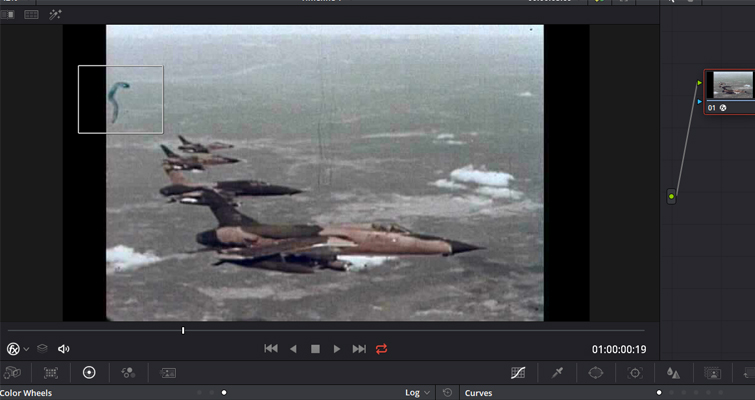
Before (thick dirt mark on the left of the frame)

After

While you can use the Dust Buster on its own, it is primarily a backup to the Automatic Dirt Removal when that tool can’t remove the heavy imperfections from a clip. The primary difference is that you, the user, have to direct where you want Resolve to apply the Dust Buster. Similar to the Automatic Dirt Removal but with less horsepower, this tool is for imperfections that appear in just one frame. If the blemish lasts longer than a single frame, you’ll need to move through the clip frame by frame, drawing a box around the defect.

You’ll find the Dust Buster in the same OpenFX panel category as the Automatic Dirt Removal. Once you find it, apply the effect to a new node. You need to make sure that the OpenFX icon is displayed in the drop-down menu below the viewer; otherwise, you’ll be unable to repair your footage. Then, find the imperfection in your clip, and with your cursor, expand a box around it and let Resolve work its black magic. The process can be slightly confusing because Resolve doesn’t give you an indication that the effect is active, and when you draw a box around the error, there’s no change to the cursor’s appearance.
That’s it. It’s remarkably powerful, and even someone brand-new to Resolve can use it. While in my example the hair clip was off to the side and free from any moving objects, this process will work on practically any shot.
As with any effect, these tools can cause setbacks, especially when you use the Automatic Dirt Repair on a large number of clips. It will cause playback issues, and both of these tools will only really clean specific imperfections for a few frames at a time. But for cases like the problems listed here, these will be your new go-to tools.
Lewis McGregor is a certified DaVinci Resolve trainer.
Looking for more Resolve tips and tricks? Check these out.
- How to Use the Shared Node Feature in DaVinci Resolve
- Quick Tip: How To Use Optimized Media In DaVinci Resolve
- Remove Unwanted Shot Features With Resolve 15’s Patch Replacer
- Resolve’s Lens Reflections and Film Damage FX Analyzed
- Video Tutorial: How to Configure The ADR Panel In Resolve 15


