

5 Ways to Punch Up a Boring Shot with the Rotobrush

In this tutorial, I’m going to show you how to add life to a static shot with this powerful After Effects tool.
When you rotoscope, you’re essentially animating a matte over a series of consecutive frames. This allows you to isolate and separate foreground items from the background. Once separated, you can add effects to the layers independently, opening up a world of creative options in post.
Today, I’m going to show you five simple ways to spice up a shot in a roto workflow. Many of these are relatively simple adjustments, but they add a lot to the final shot. And, while I’ll be using these methods together, they’re also effective as individual techniques.
But, first things first, let’s roto the clip.
Isolate the Subject with the Rotobrush
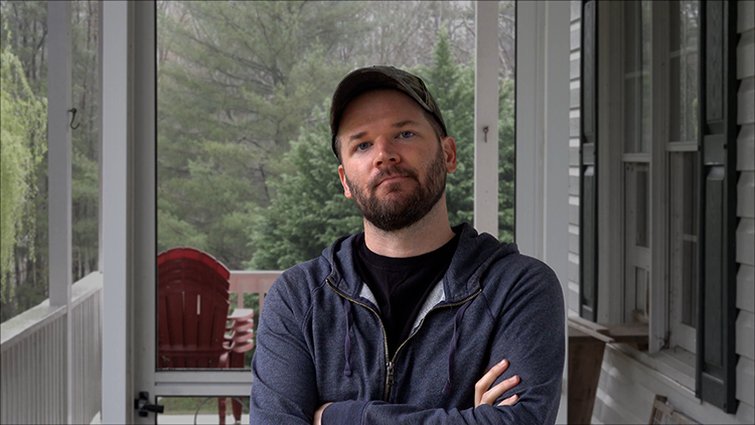
So, here’s the shot.

Again, I need to separate myself from the background, creating two layers with which to work.
To begin, I’ll double-click on my shot in the timeline to open up the Layer panel. This is where all of the roto work is performed. I’ll grab the Rotobrush tool and create a selection. Adobe’s latest updates to the Rotobrush 2 allows me to harness the power of AI to more easily find and track the edges of my subject. I can subtract areas from the selection via Alt + clicking. To achieve usable edges, I’ll switch the Quality of the Rotobrush effect in Effect Controls to Best.

To perform the roto, I can simply press the spacebar to propagate all of the frames in the work area. To go frame by frame, I’ll use the Ctrl + right/left arrows. To get the best roto possible, it’s important to nail that first selection. This helps the Adobe sensei AI tech figure out where the edges of the subject are located. I can view the results by toggling the Alpha views in the bottom-left of the Layer panel.

Once I’m happy with the roto, I’ll click the Freeze button at the bottom-right. I’ll go grab a coffee during this step, as it can take a little bit of time. After it’s done, I’ll jump back over to the comp panel to view the results. Now that I’ve separated myself from the background, I can quickly and easily make adjustments to help myself stand out in the frame.
Pro Tip: When shooting, always capture a clean plate if you have the time. This is simply the same shot, but without your subject. It’s not 100% necessary, but it makes rotoscoping and compositing much easier.
1. Make Color and Luminance Adjustments
Since this shot wasn’t lit, it’s flat looking. The background is nearly the same brightness as the subject, which doesn’t serve the shot well. To make it more dynamic, I’ll add a Hue & Saturation effect to the Clean Plate (background layer). I don’t want to get too crazy with this effect, so I’ll set both Master Saturation and Master Lightness to -25.


Now, you can see how I’m standing out a bit better against the background. Once again, be careful here as a little goes a long way. If I take it too far, I can get a strange effect that ironically looks like it was shot on a green screen.
2. Fake a Shallow Depth of Field
This background is also in pretty sharp focus, which is distracting from my beautiful face. To combat this, I’ll simulate a shallow depth of field. Creating a shallow DOF look is quite easy, once I’ve separated the layers. For this, I’ll add a Gaussian Blur to the background layer, and set it to 15. Done.
As with the luminance and brightness adjustments, this can quickly look cheesy and fake if you take it too far. It’ll also bring out any edge defects, so you’ll quickly see if you need to touch up your roto job. If you’re looking for something even more dynamic, try creating some custom luma mattes to give your blur some falloff.
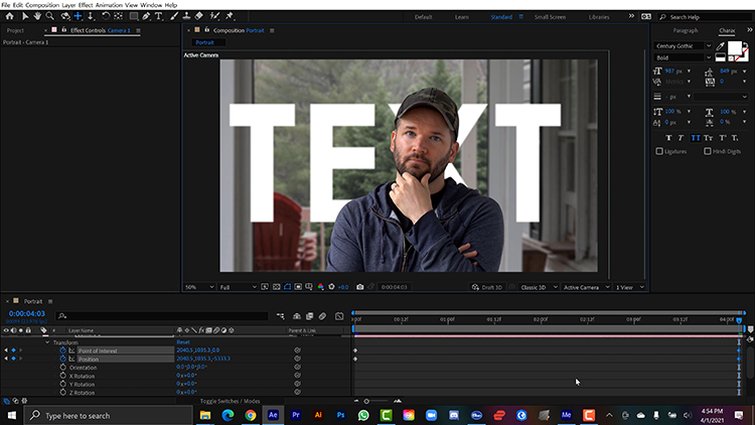
3. Place Text in the Middle Ground
One of the more common uses of the Rotobrush tool is to place text behind people and objects on screen. You’ve most likely seen this technique on commercials or even popular Netflix series like Emily in Paris. This is as simple as creating a new text layer and placing it between the foreground and background layers.

As with faking the blurring the background, adding text can quickly bring a viewer’s attention to any edge problems, so keep a lookout for those. Having text in the middle ground looks especially good with some movement, which I’ll add later.
4. Create a 3D Environment
To add even more versatility to my project, I’ll create a 3D environment. For this, I’ll click on the 3D checkboxes of each layer in the timeline panel, and then add a new camera. Now, I’ll pull my layers apart by adjusting the Z position of both layers. This setup opens up a myriad of possibilities when animating.

For example, I can now create a more realistic depth of field with the camera, as compared to just adding a Gaussian blur to the background. For this, I’ll go to Camera Options and turn on Depth of Field. Now, I can Aperture and Blur levels to tweak the look that I want. I’ll probably need to scale up the background a bit. To keep the focus on me, I’ll grab the Camera and the Foreground layer and select Camera > Link Focus to Distance Layer.

Now I can create some fake camera movements.
5. Add a Simple Camera Move
Not only was this shot not lit, but it was also shot on a tripod with no movement. Boring stuff. Now that I have two separate layers in a 3D environment, I can add some movement via the camera. Let’s fake the look of a slider moving from left to right.
For this, I’ll first place the playhead at the beginning and keyframe the camera’s Position and Point of Interest at the desired location. I’ll move the playhead to the end, and then move the camera via the Pan Under Cursor Tool. With this new 3D environment, I’m now seeing parallax between the two layers. This also looks nice when animating via the Dolly tool, as well.
As you can see, when it comes to punching up a clip, Adobe’s Rotobrush tool opens up a world of new opportunities.
Need more inspiration? Check out these articles:


