The Audio Ramp-Up: The Best Transition You Should Be Using

Sometimes, your project needs more than a simple cut, but a flashy transition is too much. Enter the audio ramp-up transition.
This is by far one of my favorite transition processes, and it has nothing to do with the visuals. It’s super powerful, and the best part is that hardly anyone uses it in short-form content.
So here’s one way to improve your transitions without using snappy video plugins — the audio ramp-up.
How to Use the Audio Ramp-Up Transition
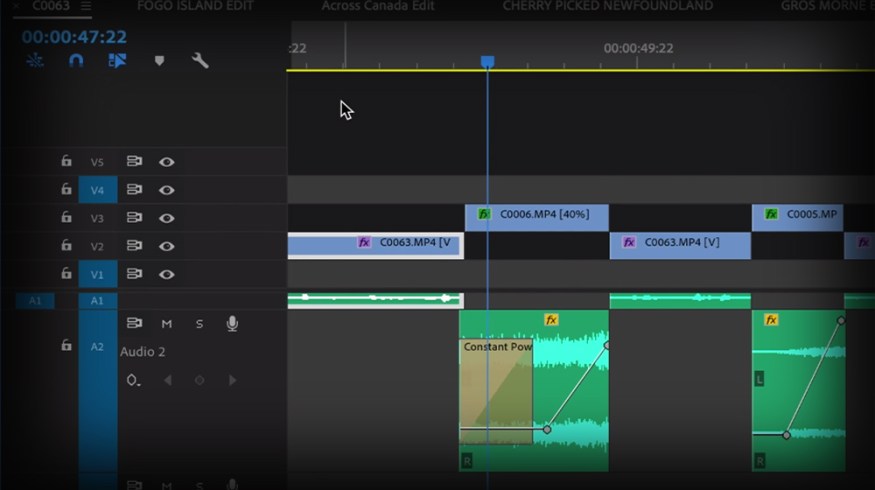
First, find the clip you want to transition from. Then layer either a sound effect, foley element, or song below it.
Next, set your audio level to how you want it throughout your clip — not too loud, not too quiet. Make sure that audio track ends right at the tail of your transitioning clip.
Finally (the most critical part) ramp up the volume in your selected audio track so it becomes more prominent than any ambient sound. Do this by selecting the Pen Tool and creating a keyframe marker about six seconds before the end of your shot. Create a second keyframe marker at the end of your audio track — only this time, raise it so that it becomes very noticeable. You don’t want it to be overpowering, but you do want it to be clear in the final cut.
When your audience watches playback, this effect will create a sort of jarring cut, lending a unique feeling to both scenes.
And if you’d like to try a slightly different approach, check this tutorial on transitioning with audio swells.
Interested in the track we used to make this video: “Lifetime Travels” by Cymatix
Looking for more video tutorials? Check these out.
- Get Better Results Using LUTs with Lumetri Color in Premiere Pro
- 5 Things Every Filmmaker Should Know Before Making a Feature Film
- Video Tutorial: How to Morph Graphics Using Adobe After Effects
- Video Editing 101: Using The J, K, and L Key Editing Shortcuts
- How to Create an Animated Circle Burst in Adobe After Effects