5 DIY Tutorials and Gear Hacks for Filmmakers

These DIY filmmaking solutions have been used on everything from commercial shoots to big-budget blockbusters. Here are five hacks every filmmaker should know.
Top image via Deakins Online
We are big supporters of DIY filmmakers and hacked-together video equipment. It’s problem solving at its finest. Apparently we like to write about a lot — especially if there are five things to teach you. See any of the following;
- 5 Killer Filmmaking Hacks
- 5 DIY Lighting Tips For Filmmakers on a Budget
- 5 DIY Filmmaking Gear Tutorials
- 5 Simple Cinematography Hacks for Under $50
- 5 DIY Filmmaking Tutorials
I almost feel like I let readers down by writing 3 Creative Ways to Use a Ladder on Set. To make it up to you, here are FIVE MORE tutorials and hacks for the DIY filmmaker.
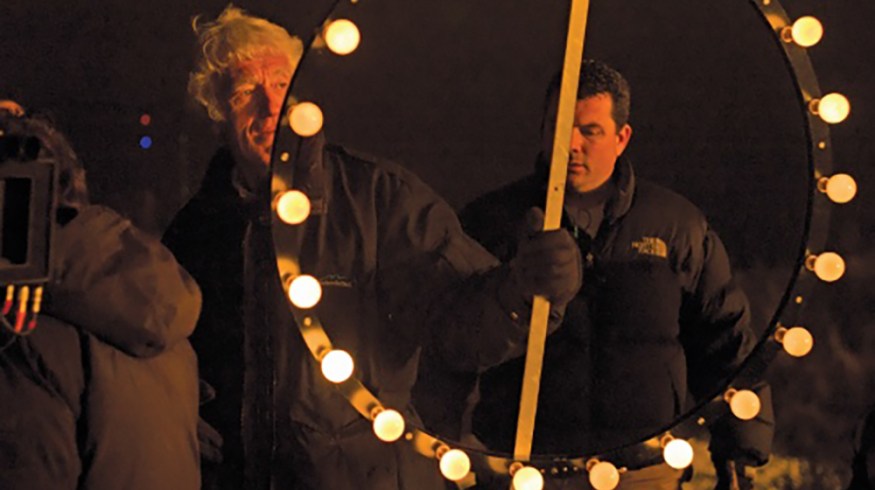
1. Build a Roger Deakins Ring Light
Roger Deakins is one of the all-time great cinematographers, which is one of the many reasons I write about his work so much. One of the best resources for filmmakers and cinematographers alike is Deakins’ online forum. There he has offered so much advice, one trick being the ring lights he has built for nearly every film.
They are really simple things though: some wooden rings of varying diameter with sockets for household bulbs a every 5″, some straight wooden strips with similarly spaced sockets, steel hoops with evenly spaced 200/300 watt halogen bulbs, sockets grouped like the fingers of your hand which also take 200watt halogen bulbs, a household socket with the socket for a 200 watt halogen bulb behind it etc etc.
He has had such success with the ring light, he even has had massive structures built similarly.

Image via Roger Deakins
This was a light I had made which consists of 5 concentric hexagonal aluminum strips holding 200 odd 75 watt household bulbs. The largest hexagon is 15′ across and the smallest 3′ 6″ across. It was controlled by a dimmer system and a skirt of ultrabounce acts as a cut as well as an interior reflector.
This was a light I had made for a Synagogue location in A Serious Man… We had a large number of shots to shoot in this particular location so my problem was to light the space in such a way as I wouldn’t take much time relighting for every angle. This rig was suspended from chain motors at an average of 20′ above the centre of the space. The total output would have been about 17Kw but as the lamp was dimmed down to about 40% it was not all that intense. I was only shooting at a base of 2.6 on 5218 with a little high speed work for which we raised the intensity of the light. We added some bounce from shot to shot, usually dropping muslin from the rig itself, but that was all the additional lighting we used.

2. Use Golf Club Travel Cases for Gear

Unless you have a grip truck, traveling with a ton of gear isn’t easy. If you find yourself having to travel or fly with plenty of support gear, you know how expensive it can be to buy rugged cases for everything. One of the best practical tips I ever got was to put all my C-stands, tripods, or any support stands in a case together.
Now you may be worried about dropping over $300 on a rolling Pelican case, but you can get the same type of protection for a fraction of the cost. I personally use rugged golf club cases. Designed to protect expensive golf clubs, it will certainly take care of all your gear too. The SKB standard golf travel case offers excellent protection at $157 — half the cost of the Pelican case. Granted there is a size difference, but the golf case has always offered plenty of room for my gear.
The above Pelican 1740 case is 45 inches long and weighs 31 lbs. In comparison, the SKB golf case is 48 inches long and weighs 15 lbs. As much as I enjoy my smaller Pelican cases, they are heavy enough as it is.
3. Build Your Own Apple Boxes

Image via Nick Ferry
Apple boxes are one of the most versatile tools on set. You can use them to add support to the camera, raise equipment, sit on them, stand on them, or make Tom Cruise look taller than he actually is.
Here is an incredibly simple build for those of you without many tools or woodworking skills. Using 1/2″ plywood, Dustin McLean built some very rudimentary apple boxes. No, they aren’t pretty – but yes, they do work. In this tutorial, he will show you how to make a full apple and half apple. DustFilms kindly provides a simple build map so you know what size pieces you will need to cut.
Author’s note: If you don’t have much experience working with wood screws, you can easily split the wood by drilling straight into 1/2″ ply. Be sure to pre-drill holes with a drill bit. I’d also suggest skipping the screws and using wood glue and going around the edges with crown staples.
If you have access to tables saws, or are a skilled craftsman, here is a more technical build from Nick Ferry. He uses a very nice grade of 1/2″ Baltic Birch plywood. He opts for the 1/2″ ply because he find 3/4″ to be too heavy. Ferry even offers a downloadable cut list on his site.
This tutorial will show you how to make all four sizes of apple boxes; full apple, half apple, quarter apple, and pancake. This build is for more advanced word workers.
4. Hang Backdrops with Metal Conduit Pipe
If you have ever needed to hang a backdrop or green screen for a shoot, you know how much of a pain it can be. In this tutorial from The Slanted Lens, you’ll see three ways you can use some conduit to quickly hang backdrops.
The first technique uses some half-inch plumbing pipe and elbows mounted to the ceiling or wall. Then you just slide 1″ conduit over the pipe. If you don’t have a fixed studio to mount the elbows, you can easily use C-stands or just a regular light stand. Jay P. Morgan shows you how to slide the conduit right onto the C-stand, or drill a hole to attach to your regular light stand. Finally, he shows you how to build a cyclorama using conduit pipe. This allows you to have more of your backdrop on camera when shooting from multiple angles.
5. GoPro Clamp
Need a quick action shot? This GoPro hack is much easier than trying to find the right GoPro accessory. Just drill a hole into a spring clamp and add a GoPro tripod mount. Done. Instant access to all those quick shots needed. Here’s a step-by-step tutorial from MicBergsma.