

Understanding Keyframe Interpolation in Adobe After Effects

Keyframe interpolation can improve the realism of your animations and save your workflow some time. Find out how in this video tutorial.
Understanding keyframe interpolation in Adobe After Effects will help bring your motion graphics to the next level. Not only will it give your animations more realism, it will also significantly speed up your workflow. In this tutorial, I’m going to show you how to use keyframe interpolation to give a simple animation more natural movement. In particular, I’m going to give a rocket graphic a more realistic takeoff. In the process, you’ll learn about the importance of spatial and temporal interpolation, and the difference between the two.
Let’s get started.
Introducing Interpolation

When you apply keyframes to a layer, After Effects will interpolate the values between them. For this particular animation, I’m using two simple position keyframes to launch my rocket. The keyframes are moving the rocket through space over a period of time. I can precisely control how the rocket moves through space and time by changing the interpolation methods.
After Effects uses the Bezier interpolation method, allowing you to control keyframes with bezier handles. I can switch the interpolation method via the Keyframe Interpolation dialogue box, which gives you options for both spatial and temporal interpolation settings. While this might seem a little technically intimidating at first glance, it’s actually quite simple once you understand the lingo. Essentially, these methods specify how After Effects applies bezier handles to keyframes. Let’s have a closer look.
Spatial Interpolation

Spatial interpolation, as the name implies, refers to space. You can view and manipulate spatial keyframes in the composition panel. If I move the end keyframe in the composition panel, the keyframes don’t move on the timeline panel. This is because the rocket is still traveling over the same period of time, just a different distance. To compensate, it will either travel faster or slower, depending on which direction I drag the keyframe. You can see the change in speed reflected in the speed dots on the motion path. Each dot represents a frame, with more dots signaling a slower speed.
Temporal Interpolation
Once again, as the name implies, temporal interpolation refers to time. When you move keyframes left and right on the timeline, you’re moving them in time. For example, if I move the final keyframe in my rocket animation, the keyframes in the composition panel won’t move. There will, however, be a change in the speed dots between the keyframes. As I move the end keyframe closer to the beginning, my speed dots will become few and far between. This is because the rocket is traveling the same distance over a shorter period of time. Therefore, it must move at a much faster rate. The speed dots will reflect this. Now, let’s tweak the animation.
Refining the Animation
Curve the Flight Path
While I have my keyframes in place, the animation looks about as real as Dwayne “The Rock” Johnson in The Scorpion King. To lend the rocket launch more realism, I need to adjust the interpolation.

First, I’ll add a quick curve to the flight path of the rocket, making it turn slightly to the left after it launches. To do this, I’ll grab the Pen tool (G) and place an additional keyframe to the motion path, roughly where I want the turn to begin. After the new keyframe is in place, I’ll select the final keyframe and move it to the left. You’ll notice right away that the motion path is not as smooth as we want it to be. I can fix this with the bezier handles. To straighten out the rocket’s flight path, I’ll use the bezier handles of the last two keyframes.
Once I have the keyframes in place and the motion path tuned in, I still have a few problems. First, the rocket is not facing forward. I can quickly remedy this by grabbing the layer and selecting Layer > Transform > Auto-Orient > Orient Along Path. This will actually face the rocket to the left, so I’ll have to rotate by 90 degrees to properly face the rocket forward. My second problem has to do with the speed. It’s still a very unnatural movement, so now I’ll focus on adjusting my keyframes temporally.
Ramp Up the Speed

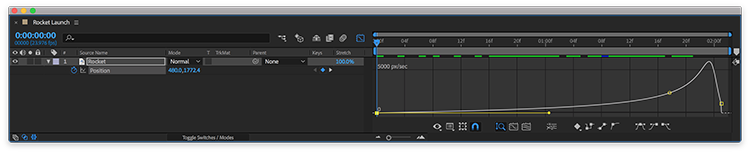
With my motion path set, I now need to adjust the speed of the rocket to give it a more organic launch. As with most rockets, I want it to slowly ramp up in speed during takeoff. I can fine tune the speed with the Graph Editor. To open this display, I’ll simply press the Graph Editor button in the timeline panel. This interface will show me speed and value changes over time. To make sure I’m viewing the speed settings, I’ll press the Choose Graph Type button and select Edit Speed Graph.
Once in the Graph Editor, I will select the position property of my rocket layer to bring up my keyframes in the display. To properly change the launch speed, I need to change the middle keyframe to Rove Across Time. This means it will not lock to a specific time but, rather, adjust based on the timing of the first and last keyframes. To make the keyframe rove, I’ll right-click it in the comp panel and select Rove Across Time. I’ll need to readjust my motion path, and then I’m ready to change the speed.
To slowly ramp up the speed of my rocket, I’ll move the keyframes and bezier handles in the Graph Editor until I get a movement I like. For this particular animation, I want the first keyframe to be set to zero pixels/second. Then I’ll grab the bezier handle and drag it as far right as possible. This will slowly ramp up the speed to the next keyframe. Voilà! My rocket now has a smooth takeoff.
Looking for more After Effects tutorials? We’ve got you covered.


