Using XML Files to Move Your Timeline to a Different NLE

If you need to transfer your timeline between two different pieces of video editing software, using XML files could be the solution for you.
So, you’ve been brought in on a project and the edit is already partially completed. You’re eager to get cracking with the work, but there’s one major problem. The current edit was done on a software that you despise using. While you want to accept the work, the fact that you can’t use your go-to editing software is a real deterrent.
Luckily, there are a few different ways to move edits between various editing software. One of them is by using XML files.
Here’s a step-by-step guide to using XML files within FCPX, Premiere Pro, and DaVinci Resolve.
FCPX to Premiere Pro
If you’d rather stay away from using Apple’s Final Cut Pro X for your edit, you can simply move your timeline out of it using an XML file.
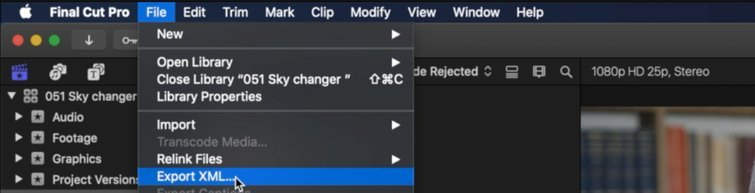
- To do this, load your current edit in the timeline (called a “Project” in FCPX) and navigate to Export XML, as shown above. You can then save it to your desired location.
- If you’d like to import it to Adobe Premiere Pro, you must purchase and install an extra piece of software called Project X27. You can download it from the App Store or the Intelligent Assistance website for $49.99.
- Next up, navigate to your XML and right-click it. Select open with then select Project X27. After this, a new window will appear so you can select the attributes of the edit that you’d like to transfer to Premiere. Once you’ve done this, hit OK and save your new XML file.
- Go back to Premiere and navigate to Import, then select the XML you’ve just created. This will import your timeline along with your footage and assets. It’s worth researching which aspects of the edit will and won’t transfer. For example, color grades will not move across to Premiere.
DaVinci Resolve to Premiere Pro
- Start off by loading up your edit in Resolve.
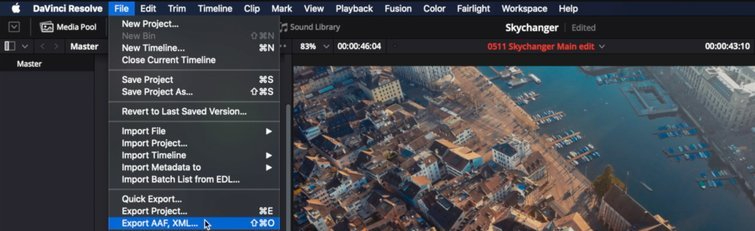
- Navigate to Export AAF, XML, as shown above.
- Once you’ve done this, a new window will appear so you can select where to save your file and what to name it. It’ll also give you the option to decide what sort of XML you want to create. I recommend selecting FCP XML 1.3, as this is the one that I’ve gained the best results from.
- If you’d like to import it to Adobe Premiere Pro, you must purchase and install an extra piece of software called Project X27. You can download it from the Intelligent Assistance website for $49.99.
- Next up, navigate to your XML and right-click it. Select open with then select Project X27. A new window will appear to let you select the attributes of the edit that you’d like to transfer to Premiere. Once you’ve done this, hit OK and save your new XML file.
- Go back to Premiere and navigate to Import, then select the XML you’ve just created. Your timeline will import into Premiere along with your footage and assets.
DaVinci Resolve to FCPX
- Start off by loading up your edit in resolve.
- Navigate to Export AAF, XML.
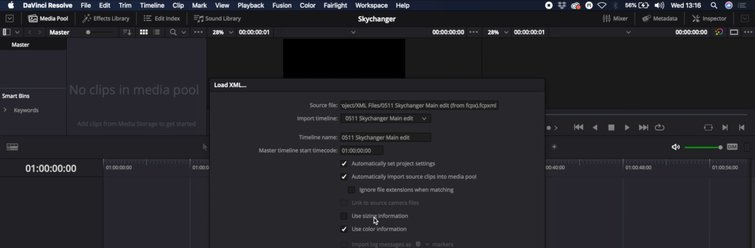
- Once you’ve done this, a new window will appear (as shown above), which will enable you to select where to save your file and what to name it. It’ll also give you the option to decide what sort of XML you want to create. I recommend selecting FCP XML 1.3 as this is the one that I’ve gained the best results from.
- Open up FCPX and navigate to File>Import>XML.
- Select the XML file you’ve just created and hit Import. Once you’ve done that, DaVinci Resolve will create a new event where you will find your timeline and footage.
FCPX to DaVinci Resolve
- Load up your current edit in the timeline (called a “Project” in FCPX) and navigate to Export XML. You can then save it to your desired location.
- Open up Resolve and navigate to Import AAF, EDL, XML.
- You can import the XML from FCPX without any interference, which is convenient. Select your file and click Import.
- A new window will appear allowing you to select various options. I advise deselecting use sizing information to ensure your edit maintains how it appears in FCPX.
- If you hit use color information, the grades you created using the color board in FCPX will come across.
- Select OK and your timeline will import along with your footage. You will find it in the media pool.
Premiere to FCPX

- Open up Premiere and load up your edit.
- Navigate to Export>Final Cut Pro XML and save your file in a convenient location.
- Once again, you’ll need to purchase a new piece of software in order to make your XML compatible with FCPX and Resolve. Head to the Intelligent Assistance website or the App store to buy it (it’s called SendtoX).
- Once you’ve downloaded it, right-click your file and select open with>SendtoX.
- When a new window appears, select the library you’d like to import the edit into.
- Once you’ve done that, Premiere creates a new event and imports your timeline and footage into it.
Premiere to Resolve
- Complete steps 1-3 from the Premiere to FCPX instructions above.
- Open up Resolve and navigate to Import AAF, EDL, XML.
- Select your file and click import.
- A new window will appear allowing you to select various options. I advise deselecting use sizing information to ensure your edit maintains how it appears in FCPX.
- If you hit use color information, the grades you created using the color board in FCPX will come across.
- Select OK and your timeline will import along with your footage, which will be added to the media pool.
So, that’s how to work with XML files within these three different editing softwares. It’s far simpler than it may at first seem and well worth mastering!
For more editing tips and tricks, check out these additional articles.
- Video Editing 101: How to Edit a Video from Start to Finish
- Blackmagic Announces DaVinci Resolve 17: Color and Editing
- How to Create the VHS Look in Premiere Pro + Free VHS Effect Presets
- Video Tutorial: How to Revive Dry Landscapes in DaVinci Resolve
- How to Replace the Sky in Premiere Pro and DaVinci Resolve
Cover image via boyhey.