

10 More Time Saving Tips in After Effects

Looking to optimize your After Effects skills? Here are 10 more After Effects tips that will save you time and let you work more efficiently!
Our previous post on 10 Time Saving Tips in After Effects was quite popular, so I’ve rounded up 10 more tips for editors learning After Effects.
1. Bringing Video Editing Projects into AE
If you’re using an Adobe based post production workflow, Premiere Pro & After Effects connect easily via Dynamic Link and Import (links to previous blog posts on this feature). Now, let’s take a look how to get your projects from other video editing apps into After Effects:
Media Composer to After Effects: Export Sequence as AAF, then import in AE using Pro Import Pro (previously Automatic Duck). Kevin P. McAuliffe has a video tutorial on the process here.
Final Cut Pro 7 to After Effects: Export as XML and import via Pro Import in After Effects.
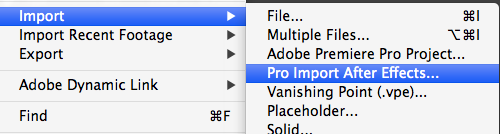
Final Cut Pro X to After Effects: There are 2 choices (free and paid). Clip Exporter is a free app you can get hereXto7 for Final Cut Prois $49.99 and developed by Assisted Editing, which make a variety of editing helper apps.
2. Get Organized for Free – Post Haste
Post Haste is a free app that that allows you to setup file and folder templates for your projects. It offers a variety of templates (motion graphics, video editing, visual effects) that you can customize. Let the computer do the tedious work like organization, so you can spend your time making cool stuff.

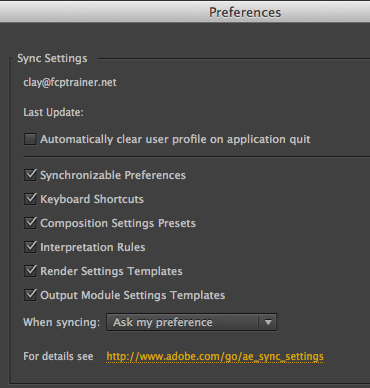
3. Sync Your Settings (for After Effects CC)
The new Adobe After Effects CC has a feature that allows you to sync your preferences, shortcuts and more across multiple computers. You simply ‘login’ to your account through AE and your preferences will populate. This is huge for freelancers and those who often work in different edit suites at large companies.
See the Adobe AE Blog for the complete list and what doesn’t sync (feature that are machine-specific).
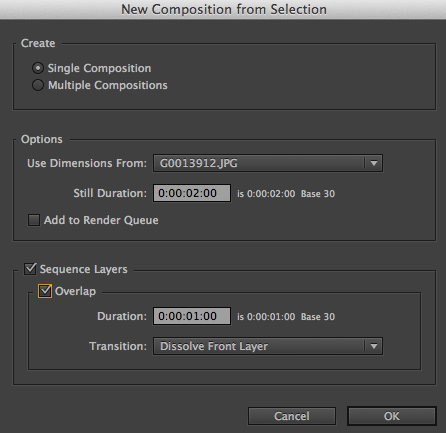
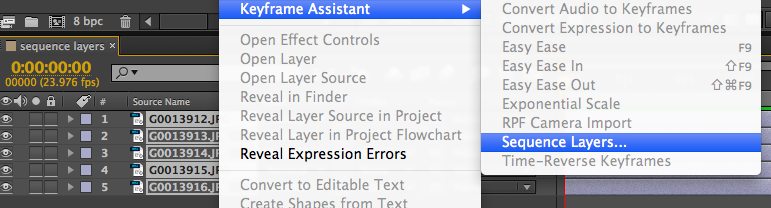
4. Automate to Sequence
This is a quick trick to put clips in order and add a dissolve between each one (also works in Premiere Pro). Ideal for quickly creating a highlights reel or photo slideshow. You can apply ‘Automate to Sequence‘ to clips in the project or those already in a composition.
From the Project: Select the clips you want, then File > New Comp from Selection ( or right click and select “New Comp from Selection”). Click “Single Composition”, “Sequence Layers” and “Overlap” if you want a dissolve.
From a Composition: With the layers stacked on top of each layer, select all, right click and choose “Keyframe Assistant > Sequence Layers”.
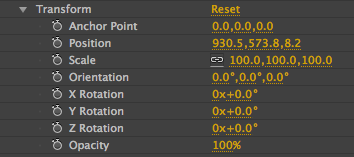
5. Move Your Anchor Point Without Moving the Layer
An anchor point determines where a layer scales and rotates from. If you change anchor point under Transform you will move the layer. To change the anchor point without moving the layer, use the Pan Behind tool (shortcut is Y). Click on the anchor point and move it to the desired location, then press V to switch back to the Selection tool.
To make life easier, move you anchor point with the pan behind tool before you animate.
![]()
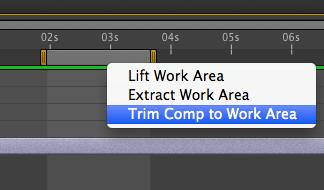
6. After Effects Work Area
The Work Area is the part of the Composition that is previewed when you do a Ram Preview (shortcut is zero on the number pad).
- Move your playhead where you want your work area to start. Press B
- Move your playhead where you want your work area to end. Press N.
- To trim your Comp to the length of your Work Area, right-click on it and select “Trim Comp to Work Area”
7. Working with Audio in After Effects
Pressing the spacebar in After Effects won’t preview audio like it will in a video editing app. Here’s a few After Effects shortcuts for working with audio.
To preview audio in After Effects: Press . on the Number Pad to just preview audio. Press zero on Number Pad to preview both video and audio.
Scrub Audio: Hold Command (on Mac) or Control (on PC) to move the playhead in a comp while scrubbing the audio.
See Audio Waveforms in Compostion: Shortcut is LL

8. U key toggles keyframes/expressions, UU toggles modified properties
This is a quick way to view or hide keyframes for a layer or multiple layers. As an example, say I keyframe an opacity change and set the scale to 31%. If I press U, I see the opacity keyframes. If I press UU, I see the opacity keyframes and the scale change.
Original

Pressing U

Pressing UU

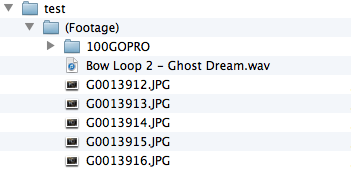
9. Collect Files
Collect Files is equivalent to Media/Project Management in Premiere Pro or FCP. You may use this feature when you want to move your After Effects project and corresponding media to another hard drive.
With a project selected, choose File > Dependencies > Select Files.
If you want to just collect files for a particular composition, select a comp first.

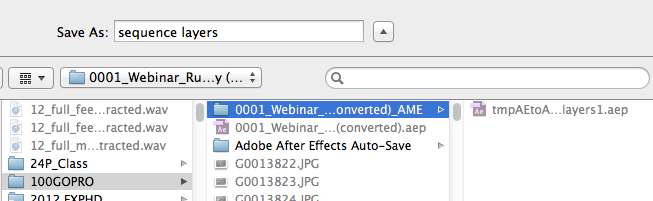
A dialog box will appear. Click “Collect” to set a destination, then name your project that will be moved with the media and click Save.
Example of ‘Collect Files’
10. Add to Media Encoder Que (for After Effects CC)
The advantage of creating video files in Adobe Media Encoder is that it has a wide range of presets to choose from (Vimeo, Youtube, Phones/Tablets).
With After Effects CC, you can now add a Composition to Media Encoder from File > Export > Adobe Media Encoder Que, or Composition > Add to Adobe Media Encoder Que. This will launch Media Encoder and create a folder in the location of your project.


Got an After Effects quick tip to share?
Let us know in the comments below!


