How to Integrate 3D Elements into Video Footage – Part II

In this series we discuss integrating 3D models into your footage. Let’s take a look at the 3D scene creation and lighting techniques.
Welcome back to this second part of the series, where you’ll learn how to integrate 3D objects in real footage. In the first article, we explained how to set the camera tracking in a recorded sequence. We utilized PFTrack as our primary camera tracking tool. The goal was to export a virtual camera—moving like the real one—to an external 3D software and play the sequence with a few 3D test objects.
If you haven’t already please take a moment to catch yourself up on Part 1 of this article.
This is the result of the camera tracking we finished last time.
Naturally, neither lights, materials, nor shadows were applied, but the purpose was to make the tracking as smooth as possible.
Not Just Static Props
Before getting straight into lighting and rendering, it’s essential to comprehend the variety of 3D integrations you can perform on a video.
Here are a few:
- Animated 3D objects are in place, which is nothing more than adding a pre-made animation and sticking the mesh to a marker. The same as we did for static objects, but with animation.
- 3D objects moving along a path, which requires more work on feature tracking. A typical example is a car on the street with a dynamic camera. The following 3D model—the blue vehicle on the elevated highway—seems to follow the road, and everything is lit and rendered according to the actual footage.
- Object / Geometry tracking follows an actual element of the shot and integrates a 3D object onto it. Many movies adopt this kind of tracking. PFTrack has a dedicated node for tracking moving objects in a shot.
Imagine that you want to track the following arms for the entire shot. This is where object/geometry tracking comes in handy. We can add a pair of 3D arms overlapping the real ones. The tracking can always be performed by custom markers.
The 3D arms might be visible in the shot as rendered elements. Alternatively, they might be invisible and serve as support for other overlapping 3D meshes or effects—consider a scar or a wound on top of the digital forearm.
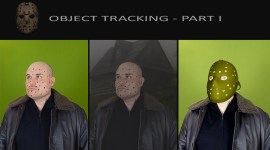
Tracking the Face of a Character
This marker-based solution for object tracking is suitable for actors’ faces.
Let’s take this shot of Davy Jones from the famous Pirates of the Caribbean saga. The actor has physical markers on his face. This solution helped the VFX department create a monstrous digital representation of the actor with a perfect match.
Since markers determine a 3D location, they can be attached to elements in 3D software—like single bones—to deform the 3D face in different areas. Practically, we can make the monster talk or simply close the eyes in the same way the actor does.
Working in your 3D Scene – Intro
Let’s take one of the previous integrations from Part I and explain how to build the related 3D scene.
Given that we’ve already exported the virtual camera to Maya, we are now ready for the next step.
Testing your 3D Object Quality with Lighting
Your model has to work under practically any lighting conditions. If the shading responds weirdly, something might be wrong with the model itself—model topology, for instance—or inaccurate shading parameters.
Bear in mind that nowadays, PBR materials automatically deal with energy conservation. That avoids mistakes like more light coming out of the model than going in. If you use physically based rendering (PBR), you have fewer problems to deal with!
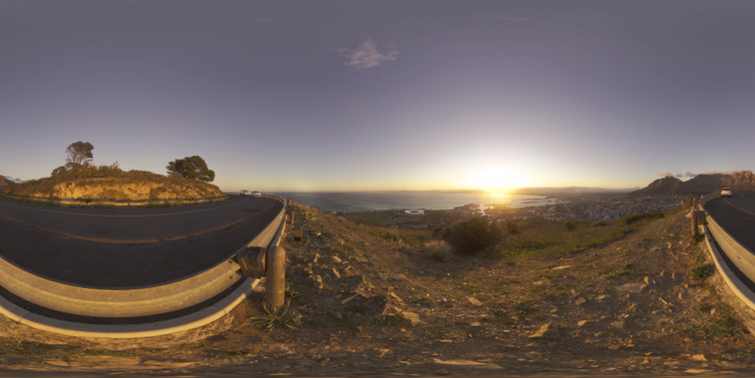
Secondly, don’t spend time building up a complex lighting setup. A simple HDRI is perfect for testing the result at 360 degrees. Build a quick render turntable!
In my project, I used different HDR maps, and I also wanted to integrate the 3D car in photos shot on location for final static renders—not necessary at this stage.


You are ready to go ahead if everything looks correct and well-lit.
Light Match between 3D Scene and Footage
This part requires approximating the environmental lighting, which comes from the video clip. You should get as close as possible but don’t go crazy. You have plenty of time to refine it in post-production—which will be the topic of our third article in this series.
From my personal experience, this is the checklist I suggest that you follow:
- Check the time of the day. Dawn, dusk, noon, and so on.
- Browse a rich HDRI library. Turbosquid has an extensive set of HDR maps.
- If the shot includes the sun, locate it and approximate its orientation in the scene
- Study the shadow quality. Sharp vs. soft. If there is no sun and the day is cloudy, you could technically produce the soft shadow effect via an ambient occlusion map to apply to your scene.
- In case the shot presents some artificial lights like lamp posts or neon signs that affect your 3D model, you should also take them into consideration.
Depending on your model and its distance from the camera, you might add more or fewer details on reflections. Since almost all of my clips were provided with an aerial view and the model wasn’t surrounded by many elements, I spent little time working on environment reflections—just a few specular ones.
Conversely, we’ll consider in another article a situation where the car is close to the camera with more elements around. In that case, you have to fake the environment reflections on the shiny surface, and I’ll teach you how. So, stay tuned for Part III.
Let’s see now a practical example. Zoom in to see the car animation coming from the bend.
Lighting Setup in Maya
We have three digital elements to consider:
- The HDRI needs to be suitable for the clip. It’s a simple Skydome.
- Directional light with the right orientation has to cast the correct shadows.
- The invisible geometries used to capture the shadows cast by the lights.


As you notice, the scene is simple and made of few elements. Furthermore, since the car is moving and the camera is far away so that the tiny height differences of the road are not being perceived, we can approximate the road to a 3D plane.
We then build a motion path—with a curve—to which we attach the car. The curve has to form a trajectory and lay on the 3D plane. Consequently, the car will move along the curve.
Shadows are captured in a separate layer and composited in After Effects, but we’ll have a look at rendering passes in the subsequent issue.
Also, I’ll show you how masks are important in post-processing. In this case, I used them to make the car appear behind the cliff and remove unwanted shadows on the plane behind the barrier.
Note that the HDRI already has a bright area emulating the sun—thus creating a shadow. Nonetheless, I preferred to have shadows from the directional light to have more control. I then hid the ones produced by the HDRI.

The importance of Building Custom Geometries
It’s time to consider a different path, which is not entirely flat but with variable height.
The cool thing about PFTrack is the ability to export the trackers as locators in 3D space by analyzing the video clip. If we can detect some features along the path—by auto and user tracking—we are also able to approximate a 3D road with the correct slope.
In particular, these are the geometries I built for the 3D scene:
- The road, with a proper elevation.
- Part of the terrain, on the right side with a lower height, where we want to catch the car shadow properly.
- The right side of the bridge, where the car’s shadow is visible through the small pillars.
- A small tree, emulating the real one, which projects the shadow onto the car at the beginning of the clip.
That way, we add more realism to the shot!
You can easily observe that the terrain is not flat but has some variations in height, as reported in the following images. The car descends towards the bridge. Once passed, it climbs a bit to reach a roughly flat surface finally.
It’s also interesting to notice a short jump as the car approaches the bridge. I imagined that an abrupt change in height would create a significant integration into the environment.


A few Considerations on Lights and Shadows
As you undoubtedly know, shadows are vital. They give a video depth, without which the result would be unrealistic and flat. Not only do they allow adding a contact shadow to the road, but also they should be considered if they interact with any video elements.
The terrain is partly steep around second 3. We want to capture that feature by the shape of the car shadow, which is more elongated and follows the elevation of the terrain.
About the tree, since we cannot have the corresponding 3D model, we add a generic prop.
The most important thing is to approximate its position so that the projected shadow on the road has to correspond to the real one in the video clip regarding location.

Furthermore, we have enough elements to determine the orientation of the directional light.
We know that it comes from the left and is supported by an HDRI.
As the last note related to the bridge, observe the shadow between one small pillar and another. It’s a tiny detail, but it’s worth spending time on that. The car seems to interact with the bridge too!
To recap:
- The lighting setup is simple! One directional light and an HDRI
- The 3D plane where the car moves is used both to capture the shadows and support the car animation
- All geometries have to be simple and include just what you need for the integration. They only capture the shadows and they are not visible as final rendered objects
- You can integrate an ambient occlusion pass to include contact shadows between the car and the road. That also improves realism.
Final Thoughts
As you probably comprehend from this second part, the integration of 3D objects in video clips takes time and patience but can be smooth if planned with a proper workflow.
We explored several aspects of the scene creation such as:
- testing the quality of the integrated 3D object
- choosing a proper HDRI to match the general lighting
- studying the sun orientation according to the real clip
- using multiple geometries to catch the shadow and interact with a few video elements
- animating a 3D object along a path
…and so on.
Furthermore, I leave you with the following clip where our hero car moves along a winding road.
The workflow is practically the same, but this time I used an approximation to capture the shadows, which works fine here.
Instead of modeling the road in detail as before, I used a moving plane attached to the car which rotates with it. The car keeps moving along the motion path anyway.
Experiment with the different solutions and find which one works better for your project!
If you liked this second installment, I invite you to follow me on my Linkedin profile page.
In our next episode, we’ll start to talk about After Effects and see how to work on post-production to make your integration even better.