Replicating 3D Lighting from a Movie Scene

Learn to mimic cinematic lighting in 3D-rendered scenes by studying the work done by professional filmmakers.
Hello everyone, and welcome to this brand new article!
This time we’ll take a step further from our previous articles involving lighting and color schemes.
As a reminder, our journey started by explaining the role of lighting schemes in filmmaking. From simple to more advanced setups, you should be aware of how filmmakers create lighting in their movie productions.
After discussing lighting schemes, we moved to another excellent topic concerning color schemes.
In that case, we leveraged theory to explain how colors convey a certain mood. A single color can convey more than one feeling depending on context and cultural associations.
Finally, we tested a few color schemes on a 3D example scene—a haunted house with a creepy look.
Now it’s time to talk about this episode!
Instead of focusing on references to find inspiration from, we’ll try to mimic 3D lighting based on the director’s intentions.
This episode teaches you how to comprehend a scene in terms of lighting. Thus, I’ll guide you through analyzing the lighting in filmmaking to convey the same mood in 3D.
Concepts like color temperature, light position and orientation, shadow management, and so on will be shown in practice. Bear in mind that you can follow along with any 3D software.
Choose your Favorite Shot
Relax, grab a cup of coffee and take your time to browse through movie archives. You can easily spend more than half an hour to pick up your best shot—it doesn’t matter how long it takes, as long as it’s significant in terms of lighting.
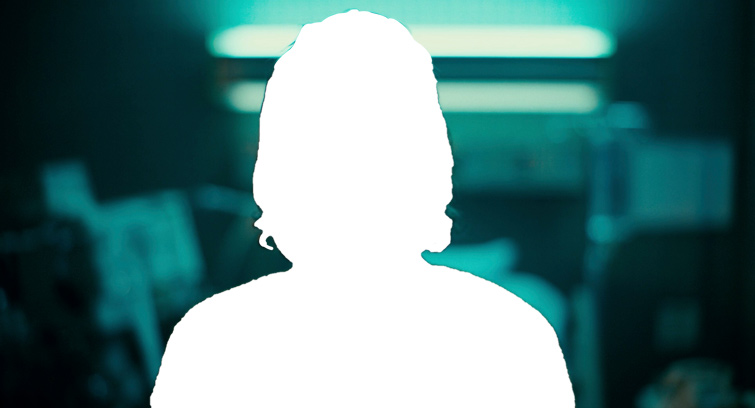
In our case, this is the scene we chose.
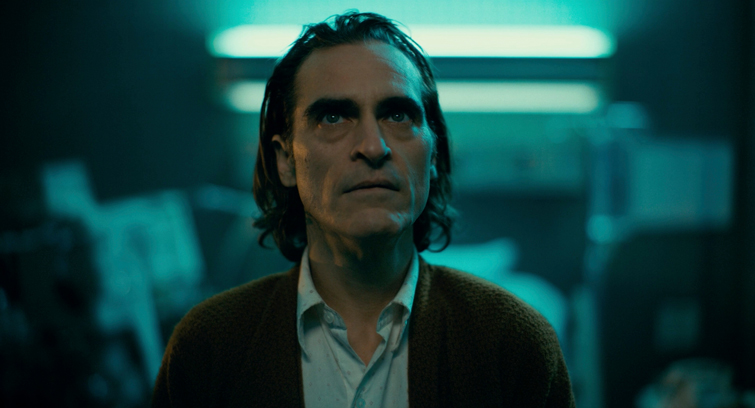
At first glance, the image has:
- A cool and saturated tint—mostly cyan.
- A soft complementary color in the orange of the skin.
- Soft light with a good contrast level.
Overall, this “Orange and Teal” color scheme gives the shot an interesting look.
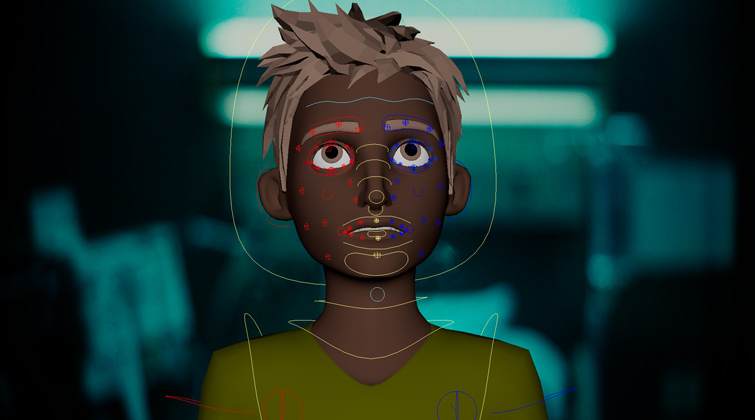
Pick up your Best 3D Character
There is no limit to imagination! You can choose realistic or cartoony 3D models. What matters is the final lighting setup you’re going to recreate. In our case, we opted for a simple rigged character that is free to download and use for 3D animations.
The guy is Ray from CGTarian. Despite his simple style, we’ll try to make him act in the previous Joker scene.
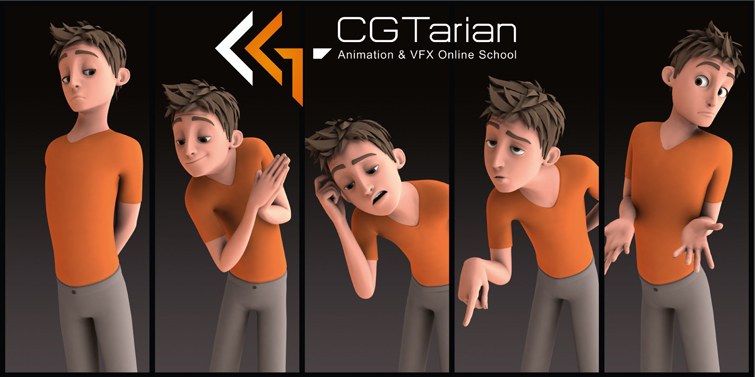
If this free character isn’t your style, be sure to check out the TurboSquid library.
This character is for Maya, but you can download a personality for your preferred 3D tool instead. We preferred a pre-made 3D model from the internet because the focus is lighting and not modeling and texturing.
To sum up, these are the steps involved:
- Studying the lighting and color schemes to understand it from a technical point of view.
- Bringing the character into our 3D tool.
- Making some changes in terms of skin shading to work with the specific software shading system.
- Using different types of light sources to mimic the same mood.
We’ll get through the types of lights, their position in space, the color temperature, as well as other excellent topics!
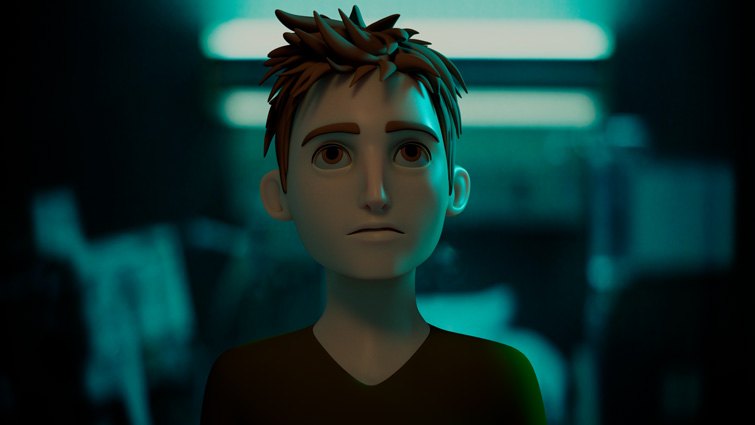
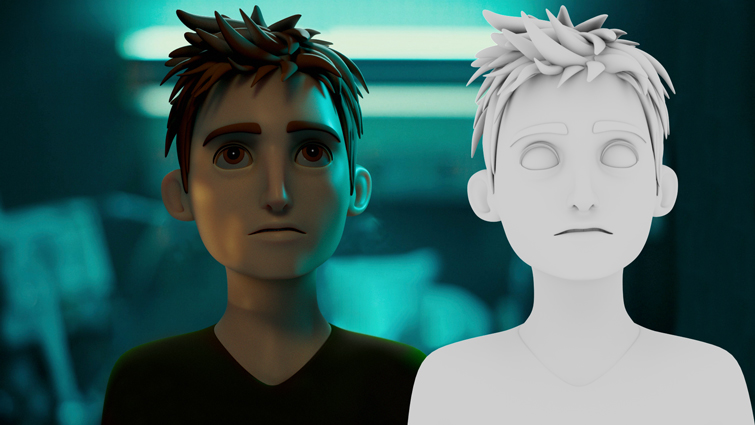
A Quick Look at the Final 3D Scene
Before describing the scene in depth, let’s look at the final result.
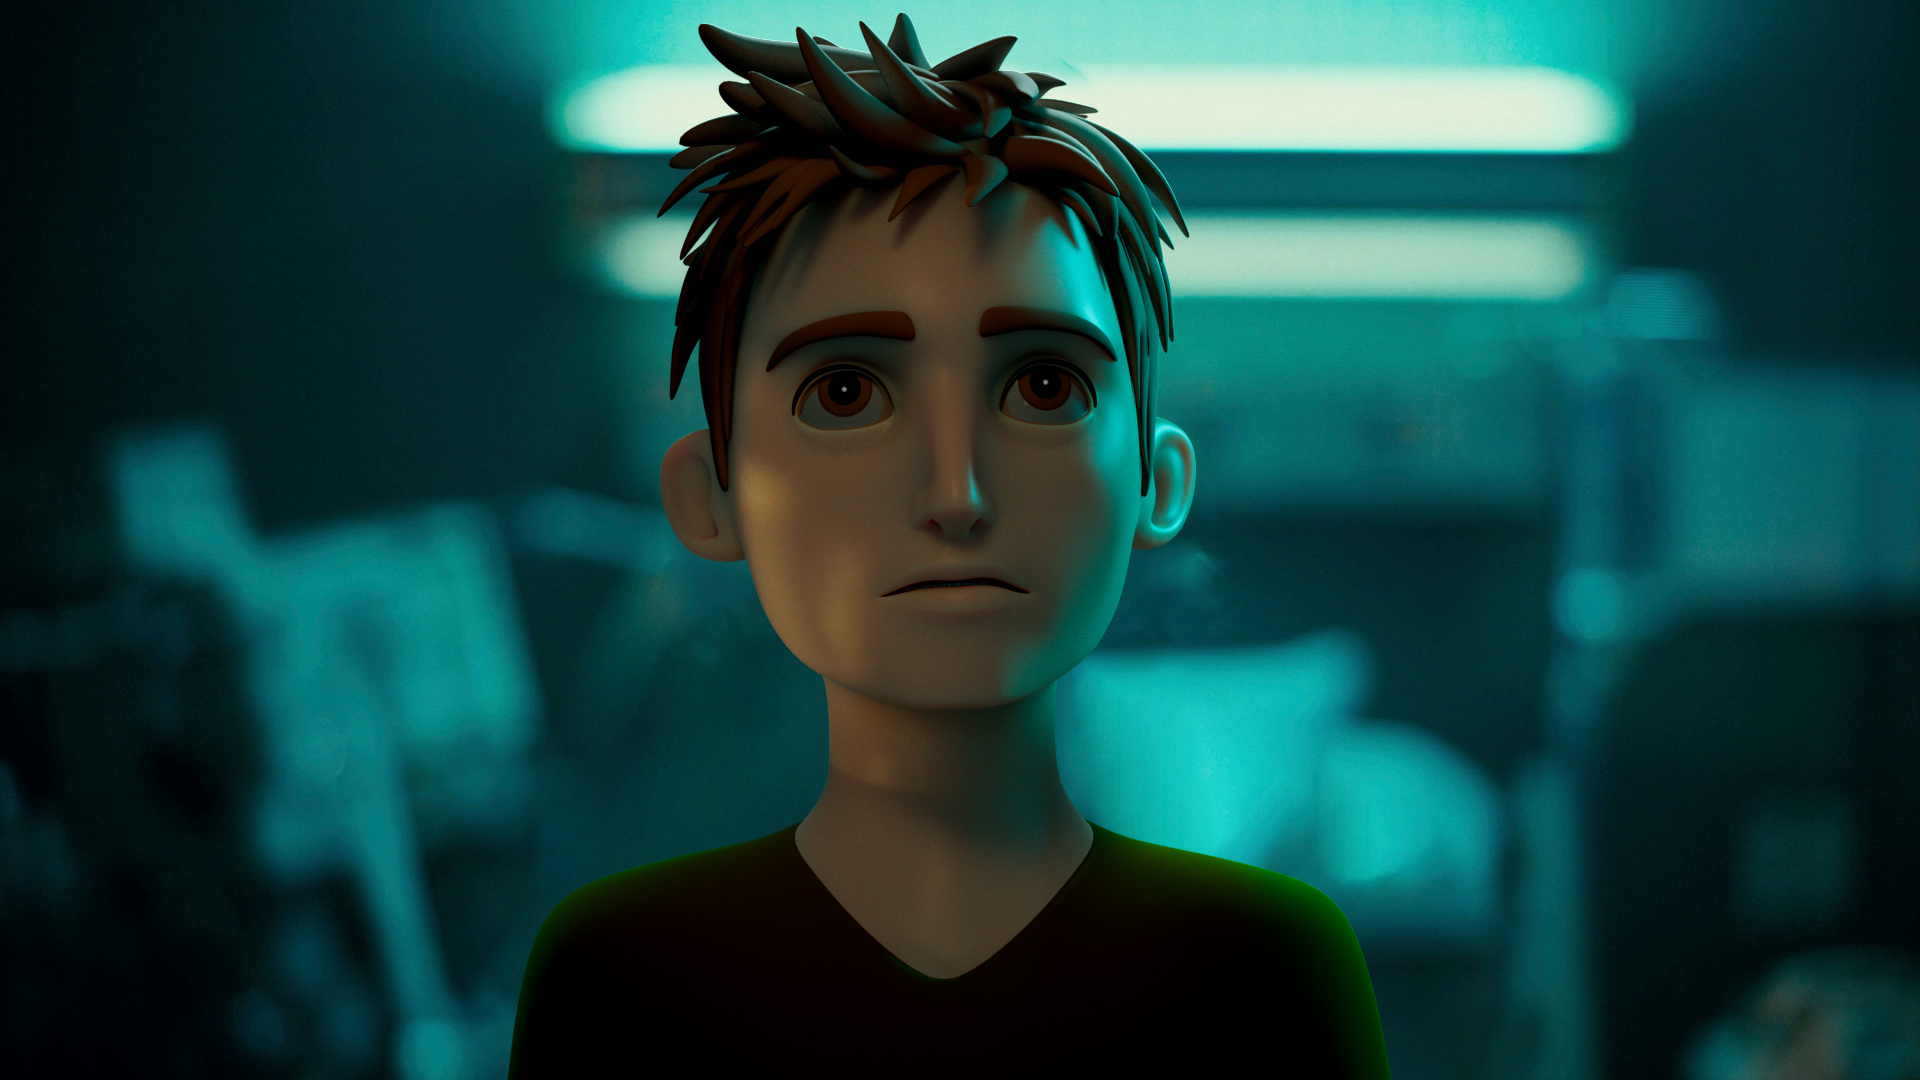
As you can observe, the 3D model lives in a very close context to the movie shot we introduced earlier. It looks like Ray is being framed with almost the same lighting setup, the same color temperature, and so on.
I’ll take you through the general process of creating the previously rendered scene in this part.
In particular, these are the main aspects to consider
- The interpretation of the different light sources by examining the movie shot.
- How to prepare the location to put your 3D character.
- The practical use of lights in your favorite 3D tool, concerning their location in space, as well as other necessary settings.
- A few post-processing tweaks to apply to get closer to the actual shot.
Gather Lighting Information from the Shot
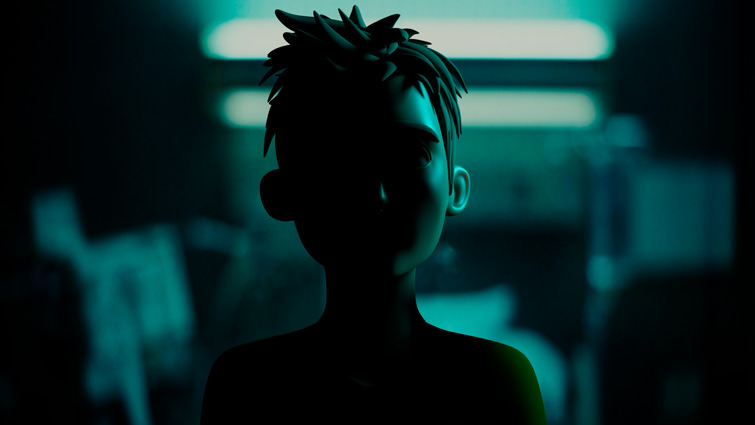
Let’s see the actual scene and try to imagine the kind of lights involved.
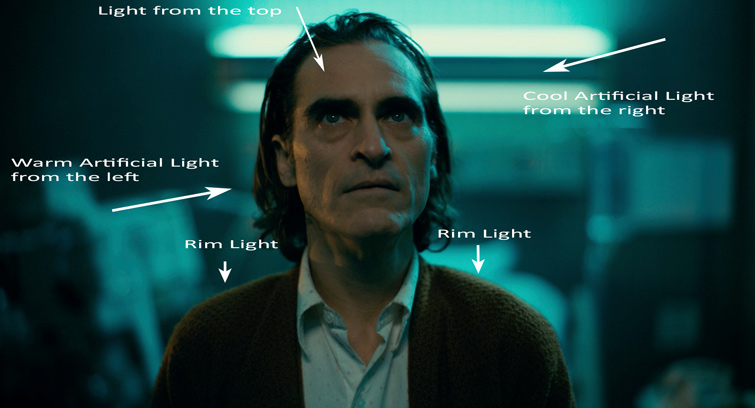
- A visible warm artificial light from the left creates a shape on Joker’s face.
- A complementary and cool artificial light from the right makes his opposite side pop up.
- A light from the top creates a butterfly-shaped shadow under his nose.
- A rim light visible on the actor’s shoulders.
Extract the Background
Since the goal is to work on the 3D character while keeping the background, we need to separate the elements into two different layers.
This operation is pretty fast when performed in Photoshop, for instance. By utilizing the Object Selection Tool, we can quickly isolate the character.
After that, we use the Content-Aware Fill functionality to replace the space with new content.
You don’t have to be super precise. Our 3D hero will be positioned at the center of the shot so he covers part of the cut area.

Now that we have a clean background, it’s time to set up the scene inside the 3D software. I will be using Maya to work on the shot, but you are free to build up your lighting setup in any 3D tool.
Inside the 3D Software
We have to import the previous background and map it onto a 3D plane. The shader associated with the plane must not be affected by the lighting setup and works as an independent backdrop.
The camera focal length is set to 80mm and positioned to frame the 3D character.

We’ll try to mimic the lighting as best as possible. The goal is to make the 3D character appear as if he lives in the exact location of Joker.
However, consider a few points.
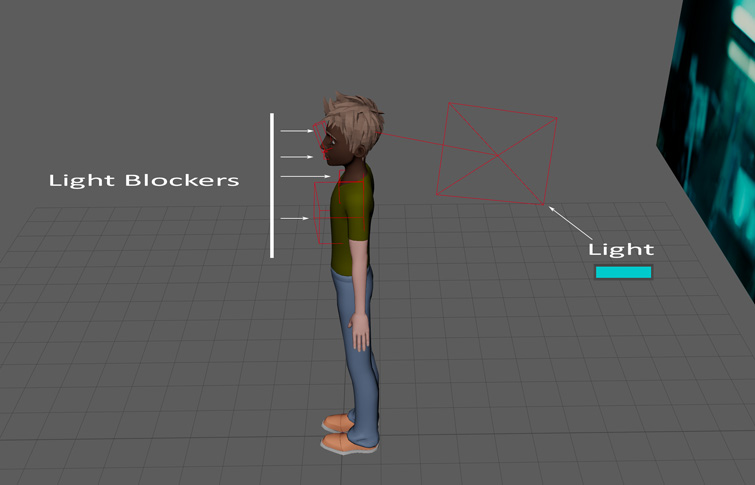
- The subject has a different head shape compared to Joker’s. This implies that light will have some differences in how it appears on the skin. We’ll look at how to fake some lighting details later by using light blockers. Blockers can completely stop the light, attenuate it, or create a penumbra between light and dark.
- Some projected shadows will have a different appearance for the same reason. For instance, the hair will project shadows on the 3D character’s forehead. Meanwhile, the hair in our live scene is slicked back.
In a nutshell, play with the light properties and get closer to the same mood!
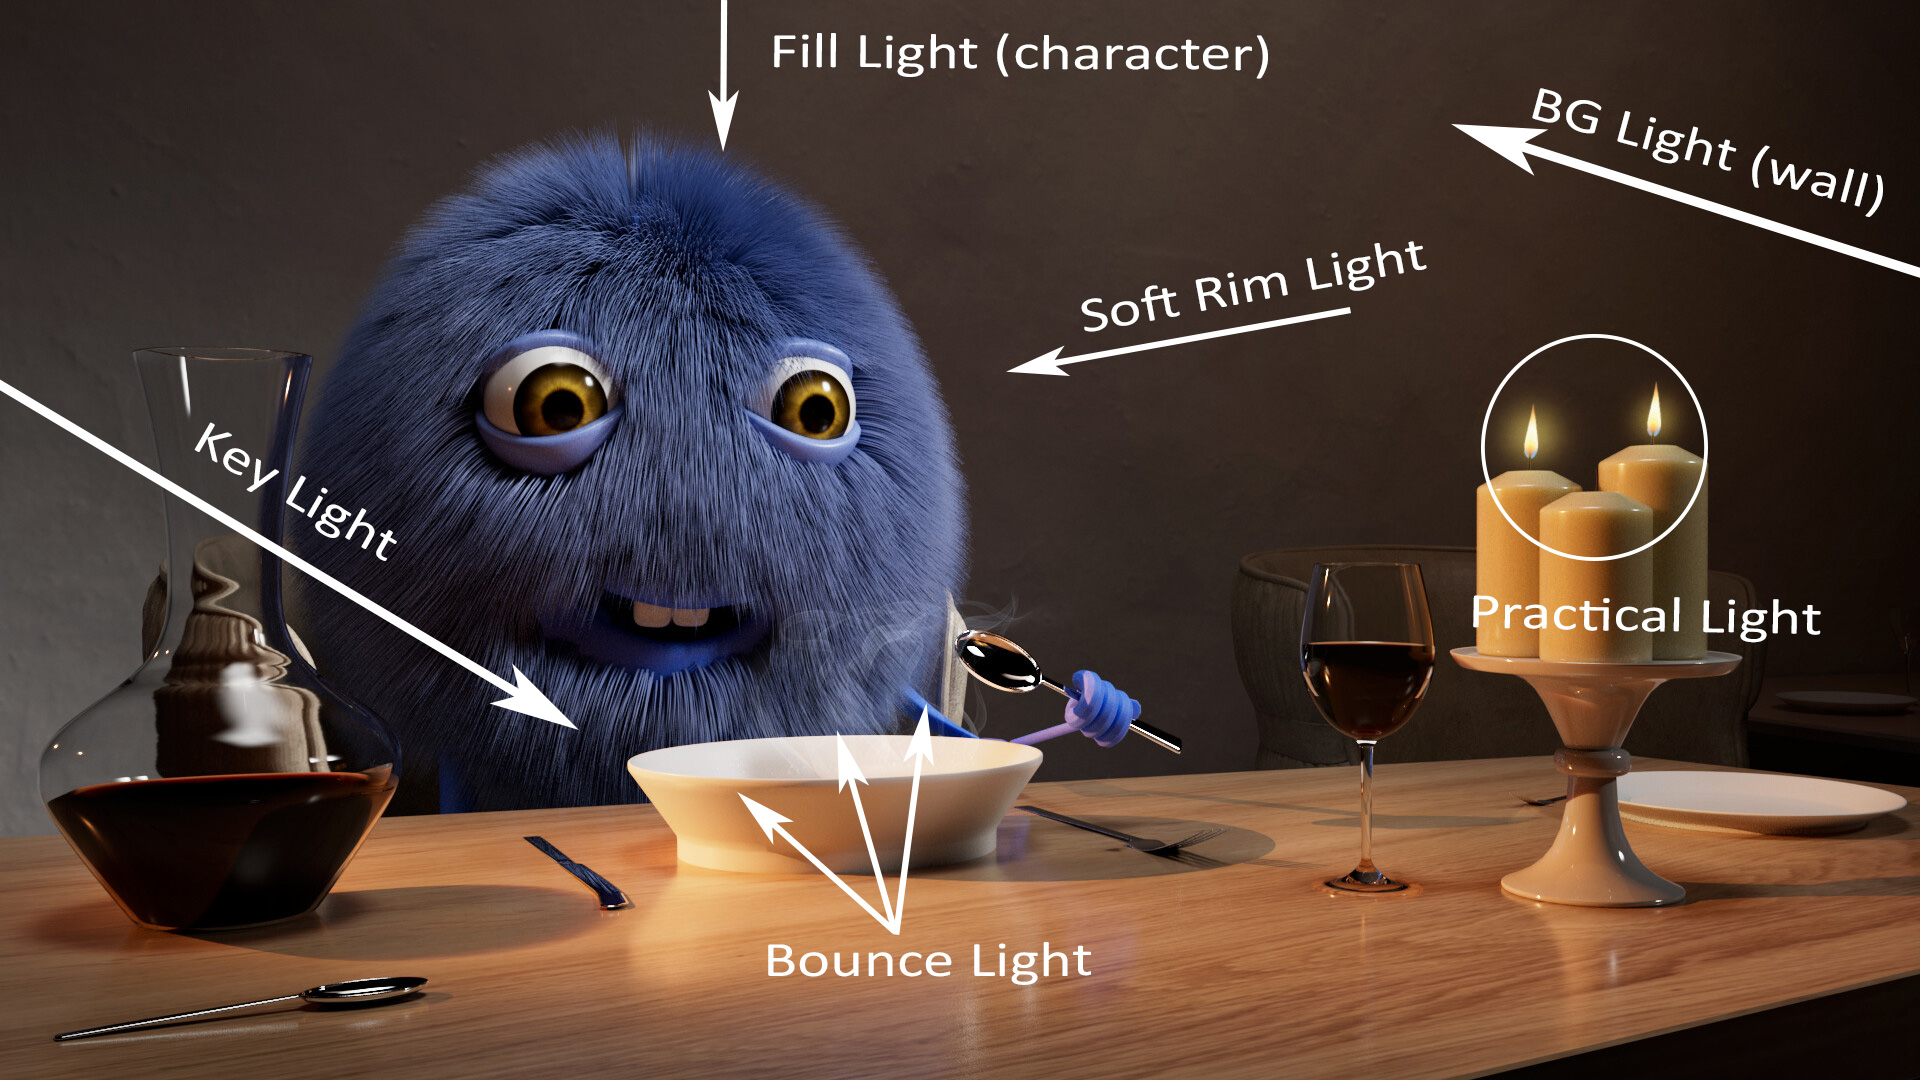
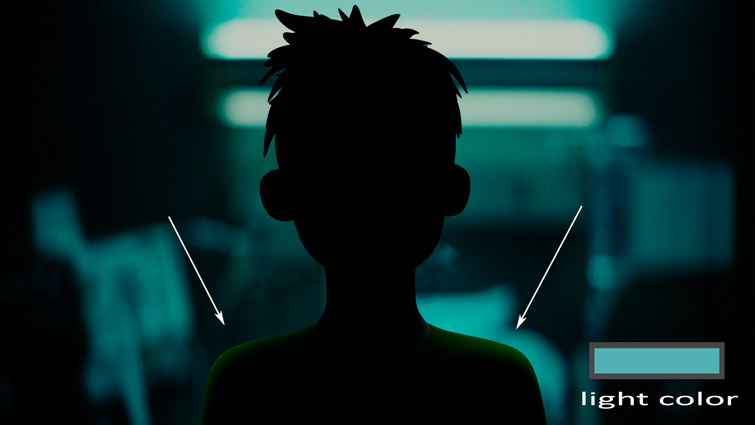
Lighting
The character is inside a place where the ambient light has a soft light blue/greenish contribution. Let’s add it in 3D by using a Skydome Light. This light encompasses the character and has a solid color.
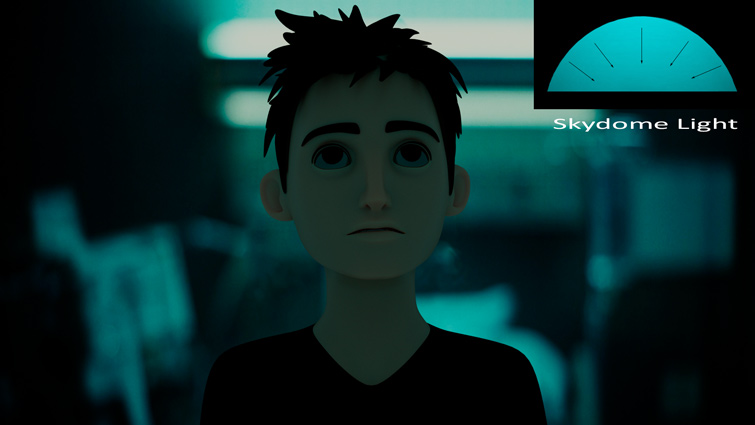
You can observe how soft and weak it is. Use just a little bit of that tint to make him appear inside of the environment. Remember to decrease the saturation a bit.
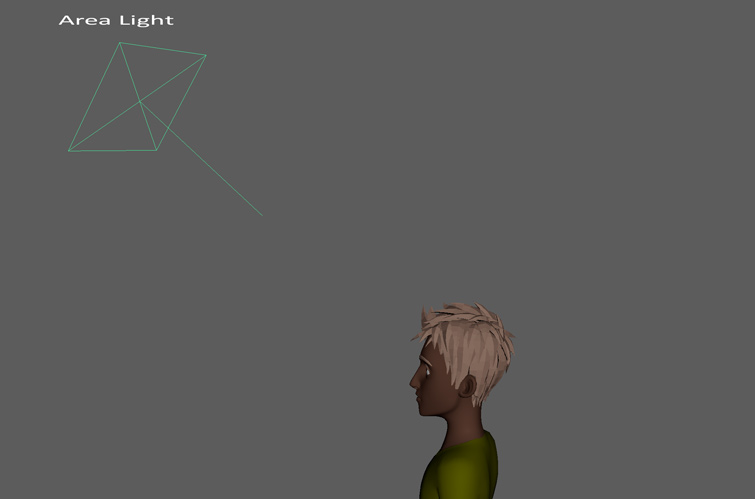
Area Light from the Top
An area light is a rectangular light source that acts like an array of point lights. It is available in practically all 3D software.
It’s well known for the soft shadows it produces, and the image below explains the reason behind that.
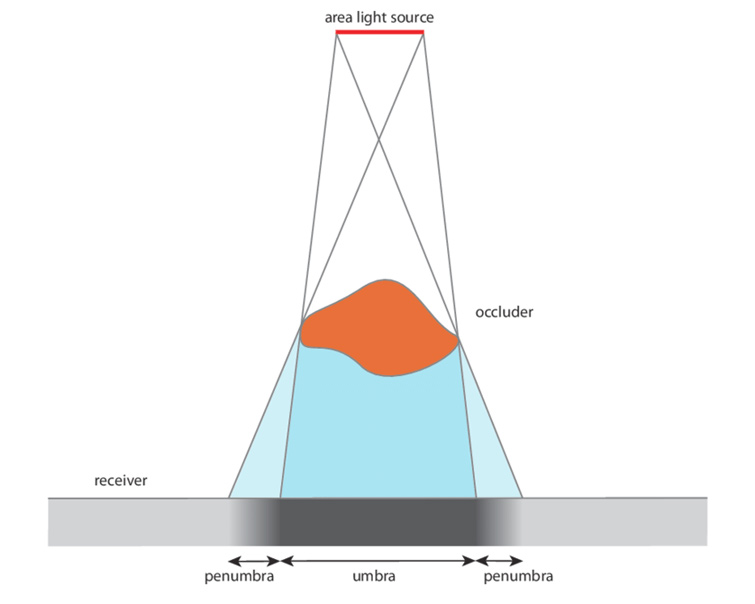
As we enlarge the area light, we make shadows even softer. Conversely, a small area light reduces the transition between light and dark—aka penumbra—resulting in harder shadows.
Also, some renderers like Arnold have a spread parameter that indicates whether light emits focused rays instead of diffused ones. If the spread is close to 0, light behaves almost like a laser beam—thus producing very sharp shadows.
Now you know how to manage area lights if you want to have both softer and sharper shadows!
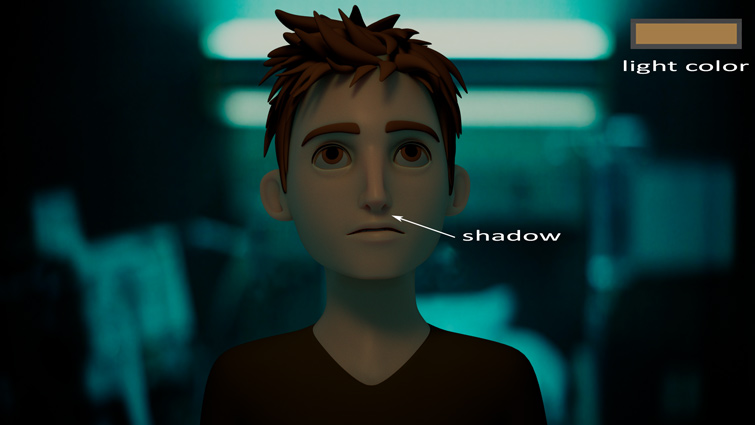
Back to our scene, let’s start positioning the light.
- It has to be focused on the character’s head and in a size that’s not too big. We want more definition in the shadowed areas.
- It is positioned up above the character, pointing towards him.
- The light color is light brown.
A good habit is to sample the color from the real picture and find a value suitable for your lighting setup.
Furthermore, notice the shadow under his nose. It’s not 100% sharp, but is actually a bit soft due to the size and spread of the area light.
Warm Light from the Left
Light coming from the left is warm and seems to create a projected pattern. Its shape is the result of the Joker’s head morphology and the shirt collar cutting light on the neck. Since our 3D character is different, let’s pretend to have a projected pattern.
The first image shows just the projected pattern, while the second one is the previous result plus the pattern.
But what’s the best way to accomplish that?
Depending on what your software offers, there are different solutions:
- Using gobos—aka “cookies”—allows projecting light shapes onto a surface.
- Creating custom area light shapes with very low spread and small size.
- Using light blockers to define areas where light has little or no influence on the geometry.
We’re going to use a mix of the second and third options because it works well in our case.
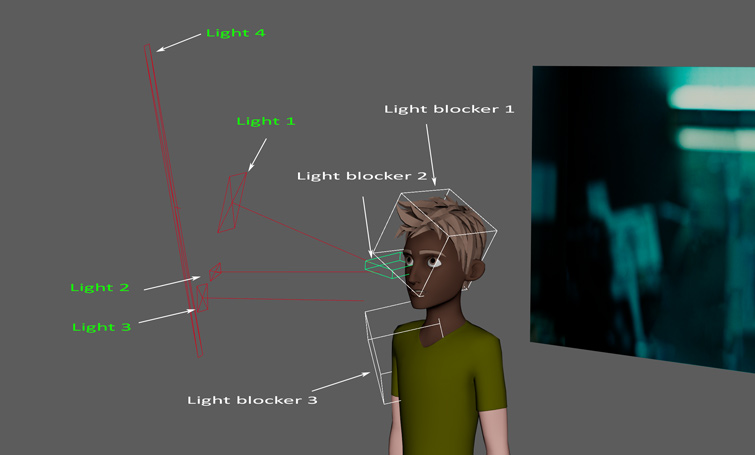
Let’s explain the role of each light and blocker:
- Light 1 is a small area light responsible for the stripe on the character’s cheek.
- Light 2 is smaller and creates that delicate highlight at cheekbone height—spread is also low.
- Light 3 works on the character’s neck.
- Light 4 affects that vertical highlight close to the mouth.
In order to shape the effect of the lights on the 3D character, we introduce three light blockers.
- Light blocker 1 prevents light 3 from spilling vertically and sets the light fading.
- Light blocker 2 is small and cuts a portion of light 1 which extends to the front.
- Light blocker 3 creates the sharp cut that we observe on the neck.
The light colors are all shades of brown.

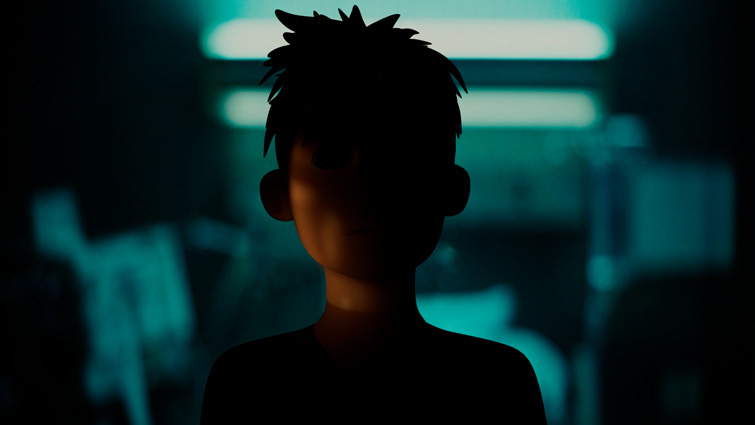
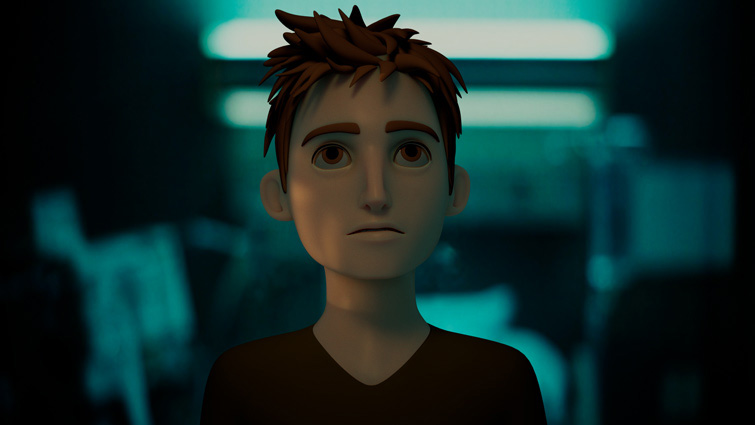
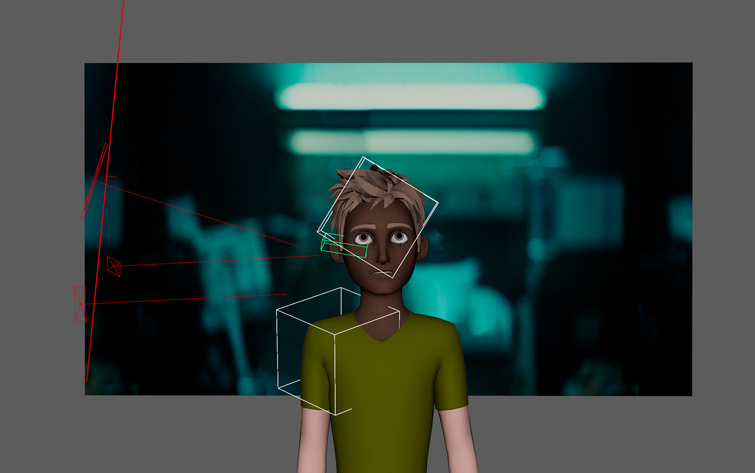
Cool Light from the Right
On the other side of the character’s head, we introduce a cold light, creating a nice contrast with the warm counterpart.
As we did before, we’ll be using light blockers to soften and create a more interesting color distribution. Furthermore, since the 3D character has a different head shape, we’ll just capture the general impact the light has on him—and also a few critical details.
These are the features I kept:
- A small portion of the tip of the nose was hit by the light.
- The shape of the cheekbone.
Note that light also hits the hair, preventing it from illuminating a bigger portion of the forehead.
Furthermore, we left the warm color on his cheek, as happens in the photo reference.
Here is the lighting scheme.

- The first upper blocker stops the light under the eye, leaving it just on the tip of the nose.
- The second upper blocker avoids light hitting the mouth.
- The first and second lower blockers attenuate the light on the body and the shoulder.
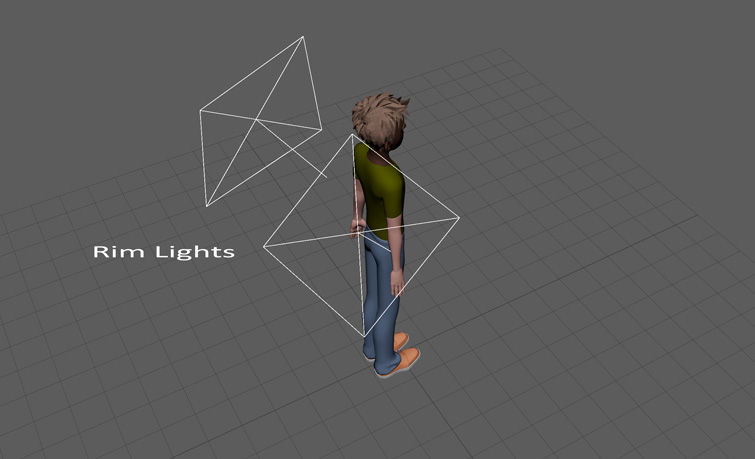
Rim Lights at the Shoulders
In this case, these are the simplest lights to set up.
From the photo reference, the rim effect is soft and not too accentuated. Consequently, we used two area lights oriented downward.
The spread is not that low and the effect is subtle.
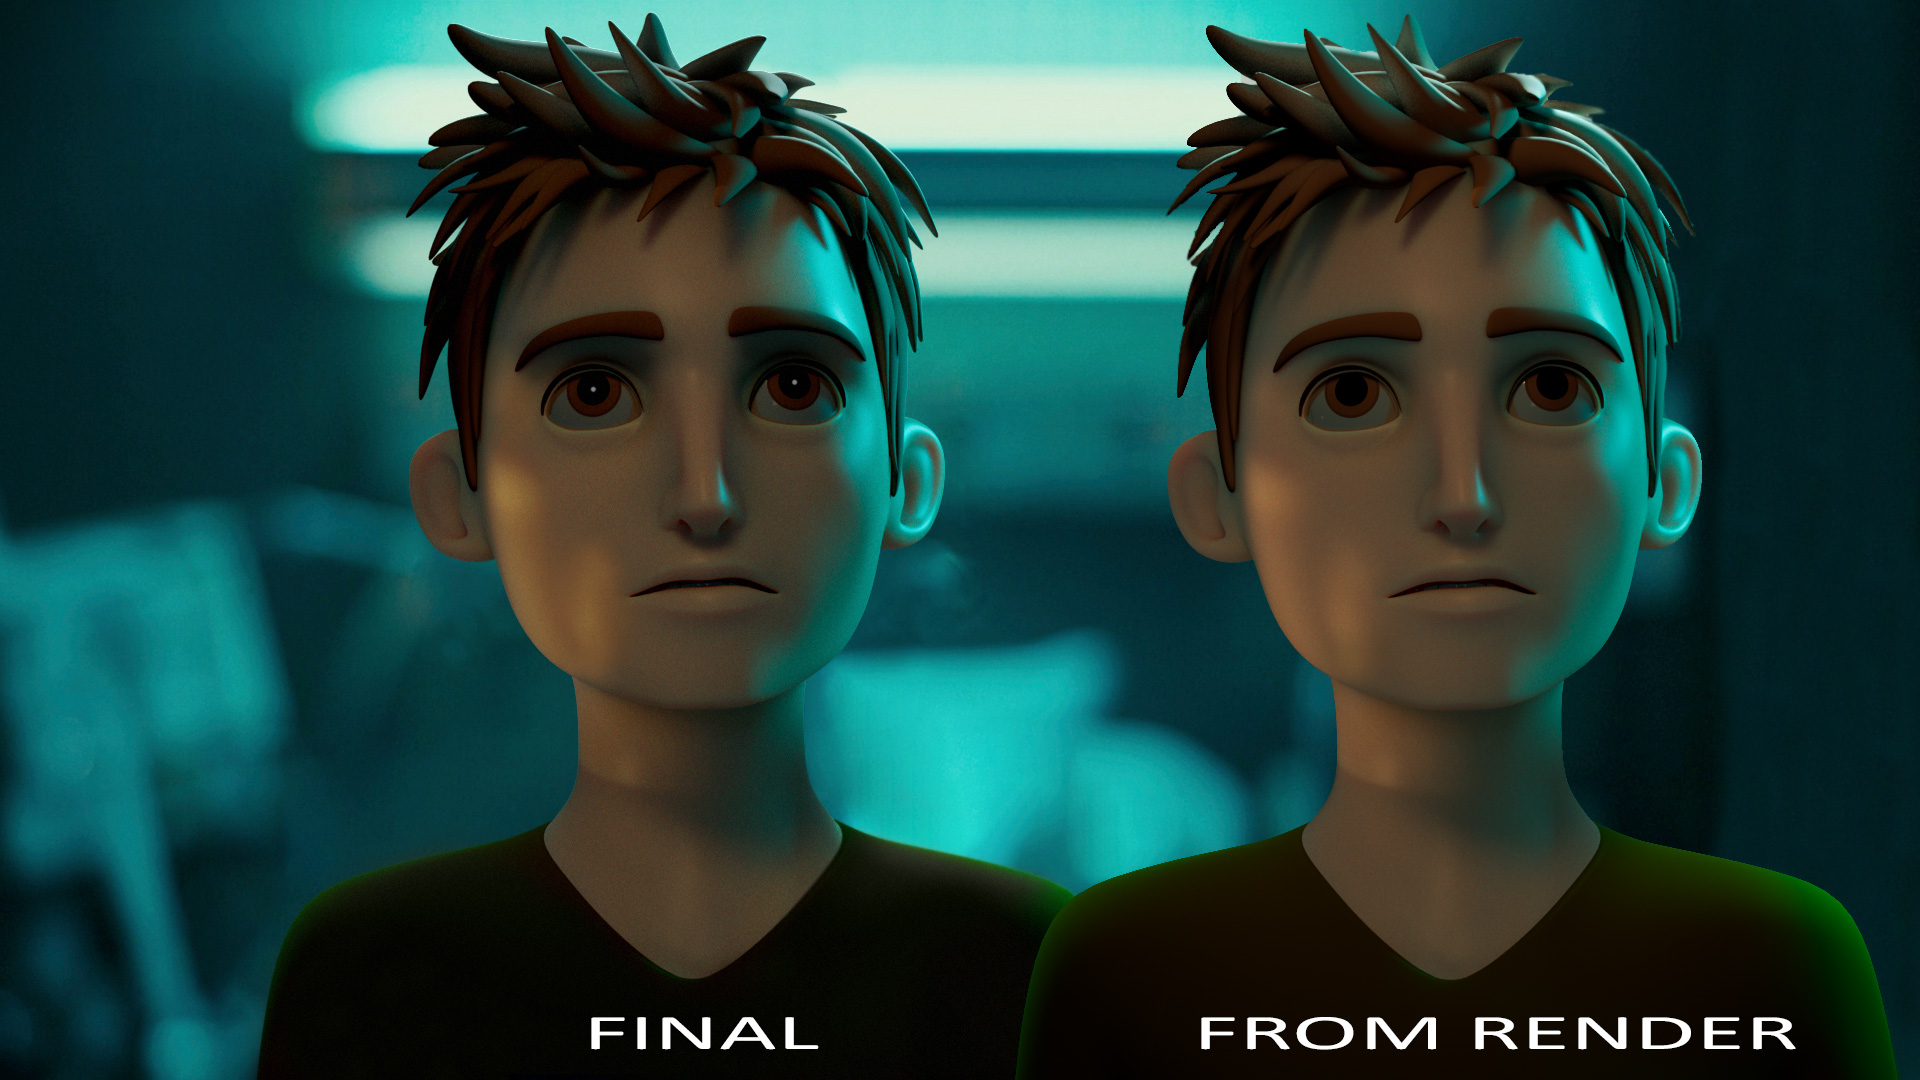
Post Production
Now that the lighting is done, it’s time to make some small adjustments.
The character has been rendered in Arnold with an ACES Workflow. However, we’d like to enhance a few elements to finalize the work.
Despite looking quite similar, the left render is the result of post-processing in Photoshop. I must admit that, from the pure render, I had already obtained a decent result, but I wanted to improve it.
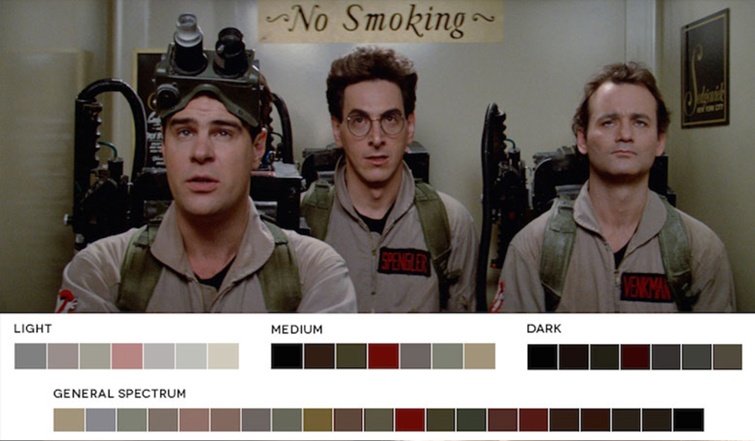
Color Match
We did a bit of color match to correct the tones of the final render by sampling the dark, middle, and light tones from the Joker picture. We already started with a nice color match, and that’s why we didn’t spend a lot of time on that.
The effect is subtle, but definitely improves the result.
Ambient Occlusion
The presence of soft shadows in occluded areas increases the quality of the render. An ambient occlusion pass allows adding more contrast, which is what we look for in the render.
While overlaying this map to the other layers, consider using the multiply blend mode in Photoshop.
Color Correction
One of the things you certainly notice is the color of the warm light coming from the left. After color correction, it appears more yellow, matching the Joker shot better.
In this case, we used the Replace Color function in Photoshop.
After sampling a key color, the tool allows isolating the area where to change the hue, saturation and lightness.
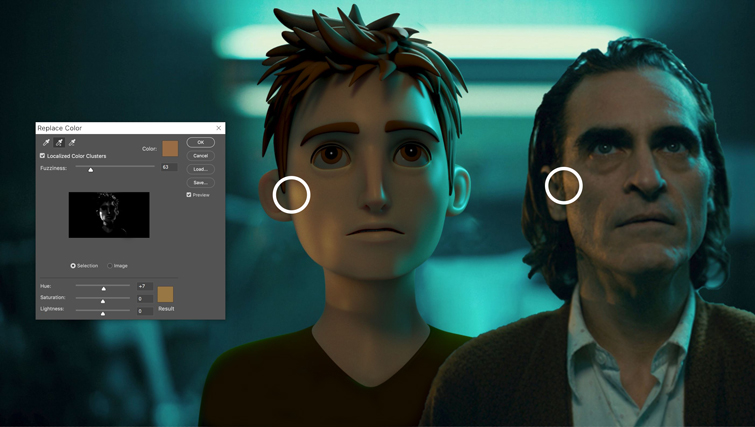
Furthermore, we also applied Curves and Levels under Adjustments a bit by varying a few parameters on the histogram. In this case, changes are global and not limited to specific areas.
I invite you to experiment with color correction!
Work on Shadow Opacity and Grain
Last but not the least, the shadows under the nose and the eyes need tweaking a bit. If you observe the Joker shot, you will notice that shadows are a bit darker, so we’d like to increase the opacity on our render a bit.
The easiest way is to paint a dark color in those areas in a separate layer. After that, we use a multiply blend mode and decrease the opacity.

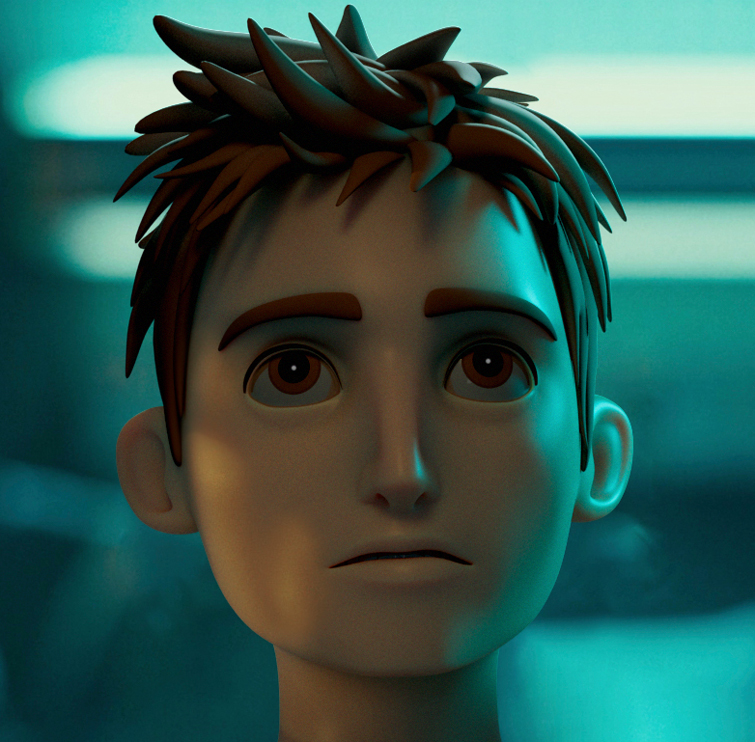
To make the integration even better, add some grain. An option in Photoshop is called Add Noise under the Filter Menu. Do not go wild with the effect! The above image has some grain effect applied.
Here is our final result compared to the Joker shot.
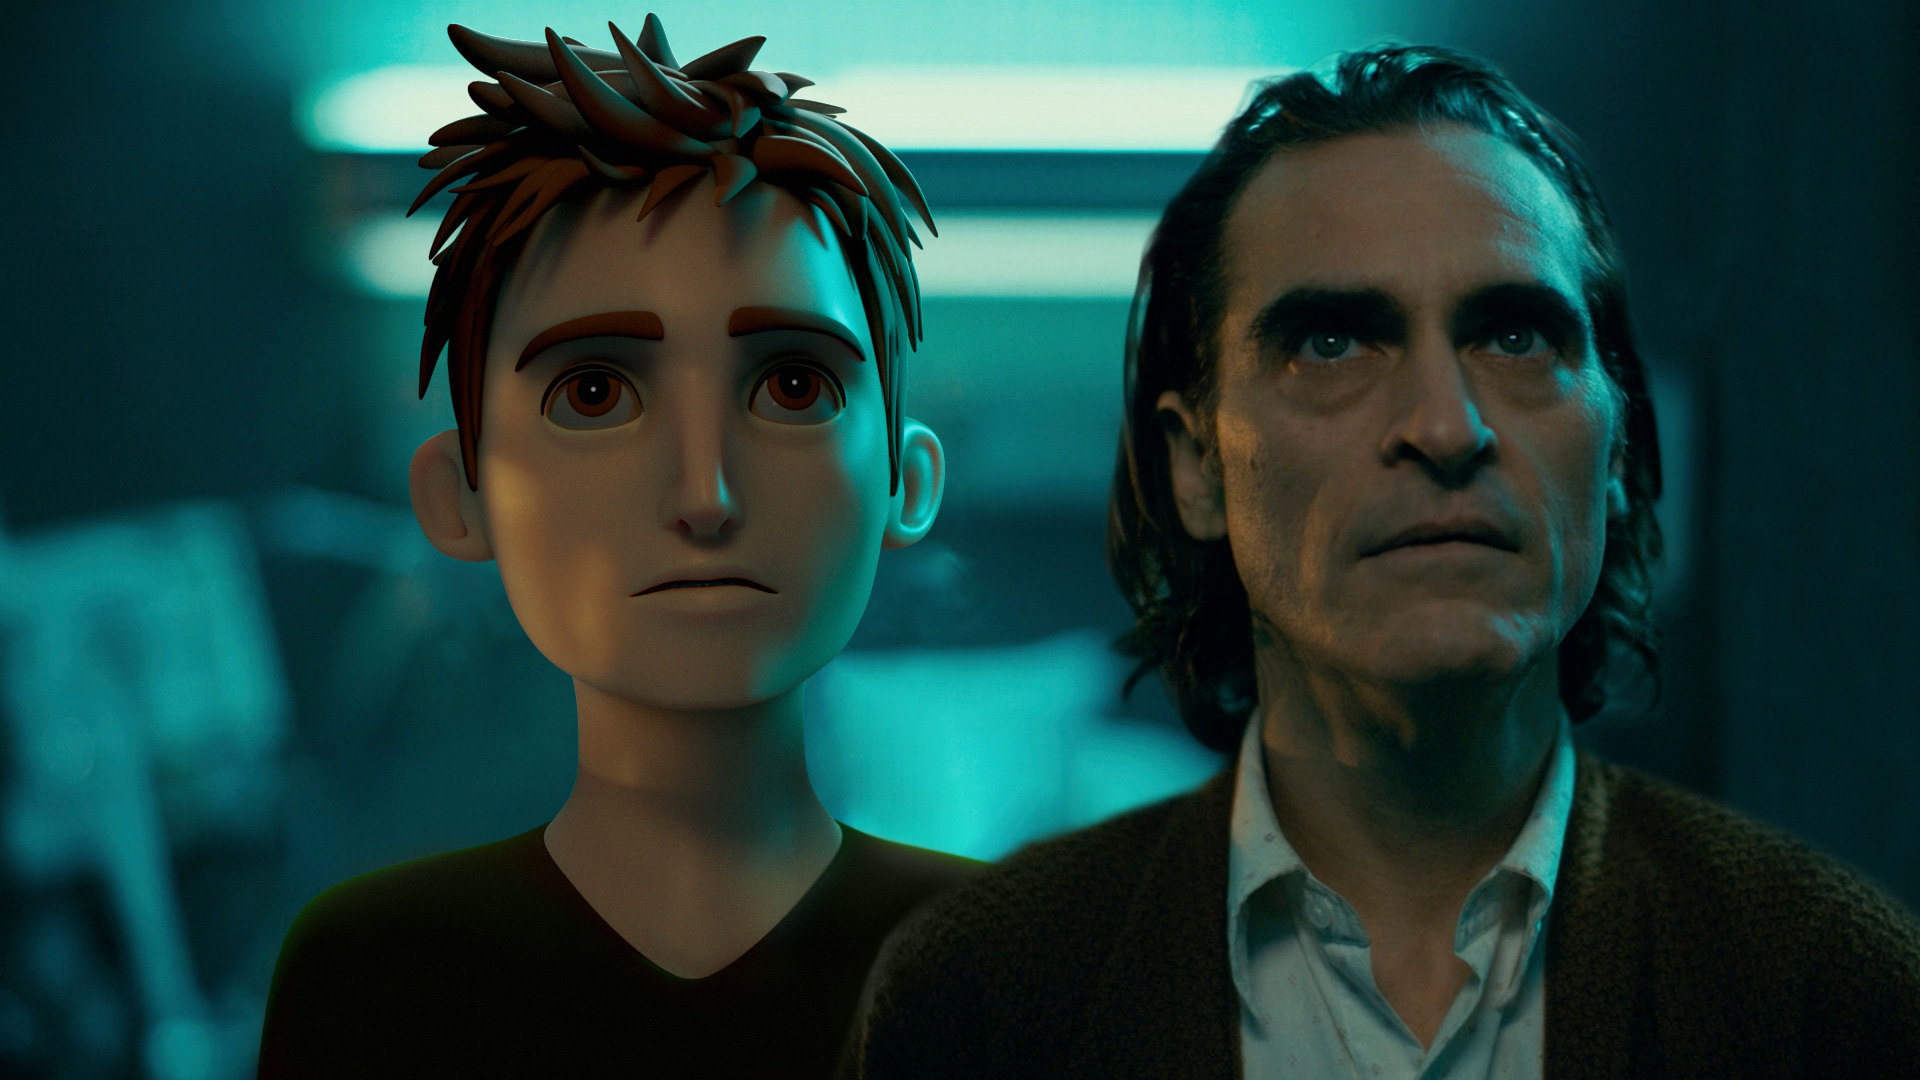
Even if the warm light shape from the left is connected with the Joker’s head morphology and the shirt collar cutting light on the neck, we can still keep it on our character and pretend that light comes from a projected pattern.
We covered the process behind creating cinematic shots in 3D by observing real shots from movies. At this point, you should be able to create your render by picking up shots from movie archives.
However, since you cannot have the same character in the shot, try to match:
- The mood, color temperature, dark, mid, light tones, and other relevant aspects.
- The light position and orientation as much as you can.
- A few lighting details like projected patterns that accentuate specific areas.
That said, I hope you like this article and invite you to visit my Linkedin Page.
For more, check out these articles: