
A Rundown Of The Edit Page Changes in DaVinci Resolve 16

In this roundup, we go over all of the updates to the Edit Page in DaVinci Resolve 16 — and what they mean for your projects.
In the NAB 2019 live panel, Blackmagic Founder Grant Petty touched upon the fact that, in 2019, Resolve in now in use among a variety of different cultures. Some eagerly await the latest addition to the Fairlight page; others look to see if there’s anything new for the already-renowned color page. I love to hear about what has been added to the edit page — Primarily because we often see the inclusion of many tools that were the basis of workaround tutorials here on The Beat because Resolve didn’t initially have them.
The edit page has been through a rigorous update process over the last few years, and we didn’t expect to see any significant adjustments to the page — nor the inclusion of any groundbreaking tools that would make you ask, “why wasn’t this initially in the software?” That said, we do have several features and some new changes to run through.
UI Interface Updates
Overall, there have been no significant updates to the UI. (Since the UI is incredibly efficient and smart, there was no need to implement an overhaul to the layout.)
Hide Page Icons
A few of the page icons got fashionable updates, with new color rendering and differently designed icons. But most importantly, you can now hide unused page icons. As we covered earlier, there are now a variety of users who use Resolve. Is a professional colorist ever going to need to use the Fairlight page? I’m not versed in Fusion, and realistically, I’m likely never to visit the page. As such, we can easily hide unwanted pages by selecting Workspace Menu > Show Page and then deselecting what pages you want to show.
![]()
It’s a small update, but if you tend to open programs from your docked windows or Mac toolbar accidentally, then you’re probably prone to casually hopping pages without intending to. I’ve accidentally clicked the Fusion icon plenty of times, and since it takes a second or two to load up the processor-heavy page, it’s quite an annoyance. (Not anymore!)
Timeline Changes
There wasn’t an inherent need to change the timeline since it was already fantastic, but we do now have a ruled timeline, which allows precise placement and editing.

Another subtle change comes when scrubbing through the timeline with the playhead — we now have tape-style audio scrubbing which will help editors find specific moments within the timeline without pressing play. You can see a visual and auditory example of this in action in Blackmagic’s “What’s New” video.
Inspector Panel Changes
Since 16 is still currently a beta release, I would wager that this feature is more of a bug than an update. If this is a legitimate change, well, it’s not a clear one. When opening the inspector with a clip selected, you have a range of adjustable tools and parameters to manipulate. In 15, the inspector’s tools looked like this:

In 16, it looks like this:

Cleaner and more compact; however, it’s not necessarily apparent how you open the additional settings. A single click does nothing, and there’s no drop-down arrow; instead, you have to double-click over the title, and the panel will animate open.
Stabilize and ResolveFX
There’s been a huge push to create individual identities with each page, but the problem is that there are some tools that reside in other pages, which means you’re going to have to visit them once in a while — or do you? In 16, several features that were previously only in the color page have now been added to the edit page. Stabilization (rightly so) is one of them.
You can now stabilize a clip directly from the inspector panel, and aside from a visual graph of what has been stabilized, it works in the same manner.
Additionally, you can now find more ResolveFX effects in the effects panel (quite a tongue twister), which again quashes the need for using the color page (if you have no other need for it).
Adjustable Clips
One of the big takeaways from the NAB demonstration was Resolve’s answer to After Effects’s adjustable layer: adjustable clips. Regardless of the difference in nomenclature here, the adjustable clip does the same thing as the adjustable layer; it will affect all video clips underneath with whatever effects you add to the adjustable clip.
While you could do this with Resolve 15’s new shared node feature, this new addition to Resolve makes the effects process a lot easier to manage and maintain.

To add an adjustable clip, open the Effects panel, click the effects sub-panel, then drag and place the adjustable clip to the desired place on the timeline. Like an After Effects layer, the clip will affect all clips that sit underneath it, so you will need to increase or decrease the layer’s length if you want the adjustable layer to cover a larger area.

If you’re going to adjust the properties of the added effect, you need to open the inspector and switch to the Open FX panel. As a side note, if you splice the adjustable clip into two, both clips will act independently of each other. So you could delete the effect places onto the first sub clip, and the effect will remain on the second sub-clip. And although the effect has been added on the edit page, by activating the bypass color grade and fusion effects button, it will deactivate the effects from the adjustable clips.
Quick Export
In 16, not only on the edit page, but also across all pages, you can now Quick Export. You can do this simply by navigating to File > quick export. This process very much mimics exporting in Premiere Pro, which is just a quick dash up to the menu bar. However, there is an emphasis on quick in quick export, as there are only two export settings to select: H.264 and H.265 — along with direct YouTube and Vimeo uploads. For most online uploads, this is sufficient, but for everything else, you’ll need to continue using the delivery page. I imagine in future updates we’ll see the function for customizing which quick exports you can select.
Create Multiple-Format Timelines
Prior to Resolve 16, all timelines would conform to the settings as entered in the master settings timeline format. This was unfortunate, because Resolve had made great strides in multiple-timeline functionality. The problem was that if you had one timeline for 4K YouTube viewing and then a separate timeline for a shorter version of the video for an Instagram ad, you couldn’t create a timeline with individual settings.

In Resolve 16, this is now possible, and here’s how you do it. Go to File > Create New Timeline and in the timeline pop-up menu, hit use custom settings. From here, you can create a timeline with entirely different properties than the master timeline. However, while you can change the timeline resolution of the master timeline, you still can’t change the timeline frame rate.
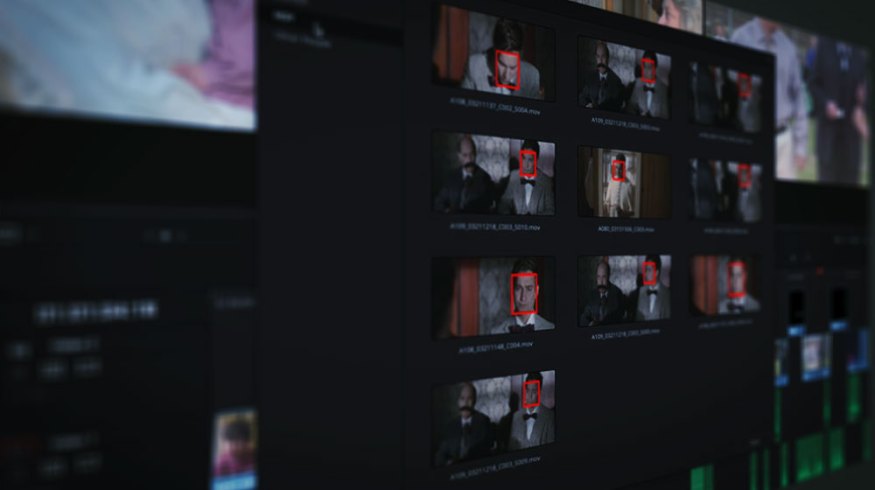
Automatic Character/People Detection
With DaVinci’s Neural Engine added into the fray, the software can do a lot more sub-surface work than previous versions, and one of those new features is analyzing your clips to identify different characters. Here’s how it works.
In your media pool, select all clips, right-click, and hit Analyze Clips for People.

Depending on the number of clips, Resolve will take a minute or two to scan the clips, and upon completion, you’ll get the following results panel:
In this panel, you can now enter the names for each character, and in doing so, Resolve will create a smart bin, which will populate with clips that contain the character. You’ll also find another bin titled “Other people,” and in this bin, you’ll find clips for which Resolve couldn’t accurately pinpoint the character. Just right-click, and tag the character, so the clip joins the correct bin.

If Resolve is unable to detect the characters correctly, you can add the character names to the metadata information.
The update and new features are certainly a lot more subtle than previous updates, but as we’ve seen new feature after new feature for the past three years, it was only natural to see more focus on the Fairlight and Fusion pages — and of course, the entirely new cut page.
You can find the full list of changes and additions to the edit page below, and for overall system changes, and new features added to the Fusion, Fairlight, and Color pages, check out the official Blackmagic press release.
• Speed Warp motion estimation powered by the DaVinci Neural Engine — DaVinci Resolve Studio^
• Timeline level resolution, frame rate, scaling and monitoring settings within the same project^
• Adjustment Clips to apply filters, effects, and grades on top of a range of timeline clips^
• Ability to analyze video clips for detecting and classifying people powered by the DaVinci Neural Engine — DaVinci Resolve Studio^
• Custom safe areas for titles and actions^
• Ability to assign any media pool clip or timeline as an offline reference clip^
• Video orientation angle in the Clip Attributes dialog
• Ease in and out position keyframes in the curves editor
• Ability to view and edit keyframes for OpenFX plugins in timeline curves
• Stabilize video clips from the Inspector
• Support for pasting color correction properties from the Paste Attributes dialog
• Improved audio behavior when scrubbing in the Edit and Media page viewers
• Temporarily enable/disable snapping for titles on the viewer using the Alt/Opt key
• All available viewer area is automatically used for 2-up and 4-up displays
• Blade operations on a selected clip results in the preceding section being selected
• Ability to toggle viewer overlays on/off and assign shortcuts for specific modes in the Edit and Color page viewers^
• Support for a larger selection of words in the keyword dictionary from workspace menu
• Ability to group and manage smart bins using folders
• User preference to automatically create smart bin categories from media pool clips based on keywords, shot, scene and people metadata
• Ability to duplicate existing smart bins
• Ability to toggle between searching all media pool bins and current bin
• Support for Go to In/Go to Out functions for three-point edits even when preview marks are not visible
• Support for switching the video monitoring output when toggling between source and timeline viewer in gang mode
• Automatic updating of the Usage in Media Pool list view
• Project setting to limit reel name matching to a specific number of characters when conforming or color tracing timelines^
• Project setting to ignore a specific number of characters from the beginning of the reel name when conforming or color tracing timelines^
• Newly pasted clips are now automatically selected
• Ability to render broadcast wave files with support for metadata when exporting timelines to Pro Tools
• Improved handling of video codec defaults and audio file names when exporting timelines to Pro Tools
• Ability to switch buses for monitoring from the Edit page
• Options to toggle views for rectified, full waveform and waveform borders in timeline options^
• Improved alpha channel handling for compound clips with more than two layers^
Lewis McGregor is a certified DaVinci Resolve trainer.
Cover image via Blackmagic Studios.
Looking for more on DaVinci Resolve? Check out these articles.


