DaVinci Resolve 15 Video Crash Course — Basic Settings
In part 6 of our six-part video series The DaVinci Resolve 15 Crash Course, we take a look at the basic settings you need to know to use all these tips.
In the final episode of the new editor-friendly Resolve 15 crash course, we’re going to cover the remaining settings you need to know to put all these tutorials to use. Don’t worry though: we’re not diving headfirst into technical jargon and advanced settings — we’re just going to cover the settings that new editors might want to check before getting started in Resolve.
If you need to brush up on the series, you can watch the first episode here.
All right. Let’s get started.
In Resolve, there are two settings menus: the system preferences and project settings. First, let’s look at the system preferences, which you can find by navigating to DaVinci Resolve > Preferences. Let’s look at a few settings that you may need to change when first loading up resolve.
Memory and GPU
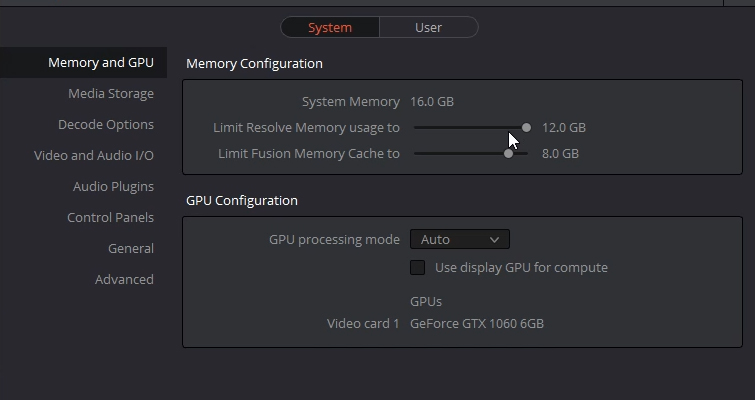
The very first window is the Memory and GPU panel; in here, you can limit how much RAM Resolve uses. Now, the more you allocate to Resolve, the less there is for other processes, which may, in turn, make things worse. However, if you find that Resolve is behaving sluggishly, see if you can increase the memory in this panel. (Even though I have 16gb installed, I can only use up to 75 percent.)
Audio I/O
I often switch between using my monitors and headphones, and sometimes, if it’s open when you’re changing the system volume, Resolve can get confused. If that’s ever the case, head into the Video & Audio I/O, and here you can configure your audio output.
Alternatively, if you want to keep your system volume oriented to the monitors, you can use this panel to change from the system default to your headset. On a basic level, I think these two are the only options you need to know. Although, I would say, for good measure, read up on the autosave feature.
Project Settings
If the system settings affect the hardware, the project settings affect the project and software, like the resolution and frame rate. To get here, you need to head to the bottom right, where we have a cog icon. Let’s first look at timeline resolution because this can sometimes catch people out.
As I mentioned in Episode 3, you set your timeline resolution when you create a project, when you create a timeline, or when you first import a clip that doesn’t match the default settings — Resolve will ask if you want to make adjustments. If for example, you want to switch from 4K to 1080p so you can crop the 4K footage, you would open the project settings, and change the timeline resolution to 1080p. (However, look at what happens when we do this — see video.)
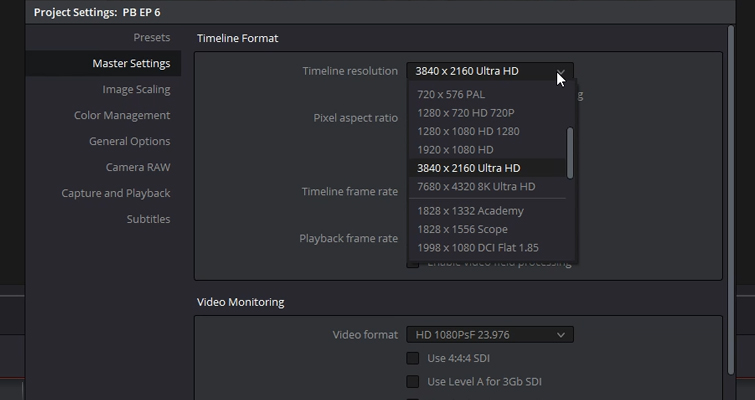
The 4K footage in the viewer has remained the same scale. If we were to insert a 4K file onto a 1080p timeline, then we would have to decrease the scale of the 4K file to fit into the viewer completely, right? But Resolve has an image scaling process that will change how your footage interacts with a timeline with a different resolution.
To adjust these properties, we need to drop down one panel to Image Scaling. Here, you will find an Input Scaling option, which controls the resolution of mismatched media. The default says “scale entire image to fit,” which is what happened to our footage. However, we can change that to “center crop with no resizing,” and when we do so, the image in the timeline has resorted to its recorded resolution.
There may be a time when you’re working with 4K and you want the majority of clips to decrease in scale, leaving only a few at the default size so you can crop and zoom in and so forth. Well, changing the entire timeline properties is going to be cumbersome. So, instead, after changing the timeline resolution, close the settings panel, select the 4K clip that you want to keep at default size, open the inspector, and scroll down to the scaling section. Here, instead of using the project settings, change them to crop, which will then override the 1080p project setting.
Optimized Media
Let’s look at one more basic setting that may improve your Resolve workflow if you feel like playback is sluggish. There’s no denying that Resolve needs a somewhat-powerful machine to operate efficiently. However, even my computer, which is reasonably well-kitted-out, struggles with high-resolution files with a significant data rate. There are two things we can do to lighten the load. We can go to Playback > Proxy mode and lower the resolution of the playback.
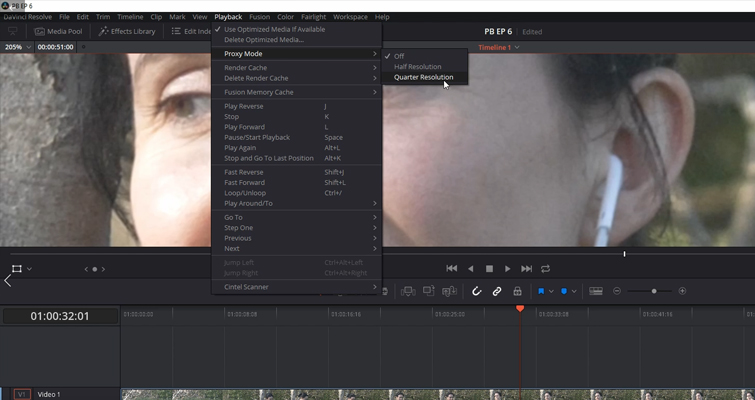
You can see the drastic decrease when I switch playback to a quarter resolution. (It’s important to remember that when you’re doing this, you’re not doing anything to clips of the timeline; it’s just a playback setting.) However, as you can see, this isn’t ideal if we’re editing footage that requires close analysis of the details in the shot. Everything is blurred. So, what we can do is generate optimized media.
To do this, you right-click on a clip and select “generate optimized media.” Resolve will then create a proxy file at a lower resolution and format for real time playback. But what resolution and format? Well, let’s head back to Project Settings > Master Settings and scroll until you reach Optimized Media and Render Cache. Here you can choose what resolution and format you want for these files.
So, we’ve only skimmed the surface of editing in Resolve in this miniseries; there’s so much more to this software, but as with most things, you’ll primarily learn by running into an obstacle, searching for a solution, and implementing the fix. So, if you do get stuck, you can find a library of solutions here.
We hope, if you’re entirely new to editing in Resolve, that after this crash course you’ll have a basic understanding of how to edit with the software. Good luck!
Interested in the tracks we used to make this video?
- “Relaxing in Vermont” by Chill Study
- “Brooklyn Drive” by Chill Study
- “Be Gentle” by Ben Beiny
Looking for more DaVinci Resolve tutorials? Check these out.
- DaVinci Resolve 15 Video Crash Course — Delivering Your Content
- DaVinci Resolve 15 Video Crash Course — Working with Audio on The Edit Page
- DaVinci Resolve 15 Video Crash Course — The Edit Tools
- DaVinci Resolve 15 Video Crash Course — The Edit Page
- DaVinci Resolve 15 Video Crash Course — The Media Page


