
DaVinci Resolve 15 Video Crash Course — Delivering Your Content

In part 5 of our six-part video series The DaVinci Resolve 15 Crash Course, we take a look at everything you need to know about the delivery page.
Welcome to episode 5, the penultimate episode of our crash course. In this episode, we’re going to look at how to render your content on the delivery page. If you’ve been following along, by now you should know setup (links to the other episodes are the bottom of this page).
Let’s get started.
Given the overall simplicity of the delivery page, this should be our quickest episode yet. As a basics crash course, we’re only going to focus on the fundamentals of the delivery page. That means we’ll just be covering the essentials you need to get your content ready for delivery.
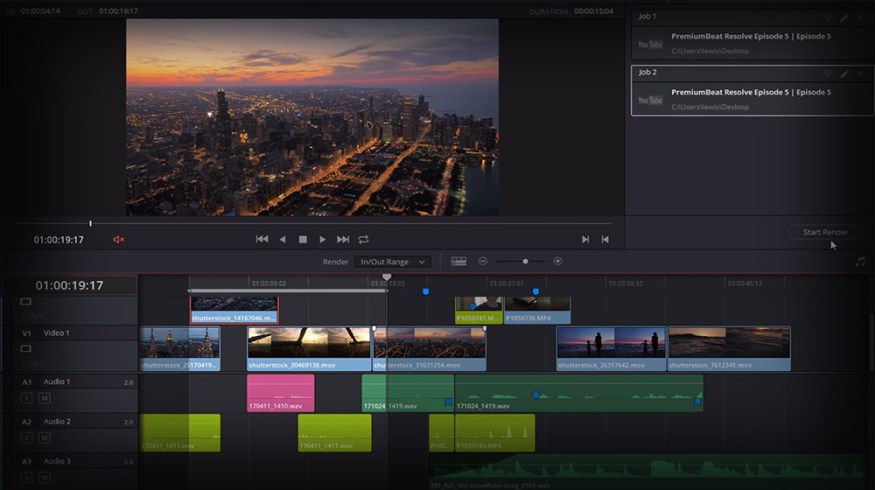
To render your edit, first you have to go to the delivery page. This page, like every other page, has its own layout, but it’s familiar enough that after working through the first five pages, you should be able to find your way around without getting lost.

- Top left: render settings panel — for selecting the settings.
- Center: viewer — to watch the completed edit.
- Top right: render queue — where edits wait to begin render.
- Underneath: clip display.
- Bottom: non-editable timeline.
Let’s have a look at the render settings panel first. This will be your first port of call when opening the delivery page. From filename and location to codec and bitrate, it’s all confirmed in this panel. I remember when I first started making films, render settings were always a bit of a mystery to me. One video is telling you to render at this setting, another article is telling you make sure you export in this format — it can quickly get confusing. Resolve helps streamline that process with a set of one-click presets. You can choose from YouTube upload or audio only, and most upload presets will only need you to click “start to render.”
In this example, my video is going straight to YouTube and nowhere else. Therefore, I’m going to select YouTube. Since 4K is slowly becoming the norm, that option is available on the drop-down menu on the YouTube tab. Resolve has changed the render settings to conform to YouTube’s suggested upload format, so essentially, all we need to do is specify the location, and we’re good to upload.

However, you can also customize each setting, so let’s look at our options. First, we have the format and codec. As stated in the YouTube online help section, YouTube’s preferred online format is Quicktime with an H.264 codec — Resolve has automatically set that for me. But if you were ever to render the file for offline viewing, you would need something with less compression; you can change that here. The initial YouTube preset will restrict your bitrate to 10,000 kbs, but if you want that extra bit of clarity at the cost of a larger file, you can get it.
If you need to change the audio settings or the file settings, you do that by hitting the audio or file button, which will swap out the sub panel here. I sometimes find that new users get lost trying to find the audio settings because they’re hidden in plain sight. (You can leave the file submenu exactly where it is for now.)
You can also render out your edit into individual clips. But, most of the time, you need to make sure that you select a single clip. When you have selected all of your settings, you hit add to render queue. When you do so, the edit under those settings goes to the queue on the right. What if, however, you need a shorter version of your edit — say 15 seconds’ worth for an Instagram ad?
What we can do is head to the timeline, and instead of rendering the “entire timeline,” we can select render in and out range. Then, by using the same keyboard shortcuts as we use on the edit page, I and O, we can create our 15-second range.

With that complete, and after a slight variation in the file name, we can hit add to render queue. Now, we’re ready to hit render. That’s it. That’s the delivery page in a nutshell. It’s nice to have an actual user interface for all of the export settings and not just a small pop-out window.
For our final episode, we’re going to look at adjusting some of the internal settings, and a few editing elements that you can only find when using fusion tools or the color page.
Interested in the tracks we used to make this video?
- “Relaxing in Vermont” by Chill Study
- “Brooklyn Drive” by Chill Study
Looking for more video tutorials? Check these out.


