The Lowdown on Working With Subtitles In DaVinci Resolve 14
NLEs generally operate similarly, but when it comes to captions, things change. Here’s what you need to know about creating subtitles in DaVinci Resolve.
When it comes to working with captions, Adobe Premiere has a great built-in caption and subtitle feature, which we have already covered in depth (with a video tutorial) here. Resolve, on the other hand, well, I’ve already expressed my dismay about working with text in this article. For all the strides Resolve has been making, when it comes to using any form of text, the program lacks the finesse of Adobe’s applications.
Unfortunately, at this moment in time, there’s no caption feature like we find in Premiere. However, with all the consistent updates and fixes we’re seeing, I wouldn’t be surprised if we saw this feature sometime over the next year or two. But, using only what’s available now, let’s have a look at how you can create, import, and export subtitles in Resolve.
Importing Subtitles
You can import subtitles into Resolve; however, they must be in an FCPXML file format. To do this, select File > Import AAF, EDL, XML > select FCPXML File. The FCPXML file will import with the appropriate time code in and out points and text formatting. The problem is that many use the SRT format for subtitles, and unlike Premiere, which allows you to import an SRT subtitle file, Resolve doesn’t accept it. Therefore, if you are working with an SRT file, we have to jump ship and use a different tool.
SubSimple, is an online tool from Resolver.tools that allows you to convert an SRT subtitle file into an FCPXML. The online tool is incredibly simple to use. You just input your timeline’s FPS and upload the SRT file for conversion. There is also a downloadable software version of SubSimple, which costs $29. It offers a batch-run function and, of course, runs offline.
Creating Subtitles
Creating subtitles in Resolve is similar to creating a text title. In fact, it’s actually the same process. You drag a Text Title/Generator from the effects library onto an empty track and customize the text in the inspector. There are, of course, guidelines for creating subtitles for broadcast, so it’s always best to check with the client for the intended output before you begin working.

When you need to change the text of the subtitle layer, instead of implementing a new text layer, simply use the blade tool (B) to splice the text layer and adjust as needed. When you use the blade tool on a text layer, like any media file, Resolve sees it as a new clip separate from the original clip. To simplify the alignment of the text, make sure you have the audio waveform ticked in the timeline options and the audio track height set to its highest. It’s easier to arrange the subtitles to the audio’s waveform than the video itself.
Exporting
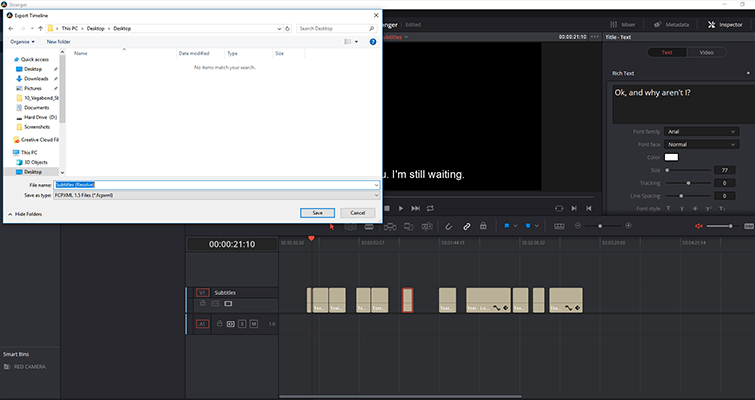
There’s no “one-click export subtitle” button. Instead, to export, first, create a copy of your working timeline and rename it to avoid confusion.

Delete all the media except for the subtitle track, and then go to file > export AAF, XML, and then select the appropriate FCPXML type. If you need to convert the FCPXML file to an SRT file, SubSimple can do it for you.
Lewis McGregor is a certified BlackMagic Design DaVinci Resolve trainer.
Looking for more information on Resolve? Check out these articles.


