
Resolve 14’s Best Editing Features For The Online Content Creator
Breaking into online video content? You’ll need the right tools for the job. Check out how DaVinci Resolve 14 can save you time and money.
Cover image via Shutterstock.
Travel vlogger, web-based comedian, video game streamer, YouTube personality, make-up reviewer: while these aren’t necessarily titles that you would classically associate with filmmaking or videography, there’s no denying that online video creation has become a viable way of making an income in the digital age. These titles are only here today because of the advances in filmmaking technology that enabled consumers to buy excellent hardware at a low cost. There are so many options for hardware and software, it can get confusing quickly, especially if you’re new to online content creating. One of the core elements of online content creating is consistency. If you’re not uploading often, you’ll lose your audience. With that in mind, let’s have a look at how Resolve 14 may aid you in creating content faster.
Quick Delivery
Rendering is often the most mundane part of editing. It’s long, it’s tedious, and it’s even worse when you accidentally forget to select a setting — then you must repeat the process. Resolve streamlines all of this, especially for the online content creator. When we go to the delivery page, we see two built-in presets for YouTube and Vimeo uploads.
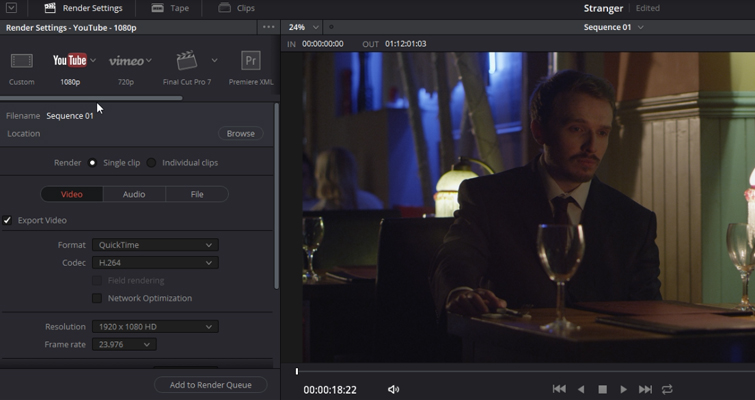
These presets are specifically for online uploads. By default, you get a QuickTime H.264-encoded media file, restricted to 10,000 kb/s. This is at 720p, but you can very quickly change it to 1080p for a crisp HD upload. Additionally, all of the settings are entirely customizable. Mainly, however, you can take your edit to the delivery page, select the YouTube preset, and start rending for your next upload.
Smooth Cut
If you didn’t perform a jump cut in an online video in 2017, can you really say you’re an online content creator? But what if you want to go against the flow and produce a video with no jarring cuts? Or perhaps you’re making a serious video using a consistent cut, but at one point you stutter or pause for too long. Well, in Resolve, there’s a feature called smooth cut that will solve this problem.
First, identify your pause, remove that section, then go to the effects library and find smooth cut. Add that to the edit point, and when you hit play, it’s almost as if the cut doesn’t exist — the smooth cut will optically blend the two points together.
Smart Bins
Resolve makes managing your media easier with smart bins. You can think of Smart Bins like an iTunes smart playlist. The bins automatically detect the specified elements of a clip and place them into the desired bin. Essentially, you could offload your media into the media pool, and have resolve automatically sort out the contents of your edit before you’ve even offloaded the final clip. So if you were working with two cameras and you want to separate the two (perhaps they require different color treatment because one camera had the incorrect white balance), you just input the details relevant to your camera.
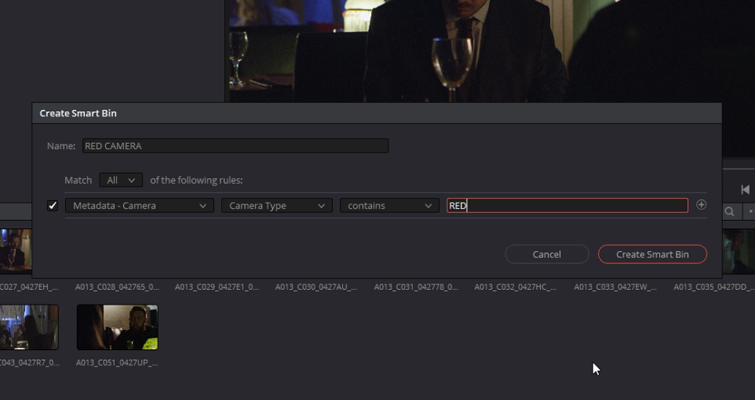
To create a smart bin, right-click in the smart bin area on the Media Page, and select add smart bin. You will then see a pop-up window that allows you to set the rules of your smart bin. Here, you can pretty much define the rules however you want. From a specific camera codec to a particular clip length — the choice is yours.
Dynamic Trim
Dynamic Trim is a great feature in Resolve, perhaps one of the best, and it’s going to decrease the amount of time you spend editing dramatically. When you need to switch between trim tools, there’s no multiple tool icons to choose from or numerous keys to hit. It’s just this one icon, which is T on the keyboard.
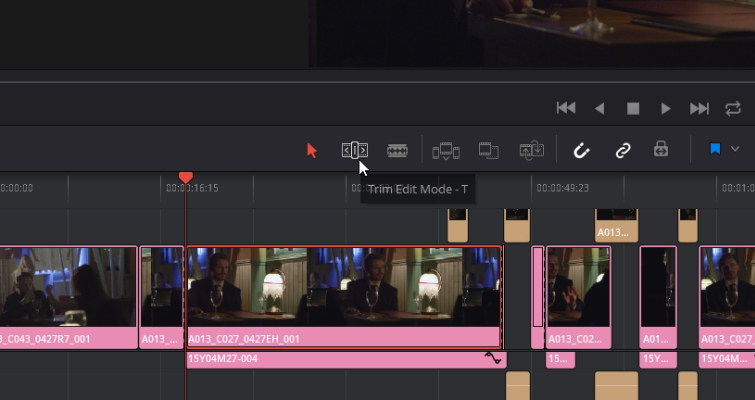
When you enter trim mode, all the available functions (ripple, slide, slip, roll) activate, depending on where you situate your cursor on the clip.
- Placing the cursor at the start or end of a clip: ripple edit.
- Placing the cursor within an edit point: roll edit.
- Placing the cursor on the top half of the clip: slip edit.
- Placing the cursor on the bottom half of the clip: slide edit.
This form of editing is very time-saving, and it will speed up your editing dramatically.
Streamlined Effects
In Resolve, you can very quickly implement transitions into your edit without the hassle of opening an effects tab. You can add an organic fade in or fade out with these handlebars on all audio and video clips.
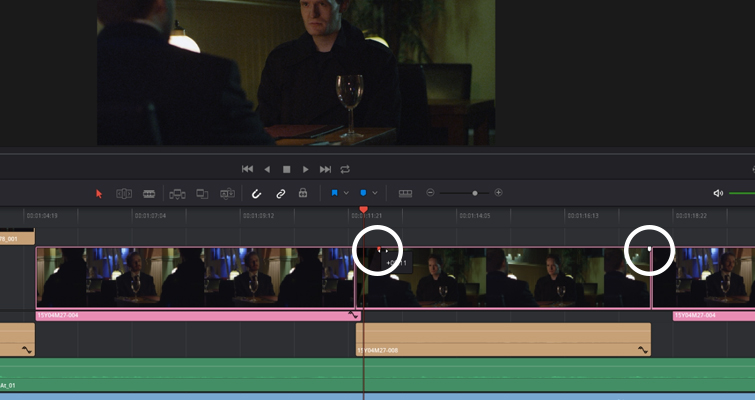
You simply drag the handlebars right or left (depending on which end of the clip you are working with), and you can implement a fade-in within milliseconds. No pen tool, effects panel, or preset needed; just drag right or left.
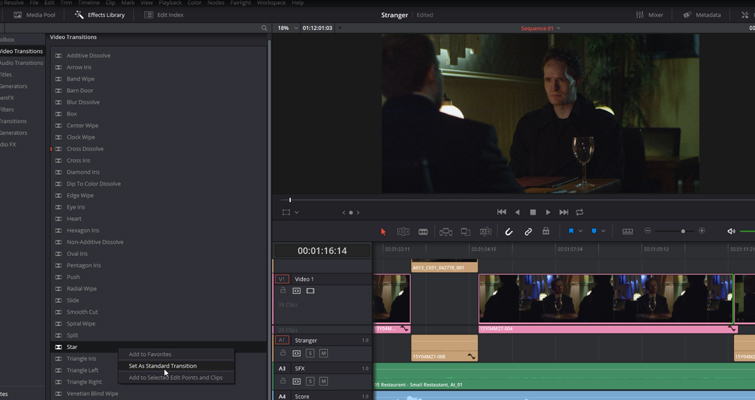
If you have a favorite transition, you like to use — let’s say the cinematic star wipe — you can forget dragging the transition to the edit point every time you want to use it. Just right-click on the transition in the effects panel, select set as standard transition, and then when you’re editing your content, click on the edit point and press Ctrl+ T. The transition will then apply to your edit point. You can also adjust the transition’s length in the same manner as a media clip.
Sync Audio from Wave Form
If you record your audio onto a separate device, you’re going to have to sync your audio in post. There are plenty of audio sync plug-ins on the market that can do this for you (or you can manually sync your audio and video files by lining up the waveform), but either way, it can take too long or cost too much. If you’ve used a DSLR or a camera with onboard audio, you can sync your video file and audio file very quickly in Resolve 14.
Find your audio and video clip in the media pool, select both files, right-click, and select sync to the waveform. The waveform from your audio capture will then merge to the video clip based on the waveform from your DSLR.
These are just a handful of editing tools in Resolve that can help you become YouTube’s next big content creator. Since the software is free, don’t shy away from downloading it and trying a few things out.
Looking for more information on DaVinci Resolve 14? Check out these articles.
- How to Create a Realistic Lens Flare in DaVinci Resolve
- Working with DaVinci Resolve 14’s Powerful Face Refinement Plug-in
- Check Out The Newest Audio Features in Resolve’s Edit Page
- Learn How To Create A ‘Deakinizer’ Tilt-Shift Effect In Resolve
- Master Resolve’s Built-In Film Grain with This Rundown
Lewis McGregor is a certified BlackMagic Design DaVinci Resolve Trainer.


