
Editing Pocket 6K Files in Resolve with a Low-Performing Computer

We’ve previously covered offline editing and proxy workflows, but in this article, we’ll cover methods to make your 6K RAW editing more amicable.
Although the Pocket 6K is budget and new user-friendly, the files the camera produces can be anything but. 6K BRAW media is a resource-heavy media that requires substantial processing power to play back.
As a side note, when I started to initially film my review video (you can watch here), I decided to record in the highest constant bitrate quality possible. The files were so immense that the card Blackmagic supplied me wouldn’t even play back the media. I had to drop down to 8:1 to review what I’d shot.
With that, it’s not going to be practical for most people to try and edit native 6K RAW files. This is especially true if you decide to add any sort of color grading or OFX effect, which requires more GPU processing. When the world was going crazy for cryptocurrency and there was a shortage of peripherals — especially graphic cards (GPUs) — we saw a rise in the price for many computer components. And, perhaps for the first time, it was cheaper to buy a pre-built custom PC than purchase the parts separately.
I wanted a system that could handle 4K files at ease, and now I have one. But at 6K BRAW 3:1, I’m only moving at 17fps. And, even on the lowest recorded settings (12:1), I’m reaching 23fps. Perhaps usable to some extent, but not favorable when trying to edit.
So, of course, we need to create edit-friendly files. We’ve covered offline editing and proxy workflows in the past, but in this article, we’re going to quickly skim over a few methods to make your 6k RAW editing a little more amicable.
In theory, there are three methods we can use to do this in Resolve. However, we’re only going to focus on two. The first technique involves decreasing the resolution playback, which can be done in the Playback Menu under Proxy Mode. You can switch the playback from Half Resolution or to a Quarter Resolution.
However, I’m going to say that if you have a low performing computer and are struggling to play back 6K in general, I’d suggest skipping this altogether. As noted by Uli Plank on the Blackmagic Forums:
Red footage, a.k.a. R3D, for example, can be quite efficiently decoded at lower resolutions, due to its wavelet codec. DNG sequences, H.264, or BRAW (while the latter is easy on the CPU) don’t profit much from lower resolution since they need full decoding to produce an image.
Ultimately, Resolve is still the original 6K BRAW file, and I’d bet money on Resolve pausing and dropping frames every so often.
Realistically, you’re going to need to create a proxy file so you’re editing with less intensive media. There are two ways you can do this.
Optimized Media
Optimized media is Resolve’s in-house system for taking your source clip and generating a proxy stored in Resolve’s cache folder.
To optimize a clip, select the clip(s) that need to be optimized, right-click over a media file, and select Generate Optimized Media. Resolve will then create optimized media. If your system is unable to playback 6K RAW files, this process will likely take some time.

When the clips have been optimized, there’s no visual indication to let you know that one clip is optimized and another is not. So, I suggest placing optimized media in a separate bin to keep track of the optimized media.
Once Resolve generates the optimized media, make sure to select Use Optimized Media If Available on the playback menu. Likewise, for grading or zoomed-in analysis, you can flick between the optimized media and the source media by deselecting this option. As Resolve retains the link to the original files, the switch is instantaneous and involves no waiting.

This should hopefully make the 6K BRAW files easier on your system. However, if you find that the generated media is still acting sluggish, you likely haven’t adjusted the Optimized Media and Cache settings in Project Settings>Master Settings. In this panel, you can set the parameters for how you wish your media to be optimized.
I’d love to give you a one-for-all setting to go to, but that’s going to depend entirely on what your system is comfortable with. But, as a starting point, I’d look at using the DNxHR 444 codec.
However, the optimized media is generated within Resolve’s database system, meaning you wouldn’t be able to move the files to a different NLE. More importantly, if you change the camera BRAW data, the optimized media will be discarded and you have to generate optimized media again (which can be a lengthy process).
Therefore, the other — and honestly most suggested method — would be to transcode your media into edit-friendly files traditionally.
Transcode Media
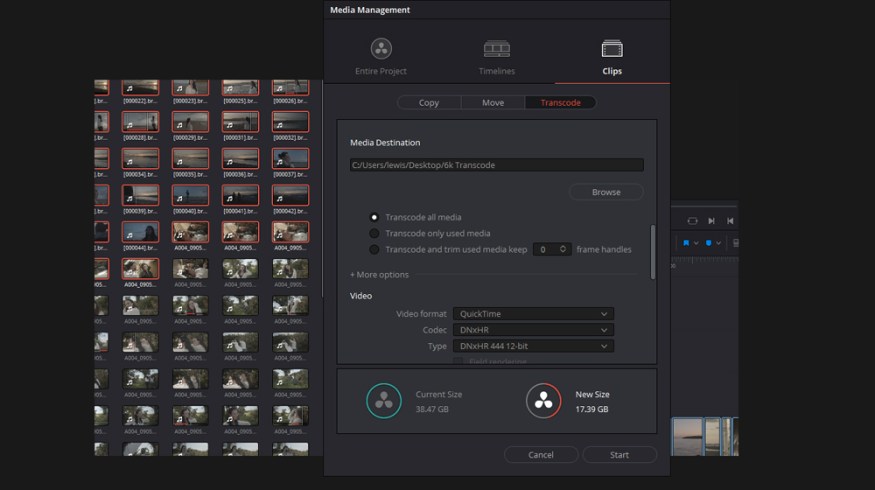
There are two ways you can do this. First, when in the media page or media pool, select the 6K BRAW clips you’d like to be transcoded, then choose File>Media Management. The following pop-up menu should appear.

First, select Clips (from Entire Project, Timelines, and Clips), then Transcode.
You can now select the Render Destination, and as before, you need to set the transcoding options to render the 6K RAW files out as edit-friendly files. Again, DNxHR would be a good starting point, depending on your machine. Although, most computers should be able to play a 1080p DNxHR file, and if it can’t, well, time for a new PC.
Alternatively (but I would suggest the above option), you could also add all the 6K RAW clips that you need to transcode to a new timeline. Head to the delivery page to transcode. When on the delivery page, there are two specific checkboxes you need to tick. First, you need to make sure you select Render Individual Clips. Secondly, on the File tab, you need to choose Filename Uses Source Name. Then, once again, select an edit-friendly preset and render your media.

With both methods, you’ll need to import the proxy files back into Resolve. Then, before color grading and/or delivery, relink/replace the proxy clips with the 6K raw files, and you’d have sidestepped a lot of stuttered playbacks and huffing.
Looking for more tips on working with DaVinci Resolve? Check these out.
- Working with Different Frame Rates in the Same File in Resolve
- Harnessing the Power of Facial Refinement in DaVinci Resolve
- Working with Super Slow Motion in DaVinci Resolve
- NLE Showdown: DaVinci Resolve vs. Adobe Premiere Pro — Processing Power
- Learn How to Fix a Variable ND Filter Vignette in DaVinci Resolve


