

Fix A Blown-Out Sky In Under 60 Seconds In After Effects

Capturing your foreground under bright conditions can easily blow out the sky in your shot. Learn how to fix the problem with this step-by-step tutorial.
Top image via Shutterstock.
Sky replacement tutorials are a dime a dozen on YouTube, and each educator will often have their own method, using a variety of different effects and techniques. The following process won’t explain how to replace a perfectly captured sky with something a little different, perhaps changing a blue sky to a golden hour set of clouds. It will, however, show you how to replace a blown-out sky with something more pleasing to the eye.
It’s straightforward and swift. It took me only 54.3 seconds, to be exact, to implement the effect ready for grading and export.
The technique requires a sky that has entirely clipped with no visible blue or clouds. This is usually the result of shooting into the sun’s direction and exposing for the foreground when you don’t have a camera with great dynamic range. The images in the example below were shot in 2016 with the Panasonic GH4. With 10 stops of DR (CineD profile), you’re going to run into issues like this.
Of course, this is one shooting practice that you want to avoid. You can correct this by filming with the sun to your back, using a graduated neutral density filter, or using a surplus of lighting to expose for the sky and light the foreground. Alternatively, if you’re unable to film in the opposite direction, you can wait for a later time in the day.
Nonetheless, there may be a reason why these alternative approaches are not possible, and you have to shoot facing the sun and work with a blown-out sky. Fear not. Here is how you can fix your footage under sixty seconds.

Before we start, you need a photograph of the sky that is the same size (or larger) as your composition.
Create a New Composition
Import your video file and the sky photo. Bring both files into your timeline, and place the sky beneath the video file.

Luma Key Effect
Add the Luma Key effect to the video file, and change the key type to Key Out Brighter. Then increase the threshold until your image returns with the sky image below now filling the sky in the video file. This is something that will be different with every clip. For my shot, 200 is perfect.
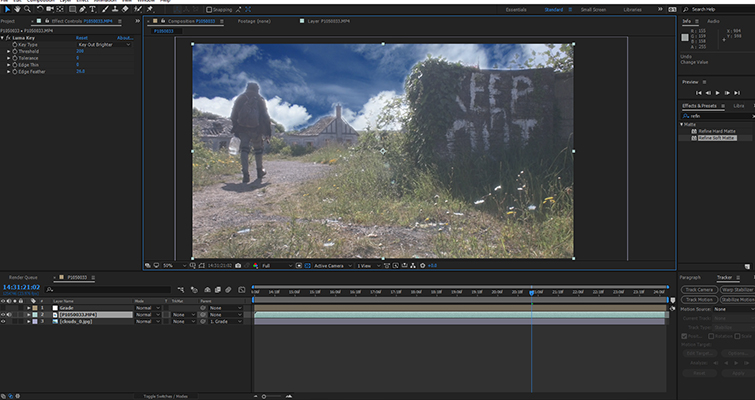
Unfortunately, we are now left with a thin white line around some edges in our image.

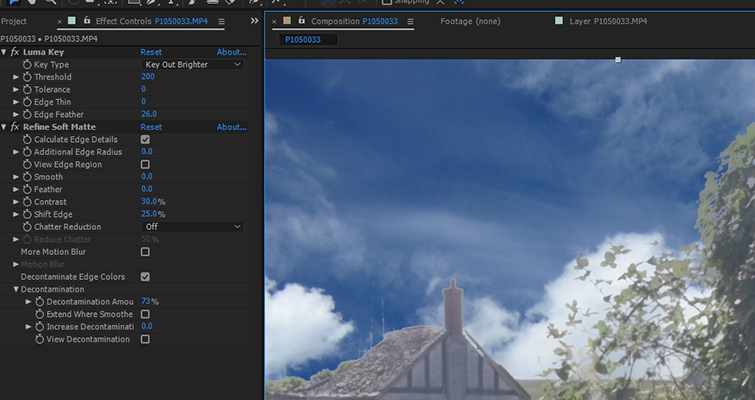
Refine Soft Matte
To fix this, add a Refine Soft Matte to the video file. This may be enough for some people. However, in shots like mine that include foliage, you will need to play around with the settings to refine the effect. Depending on your footage, the settings you will need to adjust are contrast, shift edge, and decontamination amount. If necessary, you can also change the Edge Feather setting on the Luma Key effect in the video file.
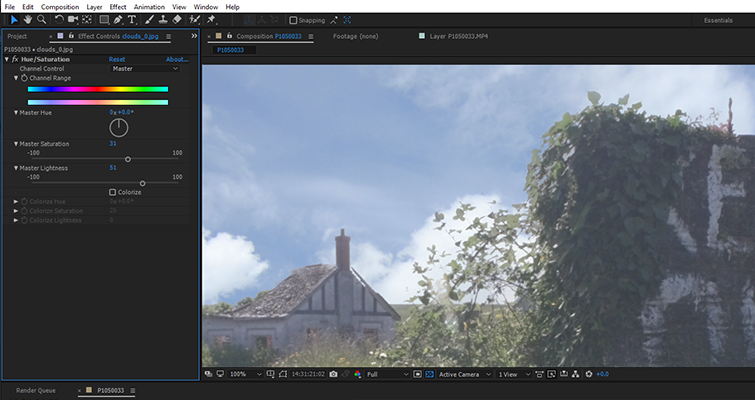
Final Adjustments
Finally, before the video clip is ready for export or grading, adjust the brightness, saturation, or lightness of the sky to match the video file.
This is a great way to replace a blown-out sky quickly, and remove any highlight issues with foliage or small objects that bleed into the blown-out highlights.
One thing to note; as we are essentially keying out the bright sky, you’ll often find that any objects that are caught within the sky will likely also be keyed out upon refinement of the effect. If you look at the before and after, you can see that we lose the entire telephone pylon. You may think that this is not ideal; to a degree, it’s not. However, due to the brightness of the original shot, we were losing some of the edges of the pylon. Therefore, the image looks cleaner without it.
Bonus Tips:
- If you have a moving shot, simply track the movement and apply it to the cloud layer.
- If you have sourced your sky image from a stock image website, you may want to add a Gaussian Blur (5-10) to the sky to take the crispness away from the picture.
- When filming, if you know that this shot will ultimately be a “fix it in post” job, make sure you grab a variety of well-exposed sky photographs to use later.
For more on post-production tips, check out the articles below.


