How to Properly Calibrate Light Meters

Avoid a faulty reading by verifying the accuracy of your light meter with this quick tip.
All image via Mark Vargo, ASC
I live in a rural area and get calls for jobs that never leave me enough time to get my meters calibrated professionally. I’ve devised a system that works for me in a pinch and I wanted to share it with all of you.
First, you’ll need a still camera with a histogram display feature. A histogram is a digital version of the zone system. The middle of a histogram is the same as zone 5, or “middle” gray. An 18% gray card is “middle” gray in value.
The idea is to expose that middle gray card to render a middle gray spike in the middle of the histogram. If accomplished, then you have achieved a perfect exposure — a feat necessary for calibrating your meter accurately.

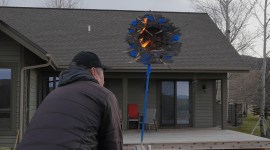
The above photo depicts the set up for our exercise. There’s a Canon still camera with an “L” glass zoom lens pointed at a gray card gripped in a C-stand.
I’m illuminating the card with the available light coming through a skylight. Know that the reading will be more consistent if you light the card with instruments, however, since many of you don’t have lights, I’ll go without as well.

Fill the frame with the gray card and set up your still camera to reflect a basic cinema situation. With my shutter speed at 1/50th of a second with ISO 800, I’ve matched the native speed of the ARRI ALEXA. The only remaining variable is the f-stop which will be set to put the exposure spike in the middle of the histogram. In this test case that f-stop ends up being a 2.8.

Then quickly take your test spot meter reading before there is any deviation in the available light, clouds, wisps, etc. If your meter is well calibrated, it should render a reading very close to a 2.8 or in my case exactly a 2.8. I don’t worry too much about a tenth or two over or under. If you are calibrating an incident meter use a flat disk, hold the meter in front of the gray card and pointed at the camera. Your exposure should be at a 2.8 or very close to it.
I know that many of you don’t use a meter, but they can be very useful in verifying the speed of the chip in the camera you might be shooting with. To ascertain this issue, shoot a gray card at the exact exposure your calibrated meter displays at the native ISO of the camera. Send the footage to a post house and ask if that gray exposure is where it should be on their scopes. If it is, then the native speed is truthful. If it isn’t, then adjust your meter to reflect that over or under metric.
I recommend that everyone should at least own a spot meter, because you never know when you might have to shoot a film on film. You can’t light from a monitor on film; a meter reading must be taken and it has to be pretty close to perfect — or else. So go on ebay and purchase one. My bet is that you’ll find a reason to use it every day even on your next digital shoot!
What are your experiences with light meters? Are they a part of your standard loadout? Share your thoughts in the comments below.