
How to Create Dynamic and Fun Line Boil Animations

In this tutorial, I’ll show you how to create simple, frame-by-frame animations using the line boil technique in Adobe After Effects.
Line boils occur when the images of a frame-by-frame animation don’t align perfectly. Whether the strokes of the illustrations are slightly different widths, or the lines just occasionally miss the mark, the result is an image that wiggles and jumps around — or “boils.”
In the early days of animation, line boils were considered a mistake, so animators attempted to avoid it at all costs. Now, the technique is common because it’s easy to create and can quickly add life to a project.
Here’s how you do it.
The Tools

All you really need to create this effect is an iPad, Apple Pencil, and the Procreate app.
There are a number of ways to create this effect. For this tutorial, I’ll be using an iPad with an Apple Pencil and an app called Procreate. I’ll also be using Adobe After Effects to tweak the animation. You can, however, create this same look using a number of other tools and programs, including Adobe Photoshop, Illustrator, Adobe Animate, and Toon Boom — or by simply drawing on paper and scanning the images.
Step 1 — Draw the First Frame
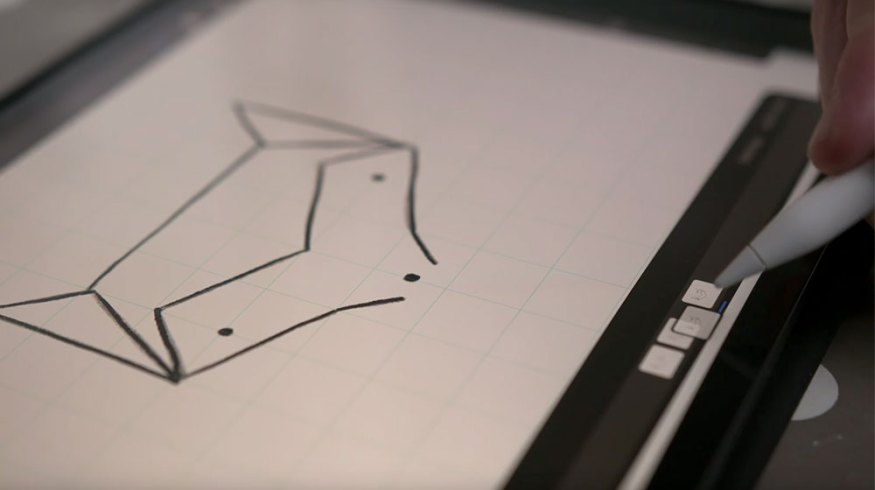
For the first step, I’ll draw my initial frame — a simple doodle of a fox. This is really the most difficult part, since I’ll just be tracing this original image multiple times once it’s finished. I’m using the Procreate app on my iPad, which makes drawing and animating incredibly easy.

Use the drawing guidelines to get a symmetrical image.
For this first frame, I’ll use the drawing guides to get a nice geometric and symmetrical fox. Again, you can use a Wacom tablet, Photoshop, Adobe Animate, Toon Boom, or even a simple piece of paper to create a line boil.
Step 2 — Trace and Repeat
Once I’m finished with my fox doodle, I’m ready to create some duplicate frames. I’ll turn on the Animation Assist feature in Procreate, which gives me a number of animation tools. This toolbar allows me to easily add and rearrange frames — and even set up onion skins. If you’re new to the world of frame-by-frame animation, onion skins give you a quick reference for adjacent frames. I can control both the opacity and number of onion skin frames.
To get my animation going, I’ll click the Add New frame button and quickly trace the original fox image. I don’t have to be exact, as I want to have some nice movement in my line boil. Naturally, the more precise I am with my traces, the less movement I’ll see in my final animation. I’ll create three frames of traces, giving me a total of four frames.

Select Add Frame to retrace your image.
To preview my animation, I’ll press the Play button on the toolbar. In the Settings option, I can control the frames per second as the animation plays back. This is a good way to find a look I’m happy with, which for this project is 8fps.
Step 3 — Export/Finish in After Effects
I can export the animation directly from Procreate in several different formats, including an animated GIF, animated MP4, animated PNG, and several other options. Let’s say, however, that I want to bring this into Adobe After Effects to incorporate it into another project. For this, I’ll export the layers, individually, as PNG images.

To incorporate your image into another project, export the layers into Adobe After Effects.
To bring these images into Adobe After Effects, I’ll select the first image, then specify import the layers as a PNG sequence. Adobe AE will automatically set the frame rate of the clip, based on the default settings of my project. To change this, I’ll right-click the clip in the project panel and select Interpret Footage > Main, and then manually set the frame rate to 8fps.

Select Interpret Footage > Main to manually change the frame rate.
Once I bring this clip into a sequence, I’ll still need to set it to loop. First, I’ll right-click the clip and select Time > Enable Time Remapping. A quick Alt+click on the Time Remapping attribute will add an expression to the parameter. Now, I’ll open up the expression language menu and select Property > loopOut. With my loop now applied, I’ll simply expand my clip out to play for the entire sequence.

After bringing the clip into a sequence, you’ll then set it to loop.

Here’s your finished product.
Voilà, the fox animation is complete. Just remember to focus on the technique, and not the tools. Creating a line boil is as simple as creating an illustration, then tracing it several times. This method works great on both illustrations and text elements, so be sure to experiment with it on your next project.
Interested in the tracks we used to make this video?
- “Arty Party” by Porter Productions
- “Head for the Hills” by Jack Pierce
Looking for more on motion graphics and animation? Check out these articles.


