
How to Create Text Effects and Animations in Premiere Pro

When you’re getting into text effects and animations, workspace is important. Master your motion graphics workflow in Adobe Premiere Pro with these tips.
In 2017, Adobe added the Essential Graphics panel to Premiere Pro. This gave users a vastly different workflow from the previous handful of title panels. Now, everything is in one panel where you can design, animate, and apply presets with ease. Let’s have a closer look.
Creating Text Animations from Scratch
To show you around the Essential Graphics panel, I’ll give you a step-by-step look at how to recreate this motion graphic from scratch.

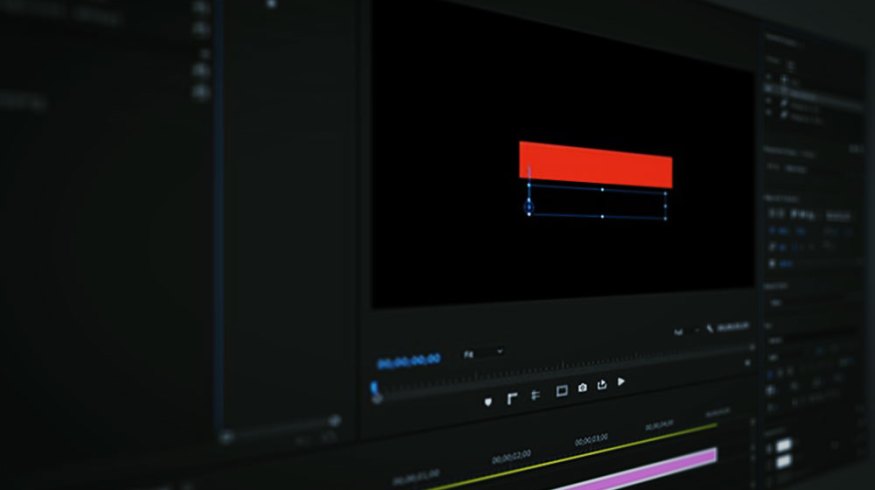
This particular graphic will consist of four elements — a line of text, two colored rectangles, and a mask. The background rectangles and the text will animate on, with each element slightly offset in time.
Step 1 — Add Text
First, I’ll go to Window > Essential Graphics. I’ll create my title using the Text Tool (T). Once typed out, I’ll have a new text layer in the panel under the Edit tab. To view all of the corresponding properties and tools, I’ll simply select the Text layer.

To center my text, I’ll use the tools in the Align and Transform section. I can change the font and style in the Text section. Under Appearance, I can adjust the color, add a responsive background, drop shadow, and even multiple strokes.
Step 2 — Create a Background
For the background elements, I’ll create two new Rectangle layers. The New Layer button is located at the top of the panel, just next to the existing layers. I’ll make these slightly large, as I’ll be adding a mask to crop everything. I’ll change the color of each shape via the Fill in the Appearance section, making one white and one red. Finally, I’ll rearrange the layers, placing the white background at the bottom, the red above it, and the text at the top.

Step 3 — Mask the Graphic
One of the latest features in the Essential Graphics panel is masking. To add a mask, I’ll first add a new rectangle shape layer. After I adjust the size and position, I’ll select the Mask with Shape option in the Appearance section. The mask will apply to any layers beneath it, so I’ll need to position my layers accordingly. If I’m working on a complex project, I can also group the layers.

Next, let’s animate these elements.
Step 4 — Animate Text and Backgrounds
With all of the assets in place, I’m now ready to bring the title to life. As you can see in the animation, both the text and the backgrounds animate in via a simple Y Position shift.
I want my animation to take place over the course of the first two seconds. The white background will appear first, followed soon after by the red, then finally the text element. Let’s begin by animating the text layer.
To animate the Y Position, I’ll first move my Playhead to the two-second mark, where I want the animation to end. Next, I’ll select the Text layer, then press the Position symbol in the Align and Transform section. This will toggle animation on for the attribute, adding a keyframe at the current time indicator’s location. I can tell animation is toggled on because the symbol will turn blue.

Now, I’ll drag the Playhead to the one-second mark and adjust the Y attribute to place the text in its start position. As I change the attribute, a keyframe will automatically add to the location. Next, I’ll animate both background rectangles using the same steps, offsetting the time of each asset.

Step 5 — Fine-Tune the Text Effects
I can further fine-tune the timing of the animation by slightly adjusting each keyframe in the Effect Controls panel.
To view the keyframes of my animation, I’ll go to Window > Effect Controls. With this panel, I can see all of the effects I adjusted via the Essential Graphics panel. Clicking on a graphic layer in the Essential Graphics panel will immediately reflect and highlight in the Effect Controls panel, and vice versa.

To smooth the animation out for each element, I’ll add an Ease Out to all of the first keyframes and an Ease In on all of the last keyframes. You can find Easing via a simple right- or control-click on a keyframe, under Temporal Interpolation.
I can further finesse the timing of each animation by adjusting the Speed Curve. To access the curve, select the dropdown arrow to the left of the Position attribute. Manipulate each keyframe via a Bézier handle.

Voilà, my animated title is ready to go.
Using Motion Graphics Templates
If you’d like to seriously streamline your workflow, you’ll want to tap into the power of MOGRT files. MOGRT stands for Motion Graphics Template, and you create them in Adobe After Effects. What’s great, however, is that you don’t even have to open up After Effects to use them.
To get started using MOGRTs, download our free pack of twenty-one MOGRTs here. You can get up and running using them in just three simple steps:
Step 1 — Install the Fonts
We designed these templates with specific font families in mind, all of which are in the pack. Be sure to install them prior to using the MOGRTs.
Step 2 — Install the MOGRT Files
To install, navigate to the Browse tab of the Essential Graphics panel. Click on the button at the bottom right-hand corner of the panel.

Step 3 — Customize
The beauty of MOGRTs is the ease of use. Not only will you save time when creating your graphic, but you’ll also have a very intuitive interface — much nicer than the default tools in Premiere’s Essential Graphics panel. Check out this graphic from our free pack, and compare this editing layout to the cluttered mess of the default tools. Once again, these are custom layouts in Adobe After Effects, specifically designed for use in Premiere Pro.


With MOGRTs, it’s as simple as drag, drop, and customize. What’re you waiting for? Download the pack now and go make something.
Interested in pre-built animated titles? Check out our recent freebie below.
10 Free Textured Title Animations
In this pack you’ll find ten animated titles that are each their own unique fonts. However, you have the ability to fully customize each title in the Essential Graphics Panel. You can remove the backgrounds, or tweak the amount of texture applied to the text, making them cleaner or dirtier, whichever fits your project more accurately.
NOTE: To use these transitions, you must have the most recent versions of BOTH Premiere and After Effects installed. They will not work without After Effects installed.
DOWNLOAD HERE
Looking for more Premiere Pro tips and tricks? Check out these articles.
- 7 Essential Tips and Tricks for Mastering Adobe Premiere Pro
- NLE Showdown: DaVinci Resolve vs. Adobe Premiere Pro — Text Effects
- NLE Showdown: DaVinci Resolve vs. Adobe Premiere Pro — Processing Power
- NLE Showdown: DaVinci Resolve vs. Adobe Premiere Pro — The Cost
- Creating Beautiful Slow Motion in Adobe Premiere Pro


