

Mask vs Shape Layers in After Effects

The Rectangle and Pen Tool can create both masks and shape layers in Adobe After Effects. In this post we break down the basics to get the most out of these tools.

When creating mask or shape layers in After Effects the most important thing to remember is this:
If a layer is not selected, you are creating a shape layer.
You create masks or shape layers in After Effects by drawing with the Shape Tool or the Pen Tool:
- Shape tool shortcut is Q
- Pen Tool shortcut is G
The reason the Shape and Pen tools do double duty is that shape layers were added to After Effects in CS3. Think of them as a mini Adobe Illustrator inside of After Effects. They are vector shapes that you can animate to create lower thirds, animated paths and backgrounds.
I have a video on using masks here that’s worth checking out if you’re new to AE. Shape Layers can be a pretty deep subject. I suggest checking out these video tutorials from Evan Abrams here and here.
As always, check the Adobe Help for details and other helpful resources. Now let’s get into creating mask and shape layers…
Creating a Mask (layer is selected before drawing):

Creating a Shape Layer (layer is not selected before drawing):
Quick tip: If you see Fill and Stroke in the Tools panel, this tells you will draw a shape and not a mask:
Drawing with the Shape Tool in After Effects
To create a mask or shape, click on the Shape Tool (default is a rectangle). You can switch between the Tool options by using the shortcut Q. Click and drag in the Composition to draw a mask or shape. To move the shape before you let go of the mask, hold the space bar.
Be aware that if you click and draw again, you are creating another mask or shape layer.

Drawing with the Pen Tool in After Effects
Click to create a point. If you click and drag, you create a point with bezier handles. To create a closed mask or shape, click back on the first point (you will see the pen icon with a circle beside it).
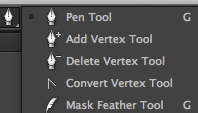
You have options under the Pen Tool to add, delete, convert vertex (toggles between straight and bezier) and mask feather (this doesn’t work on shape layers):
If you check the RotoBezier box, then every time you click you get a curved path:
Mask & Shape layers drawn with RotoBezier checked:

Mask Modes in After Effects
When you draw a mask, the default mode is Add. If you draw multiple masks, they will add together. You can change the Mask mode to get different behaviors. There are 7 choices, with the most common ones I use being None, Add, Subtract and Intersect. None is helpful when you want to temporarily hide a mask. In my screenshots, I illustrate Add and Subtract mode.
To prevent your masks from being the same color, go to Preferences > Appearance and check “cycle mask colors”.
Masks in Add Mode:

Mask 2 in Subtract Mode:

Modifying a Mask in After Effects
With the layer selected, click on a point of the mask to move that point (make sure you are using the Selection Tool, shortcut is V). With the mask selected, click on a point to move the mask.
Double click on the mask in the Composition (or use the shortcut Command + T on Mac or Control + T on PC). With the mask selected in the Timeline you’re in Free Transform mode. Here you can move the mask, change its size and rotate it. Click Return to get out of Free Transform.
To keyframe a Mask, click the stopwatch on the layer for the Mask Shape. Move the CTI (current time indicator) and modify the mask (I tend to use Free Transform).

Modifying a Shape in After Effects
When you a draw a shape, it creates a Contents dropdown. Inside of this is the Shape, and inside of that is the Path, Stroke and Fill.

You can change the Fill and Stroke of the shape layer from the Tools panel, and then adjust those settings by clicking their twirlies in the Timeline.

With the Shape Layer selected, click inside the Shape to move it. With the Path selected, click on a point to change the shape of the Shape Layer.
You have an “Add” pulldown for Shape Layers, similar to what you have for Text Animators. A simple example of using “Add” would be to draw a rectangle. Then go to the “Add” pulldown and select Rectangle. This will cut a whole in the first rectangle.

Download Shape Layer Presets for After Effects
There are additional free shape layer presets you can download from Adobe Exchange. Presets are either still or animated. These are a great starting point for those new to Shape Layers. You can analyze the prebuilt presets and breakdown how they were built.

Additional Presets viewed in Adobe Bridge:

Toggle Mask and Shape Path Visibility
When working with Masks and Shape Layers I often find it easier to hide the outlines. You can either click the icon in the Composition or use a shortcut: Cmd + Shift + H on a Mac or Control+ Shift + H on a PC.


