

Things to Check When Adobe Premiere Pro Is Lagging

In this step-by-step breakdown, we’ll look at ways to push through your edit when it feels like Premiere Pro is pushing back.
Laggy playback is a pretty—let’s go with not uncommon—complaint from Premiere Pro users. Because our team feels your pain, we took a deep-dive into Adobe’s Premiere Pro troubleshooting pages and community forums to compile a list of solutions to try out when Premiere Pro feels like it’s lagging.
Going into this, it’s important to remain realistic about your computer’s hardware and specs. (Especially when it comes to editing 4K video or videos with lots of comps or effects added in.) Also, let’s go ahead and get this little nugget of advice out of the way: Don’t update Premiere while you’re in the middle of an edit. That might seem obvious, but it’s just so easy to impulsively check for and begin an update when things get laggy. We’ve all done it. But, seriously, don’t do it.
Now, here’s a solid list of optimized settings and workflow tips to consider when Premiere Pro starts dragging you down.
Quickest Solutions for the Most Improvement
If you’re in a hurry to find out why Premiere Pro is running slow, these four solutions typically offer the most dramatic speed improvement.
1. Turn on GPU Acceleration

Under Project Settings, make sure the Renderer is set to GPU Acceleration. If the GPU Acceleration option is grayed out, you may need to update your graphics card drivers. If you update them, and the option is still grayed out, Premiere Pro may not support your graphics card.
Adobe has listed Premiere’s system requirements on their site.
2. Lower Playback Resolution

This one seems pretty obvious, but it’ll make a drastic difference if you lower the playback resolution. Adjust the setting to 1/2 or 1/4 in the bottom-right corner of the Preview Window. Usually, I’ll do this when I need a refresher for what the project is actually looking like. I’ll just change it back to Full. That probably sounds weird, but sometimes it gives me some perspective. For the most part, I rarely edit with the playback on “Full.”
You can also make sure High-Quality Playback is disabled. Click on the Wrench icon right next to the Resolution setting, then make sure High-Quality Playback is unchecked.
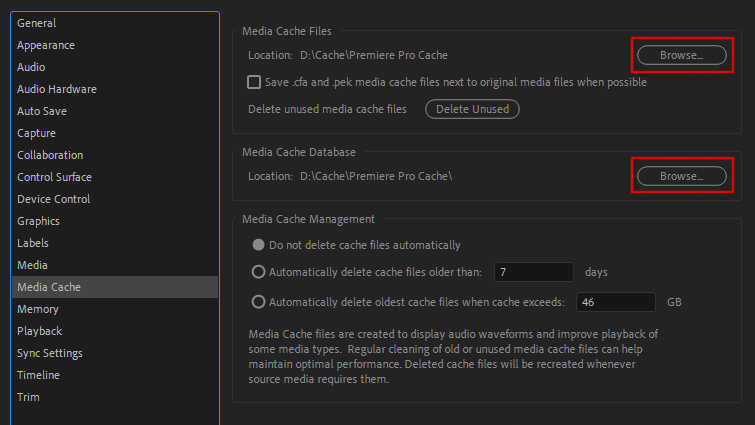
3. Purge Media Cache Files

Sometimes, old cache files can be the culprit. Navigate to Media Cache in Preferences. Then, select Delete Unused.
4. Save Cache Files to a Secondary SSD
Finally, it’s also recommended to save your media cache files and scratch disk files to a secondary drive—preferably an internal SSD—for the best playback performance. In fact, Puget Systems claims this is the number one thing you can do to increase performance with Premiere Pro.
If you have to use an external SSD, make sure it’s rated for USB 3.0 and you have it plugged into a USB 3.0 port. (USB 3.0 is usually indicated with the color blue on the port or connector.) And, just FYI, USB 3.0 has a fast transfer speed and is meant for efficiency. If you’re editing with an external SSD, you’ll need to use this.
To change the cache file location, navigate to Media Cache in Preferences.
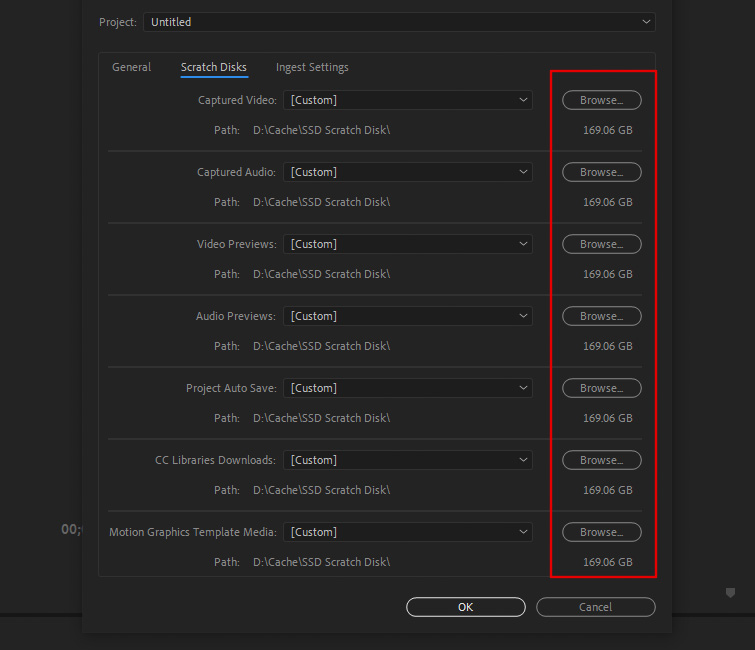
To change the scratch disk file location, navigate to Scratch Disks under Project Settings. (Note that you’ll need to set the Scratch Disks settings for every new project you work on. Premiere Pro doesn’t save that Project Setting location as it does for Media Cache files.) But, like any project, just plan accordingly based on the size and scope of the edit you’re about to tackle.
Settings to Check
Here’s a list of other settings you may want to change in Premiere Pro for faster playback. Experiment with these, as results will vary depending on your workstation.
Optimize Rendering for Performance
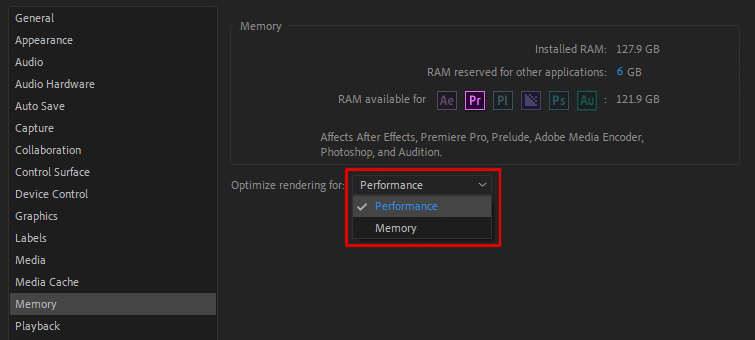
Under Preferences, navigate to Memory and set Optimize Rendering for Performance.
Disable Auto Save

Frequent Auto Saves can sometimes slow down your machine. (Anyone else feel like Auto Save crashes their Adobe apps more than it actually saves them? Either way, try this recommendation at your own risk!) Navigate to Auto Save under Preferences to turn it off.
With this accomplished, just to be safe, set a reminder on your phone to manually save the project, or set an alarm for every 5-10 minutes. Then, just keep hitting snooze so it repeats the alert reminding you to save. This type of madness is why video editors are another breed of person. Take pride in your weirdness, weirdo.
Disable Mercury Transmit
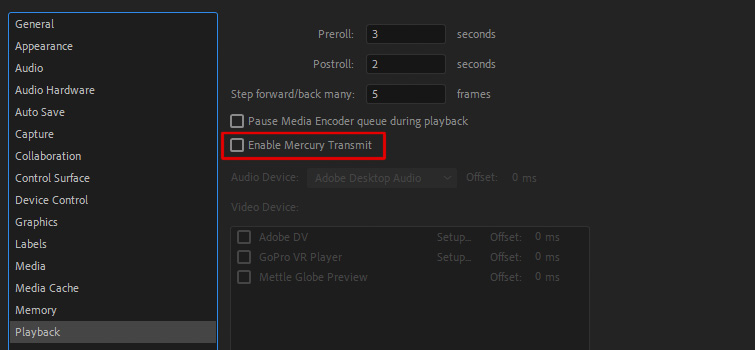
Mercury Transmit is typically used to send your Preview window to external screens. If you aren’t using one, turn this feature off. Navigate to Playback under Preferences to disable it.
Disable Refresh Growing Files

Automatically Refresh Growing Files is a setting typically used for live broadcast productions. Some Premiere Pro users have reported getting better performance with it turned off. To disable it, navigate to Media under Preferences.
Check for Updates

If your current version of Premiere Pro suddenly becomes laggy, check for updates for both your operating system and graphics card. Doing this has frequently helped solve issues for me as, more often than not, there’s an update available.
Again, if you’re in the middle of a project and everything is working normal, don’t update anything! You’ve now been warned you twice about this. Don’t do it!
Workflow Tips
Here’s a list of practices you can use to optimize your workflow (and, hopefully, increase preview speed).
Don’t Edit Files on a Memory Card
Even though memory cards are flash memory, they’re not ideal for direct editing. In other words, offload files from your memory card to a separate drive, then edit with those files in Premiere Pro.
Sometimes, it’s easy to get carried away and dump the footage right away, as you’re wanting to get right to the edit. But, for your own sanity, move them over to a separate drive, be it external or internal.
Use Proxy Files
Using proxy files when you edit is another technique that’s sure to get you better playback in Premiere Pro. Using proxy files is basically substituting a lower-resolution version of your footage in while you edit. It’ll then switch back to your high-resolution footage when it’s time to render. (In this quick-tip article, Robbie Janney explains the steps for creating proxies in Premiere Pro.)
Avoid Editing Files with Compressed Codecs
While compressed codecs are nice for recording or uploading, they aren’t ideal for editing. Compressed codecs, such as H.264, take more time to decompress while editing, so they frequently have laggy playback. Codecs like ProRes, Cineform, and DNxHD are more ideal for editing. Again, an easy way to get around this is to just use proxy files.
Render Dynamic Linked Comps

If you have any portion of your video timeline linked to After Effects or another Adobe CC app, you can quickly render and replace those for faster playback. Simply right-click on the Dynamic Linked sections of your edit, then select Render and Replace.

This tip can kind of help incrementally. So, if you have a couple After Effect comps placed in your timeline, render as you work through it. Hopefully, this will gradually speed up playback.
Turn off Video Effects

Multiple video effects can put a heavy strain on previews, as well. You can try turning off individual effects before you preview, or use the Global FX Mute button to turn off all effects.
If you don’t see the Global FX Mute button in your Preview window, you can add it by selecting the Plus icon, then drag-and-drop it into the Preview window tool bar.
Close Lumetri Scopes

If you have the Lumetri Scopes panel open, close it up before trying to play back your footage in the timeline. It might seem like a silly way to smooth things out, but it’s definitely worked for me a time or two. In fact, I’ve “closed out” pretty much every combination of every unnecessary tool you can think of while editing, and it almost always helps, even if only a little bit.
In the same vein, you might even consider waiting until the end to grade your footage, as these clips can prove to be a major contributing factor to Premiere Pro’s lagginess.
Render In to Out
If all else fails, you may just have to set an in-point and an out-point, and select Render In and Out under Sequence settings. Yes, it’ll take some time to render previews of the footage in your timeline. But, once it’s done, it should play back in real time (until other changes are made to the edit).
In the video above, the great Peter McKinnon covers a lot of the stuff we’ve touched on in this list. Give it a watch to see what the steps actually look like.
Dropped Frame Indicator

Premiere Pro also has a built-in Dropped Frame Indicator that can signal to you if you’re skipping frames during playback. (You’ll likely already be aware of this issue if you see visible lag during playback.)
Click the wrench icon at the bottom-right of the Preview window, then select Show Dropped Frame Indicator. You’ll see a small green dot that’ll turn yellow or red if there are dropped frames during playback.
Close out Other Adobe Applications
This might seem like an obvious (or possibly ridiculous) point, but hear me out. In my experience, having Lightroom open in the background has caused Premiere to run slowly before. As such, I try to make sure Lightroom and Photoshop are closed before I start editing. Obviously, you’ll need After Effects open, which is fine. Ultimately, just be aware of anything that might start sucking away at your machine’s resources when you need them most.
Also, seriously, don’t update anything in the middle of an edit.
Want a few more Premiere Pro tips, tricks, and tutorials? Well, here you go:
- New Premiere Pro Public Beta: Adobe Reimages Import/Export Workflows
- An In-Depth Look at the Adobe Premiere Pro Editing Tools
- 2021’s Top 10 Premiere Pro Video Tutorials
- Why Premiere Pro Is Crashing and How to Make it Stop
- Tips for Working with Photos in Adobe Premiere Pro
Cover image via insta_photos.


