

Quick Tip: Saving Stills in After Effects
If you’re trying to quickly save a still, or maybe you’re just curious about how this process is done, follow these quick tips.
From pre-visualization to concept mock-ups, there are many reasons why you may want to save a still image out of After Effects. So, if this is an issue you’re trying to conquer, we’ve got you covered.
Follow these tips below as we walk you through four quick steps:
Let’s get started.
How to Save Stills in After Effects Step-by-Step
Step 1: Select Your Frame
With your composition selected, move the Current Time Indicator to the frame you want to export.

Step 2: Save Frame As
Images (JPEG, PNG, TIFF, Etc.): Navigate to Composition > Save Frame As > File.
If you want to save your still frame in a standard image format. You may see the popup window open when you click this, click Save and move on to the next steps.
Your frame will now be added to the Render Queue.

Photoshop (PSD): If you want to save a Photoshop document, navigate to Composition > Save Frame As > Photoshop Layers. Just follow the prompts and hit Save.
ProEXR: For OpenEXR file format, navigate to Composition > Save Frame As > ProEXR.
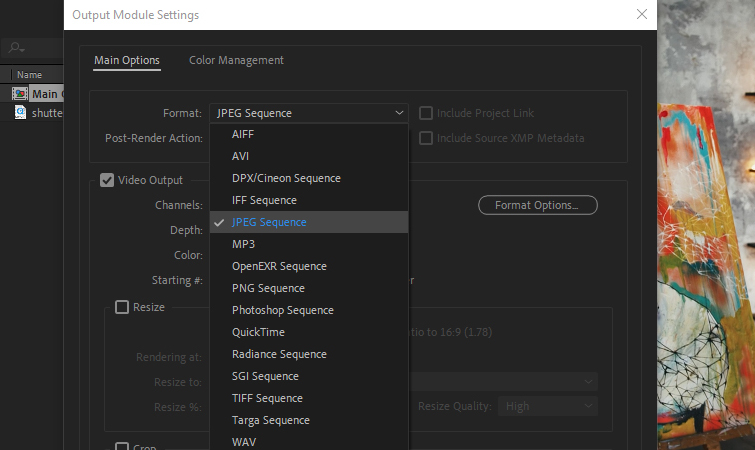
Step 3: Select Image Settings
You’ll now see that your still frame has been automatically added to the Render Queue. Click the blue text next to the Output Module. It will probably say Photoshop or Lossless by default.

Change the format from Photoshop Sequence to your desired image settings in the popup window. We’ll export a JPEG for our still image, therefore, we’ll select JPEG Sequence. Then click OK.
When you choose Sequence JPEG, the JPEG Options window might open up. Set the Quality to 10 and click OK.
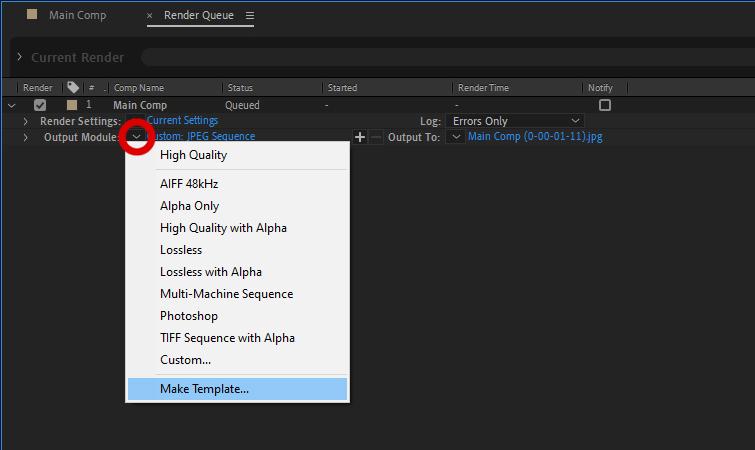
If you anticipate that you’ll need to save a lot of still images, go ahead and make an Output Module Template, so you can quickly select your image settings in the future.
To do this, hit the drop-down arrow next to Output Module and select Make Template. You can now name the template, such as “JPEG Still Image,” and click OK.
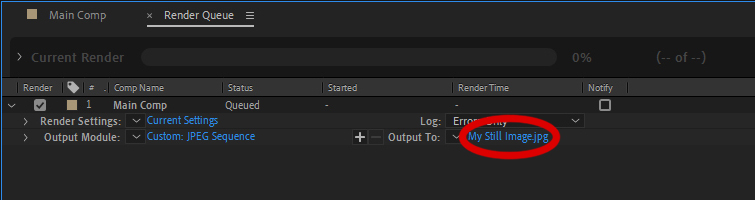
The final step is to name your still image. Click the blue text next to Output To. You can now type a name for your still image and select where you want the file to be saved on your computer.
When you’re done, click Save.
Step 4: Export
With all of your image settings adjusted, you have to click the Render button now. (You’ll notice the Current Render Progress Bar flash blue, indicating that the image has been exported.)
You should now see your still image in the Save location you selected in the previous step!

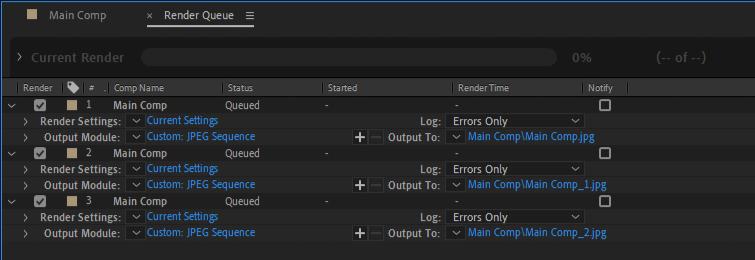
If you need to export multiple still images from the same project, you can repeat the process (steps 1 – 3) and add them all to the Render Queue. Then you can Render them all at once to save time.
And that’s it! You’ve successfully saved your stills in After Effects.
Don’t stop there. Check out a few of our other inspiring articles:


