

A Focus on Resolve 17’s New Masking Tool: Magic Mask

DaVinci Resolve adds an Adobe-like masking feature that’s just made isolation grading extremely easy: Magic Mask.
Well before Resolve had become a competitor to Premiere Pro for its editing capabilities, it was (and still is) a world-class color grading software. Likewise, its tracking features have always been outstanding, if not one of the best. However, with the introduction of the Resolve 17 beta, they’ve now included a new tool that improves the capability of the tracking, making it incredibly easy. It’s called Magic Mask. Let’s take a look at how it works.
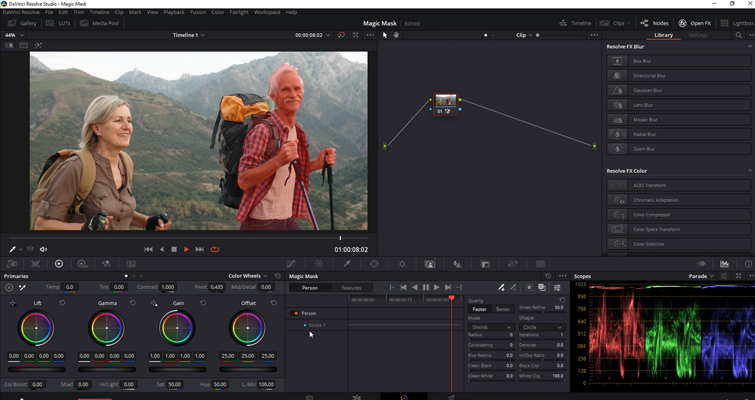
Person Strokes
With the neural engine, we’ve seen several new features added to Resolve over the past year. The latest such feature is the Magic Mask. This new tool allows you to isolate one or more people within your composition by applying nothing more than paint strokes to the person. With the Magic Mask, you can either generate a mask for the entire person or switch the operation to focus on a specific feature—from the arms to the person’s shoes. And, yes, this does suggest that this Magic Mask is to be used on humans only. So, it’s already slightly different between using the HSL qualifier to isolate the color of a car.
Creating a Magic Mask
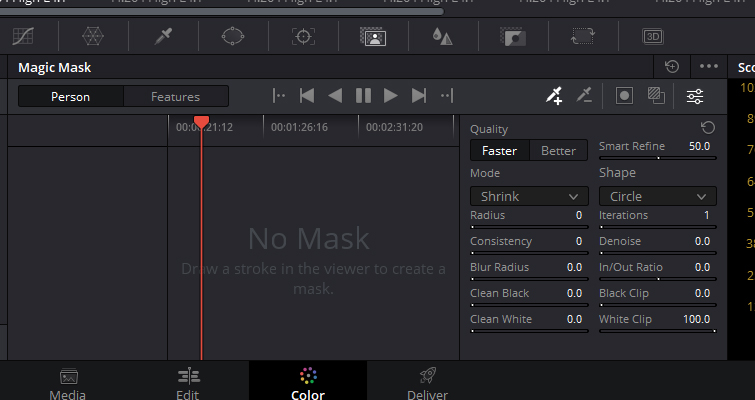
So, let’s have a look at how you use this tool. On the color page, you’re going to find a new icon titled Magic Mask. When you click that, you’ll see this new panel. It’s divided into three areas: the Toolbar, the Stroke list, and the Mask Finesse panel.
Ultimately, there’s nothing wholly new about this area as it’s remarkably similar to other elements within Resolve. The Mask Finesse panel, for example, has near enough all the same settings you’ll have for HSL qualifications and power windows. So, there’s not really any additional learning needed—to some extent.
To apply a Magic Mask to a person, you simply add a stroke to the person you want to mask. Now, you might think that it’d be beneficial to apply a really long stroke, so the software is registering more of the person, right? Well, as noted in the reference manual, very long paint strokes aren’t usually that useful and can be counterproductive later on when you’re trying to track strokes to follow motion in the clip. This is particularly true if a stroke needs to follow something changing shape as it moves, like an arm. While you can make as many strokes as you like, fewer strokes actually work better.

With the stroke added, I recommend turning on the mask overlay to see where you stand with the mask. In general, I think it’s going to do a solid job from the base stroke.
Using the Finesse Tools
However, if needed, we have the finesse tools to refine your mask. As I previously stated, you can ind many of the finesse tools elsewhere in Resolve, so I won’t repeat basic information on these settings. But, if you’re entirely new to Resolve and find yourself watching this video, I will say (for the most part), you’re going to want to be dealing with the denoise, the clean black and white, blur radius, and of course, the radius of the mask itself, which can be controlled by the radius slider. You will control the radius through this dropbox to either expand or decrease the mask.
Apply Tracking
Finally, we need to apply the tracking because the subject and the camera is moving and, as with the power windows, it’s the same method by simply hitting play.
Once we’ve applied the tracking, we can make one final pass over the mask to see if we need to refine the selection. Then we can make our grade adjustment.
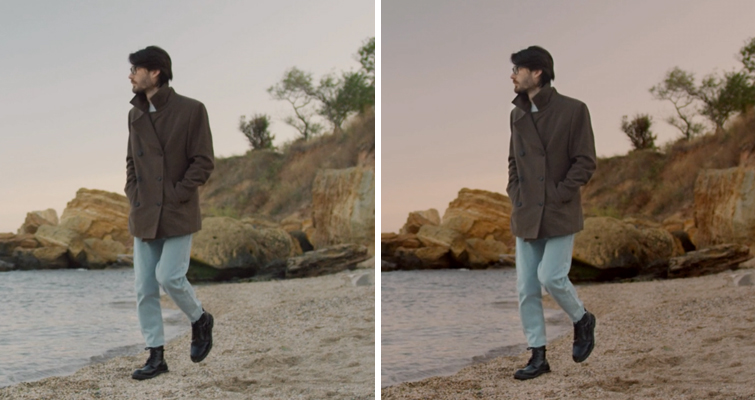
For the likes of using the Magic Mask to mask out an entire person, it’s useful for a general offset adjustment to either bring the subject out of the scene, or perhaps to give them an overall creative color cast.
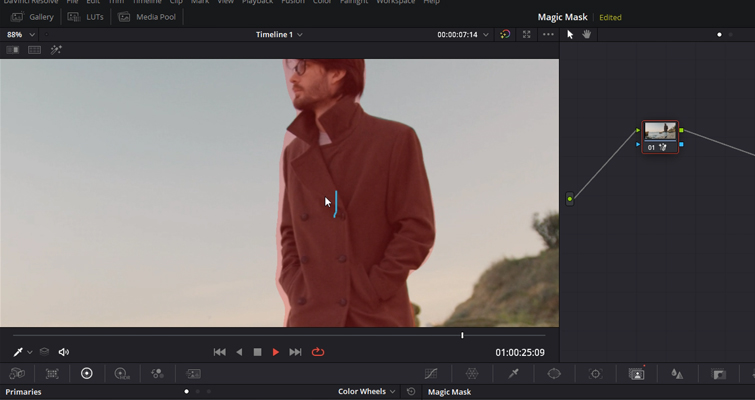
Suppose you find that there’s a section that’s being masked and you don’t need it masked. In that case, you can also paint a subtractive stroke (colored red) over parts of the image that isn’t the person, or feature you’re isolating, to correct any problems you see in the generated mask. But remember, you’ll need to track this again.
Additionally, if you feel like it’s not correctly picking up (for example) an arm when the character moves, you can add a stroke. But, again, I suggest not using too many strokes. Not only is it going to slow your system down, it’ll likely confuse the software. Therefore, I advise using around four max, if needed.
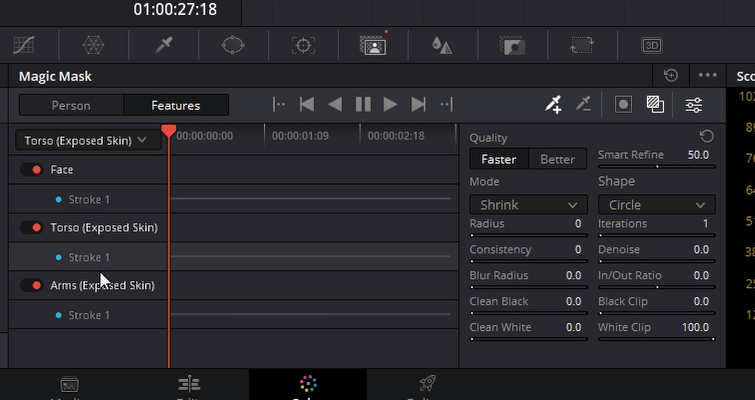
Feature Strokes
We can also add feature strokes for more refined mask choices. This is particularly useful for skin tone adjustments and more specified corrections to individual body parts.
To do this, we simply swap over to the Features tab, then select the appropriate feature. In our case, we’re going to select a face, then add another feature for exposed arms. Every time you add a new feature, it adds a layer in the Magic Mask panel. You can turn these off or outright delete them.
This follows the same general principles as the person mask. First use the finesse tools to refine the mask selection. Next, use the subtractive stroke if the mask highlights an area that you don’t need, and then track forward.

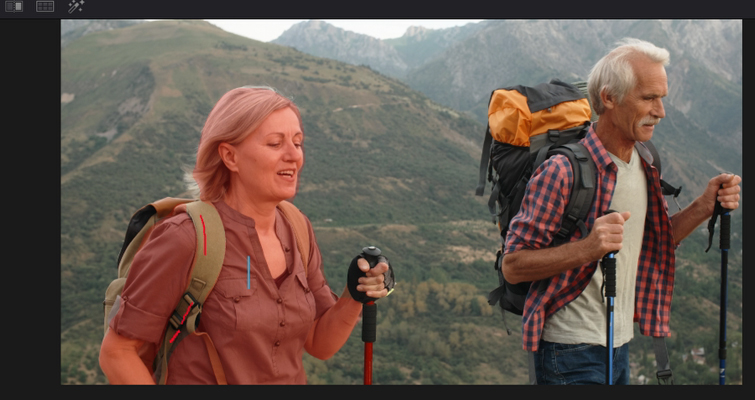
In this particular shot, we have two people with similar skin tone values. Typically we’d have to pull a skin tone qualification, then mask out the woman to isolate her. Of course, the qualification isn’t just one step. So maybe that’s a few minutes of work, then the mask is an additional step. The Magic Mask quashes that process into a simple tool.
Due to the neural engine, the Magic Mask is perfect to analyze and correctly isolate human features against backgrounds that have similar elements, whereas this would be difficult to separate using the qualifier. However, it doesn’t mean that this is the tool to replace the qualifier and power windows. The Magic Mask doesn’t have soft translucent mask edges and, depending on the complexity of the movement and detail of the shot, it may not be precise enough to replicate that of intensive rotoscoping.
However, for what it is, the Magic Mask is about to make a number of isolation grades incredibly easy to perform.
As a side note, I noticed that my computer’s performance became sluggish after applying the Magic Mask. Usually I can play graded 4K files with no issues, but with the Magic Mask active on a node, I could only obtain 10-15fps. Whether this is because the tool relies on the processing from the neural engine or because R17 is still in beta and this feature is not yet fully developed is a mystery to me (at the moment). However, as always, we’ll keep you updated with any new advancements.
For more on DaVinci Resolve, check out the articles below:


