

Variable Speed Changes in DaVinci Resolve 10 Lite

Create or modify variable speed slow motion with the new features in Resolve 10 Lite. The ability to import speed changes or create them in Resolve is a big deal for video editors.

In this quick tutorial I assume a basic knowledge of Resolve 10 Lite. If you’re just starting out, I suggest reading “Getting Started” in the Resolve 10 Lite manual. We also have many DaVinci Resolve blog posts to get you up to speed here.
Working with Variable Speed in Resolve 10 is fairly intuitive if you have worked with Variable Speed in NLE’s. Note: Resolve’s terminology for variable speed is “nonlinear speed ramp”. In fact it is very similar to working with variable speed in FCP X with the Range Selection tool.
The fact you have this kind of power in a free app is kinda mind-blowing. This is an exciting time for those of us who wear a lot of hats and work with a variety of post production apps on a daily basis.
Importing Speed changes via XML
You can import speed changes into Resolve Lite via XML.
Im my example I created Variable Speed changes (retiming) in FCP X, then exported that as an XML. First, create a new Resolve Project, and then import the XML (File > Import AFF, EDL, XML). Then, click on the Edit page to see the Timeline.
Clip in Resolve’s Edit page (click image for larger view):

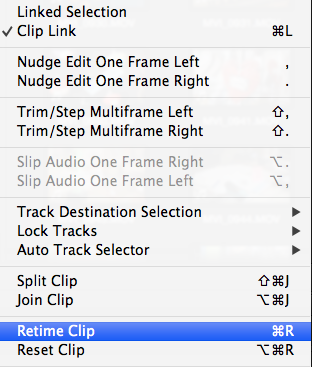
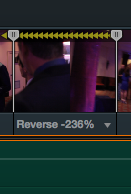
Select your clip and press Cmd + R (Control on PC) to “Retime Clip”. This shows you the speed changes that were applied in FCPX. The variable speed segments show yellow arrows, and the freeze frame as red bars. Notice the closer the arrows are to each other, the faster the clip is. The further apart the arrows, the slower the clip.
View after adding Retime Clip (click image for larger view):

Notice that “Speed Point” handles were added between each clip. Dragging on a Speed Point” will change the speed for that segment, with the change rippling through to the other clips (just like a ripple edit in an NLE). Now that we can see our speed segments, lets make some changes.
Speed Change Options
These speed change options work on imported XML or clips added into Resolve. This is helpful in situations where you may have not originally planned to use slow motion.
Click on the pulldown (down facing triangle) on a speed segment to reveal the speed options.
Select “Change Speed” to change the speed for that segment. You have speed options from 10 to 800 percent. “Reset to 100” sets the speed to normal speed and the arrows change to blue.
Speed Pulldown highlighted in red:

“Reverse Segment’ will play the segment in Reverse. The arrows will now be facing left and the speed has a negative number in front of it.
Add additional segments by positioning your playhead in the desired location, and then clicking “Add Speed Point” from the pulldown. You can also clear added speed points with “Clear Speed Point”.

Similarly, “Add Freeze Frame” will add a freeze-frame at the playhead.
“Rewind” adds 2 segments: a reverse speed that you specify and the previous speed. In my example that gives us a 25% segment, a reverse -50% segment and another 25% segment.

Be careful with “Speed Ramp”. This will remove any current segments and replace them with ramp up or ramp down segments. I would use this where I had a clip that was normal speed and I wanted to create a speed ramp.

“Reset Clip” will remove any segments, giving you a clip at 100 % with blue arrows.

Smoothing Speed Changes
Resolve 10 Lite can give you smooth speed changes by using Optical Flow. Optical Flow is available in motion graphics apps like After Effects & Motion. It is not available in all NLE’s, as most of them offer Frame Blending, which doesn’t look as smooth or natural.
To get to the “Retime & Scaling” options for a clip, click on the “Effect Inspector” icon on the “Edit Page”. This sets the rtetiming options on a clip basis.
Change the settings for “Retime Process” from Project to Optical Flow.
Effect Inspector highlighted in red:


To change the frame interpolation settings for the project, click on the gear icon. Set “Retime Process” to Optical Flow.


Here is a demo on Vimeo of the Optical Flow compared to an original speed clip and frame blending (from Walk/Humbly Films):


