How to Properly Film Windows for Daytime Interior Scenes
Balancing windows in interior locations can be extremely difficult. Here’s how to get the right exposure by adding or reducing light.
Shooting indoors? Capturing windows (and what’s beyond) can add depth to your scene, but the difference in interior and exterior exposure levels can also ruin a shot entirely. Here’s what you need to know.
Nothing sells the realism of a daytime interior more than being able to see out of a window. This is a challenge as far as cinematography goes because it’s extremely rare that the interior’s exposure levels match exterior ones.
Once you expose for the typical interior, the outside will be “hot” or overexposed. This is something many cinematographers try to avoid because blown-out highlights are one of the key differences between film and digital — and they immediately kill the cinematic look.
The easiest way to achieve this is to wait until the right time of day when the sun is either rising or setting. The downside of this is that this level will only last for several minutes, and if you want to shoot for longer than that, you will need to find a different solution.
Another way of bridging the gap between exposure is to increase the levels inside until they match those outside. This requires bigger, more-powerful lights, which increases production costs. But the larger downside is that it causes your talent to squint and affects performance. It’s even worse if you’re shooting an interview, unless you want your subject to look pained and uncomfortable.
Neutral Density to the Rescue
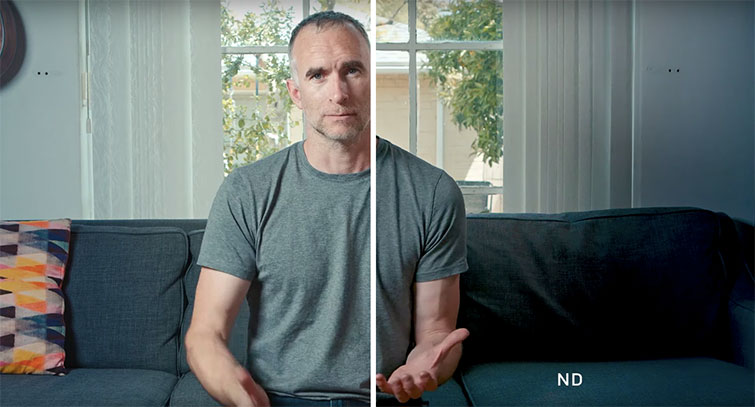
A third, and perhaps the most widely used solution, is to add neutral density to the windows. This comes in 48- or 60-inch wide rolls, and is available in .3, .6, and .9 strengths, which represent 1, 2, and 3 stops of light loss.
You can hang these outside the window on a C-stand, or if it’s windy, you can apply them directly to the window with water or adhesive. This takes time, but nothing else will allow you to match exposure inside and outside as easily.

The rolls aren’t cheap — at around $100 for 25″ — but you can also buy a DIY alternative from a hardware store. The downside is that they’re not as color neutral and may tint the light coming from the window.
Make the Outside Disappear
If you want a window in your shot, but don’t want to see what’s outside, you can swap the neutral ND for some diffusion, like grid cloth or Soft Frost. This will cause the window to blow out completely, creating a nice even light from outside.
Depending on the window’s position relative to the sun, the diffusion may or may not help illuminate your scene. If this is something you want to take advantage of, you can add your own source of illumination, like a daylight-balanced HMI or LED fresnel. This will also allow maintain the same effect inside the location after the sun has gone down.

Illuminated diffusion on the outside of the windows is a beautiful effect, and you can see it in many scenes when the filmmakers are trying to keep the focus on what’s happening inside the room, rather than on the character’s connection to the world outside. Lincoln used this technique in the majority of its locations, as did the recent Greig Fraser-lensed Vice.
By adding or reducing light from windows, you’ll have more control over your daytime interior scenes, and you’ll be able to deliver an ambience that will better serve your story.
Interested in the tracks we used to create this video?
- “Oceanfront” by Vincent Tone
- “Positive Day On” by Make Music
Looking for more video tutorials on filmmaking and video production? Check these out.