7 Useful Ctrl and Cmd Key Shortcuts in Adobe After Effects
Constantly using the mouse in After Effects can become annoying. Use these handy shortcuts instead to speed through your next project.
After Effects is a powerful creative tool that many people find intimidating. But, as you work more with the software, you’ll realize the value of keyboard shortcuts
Here are 7 handy ctrl/cmd key shortcuts that will save you time and ease your workflow.
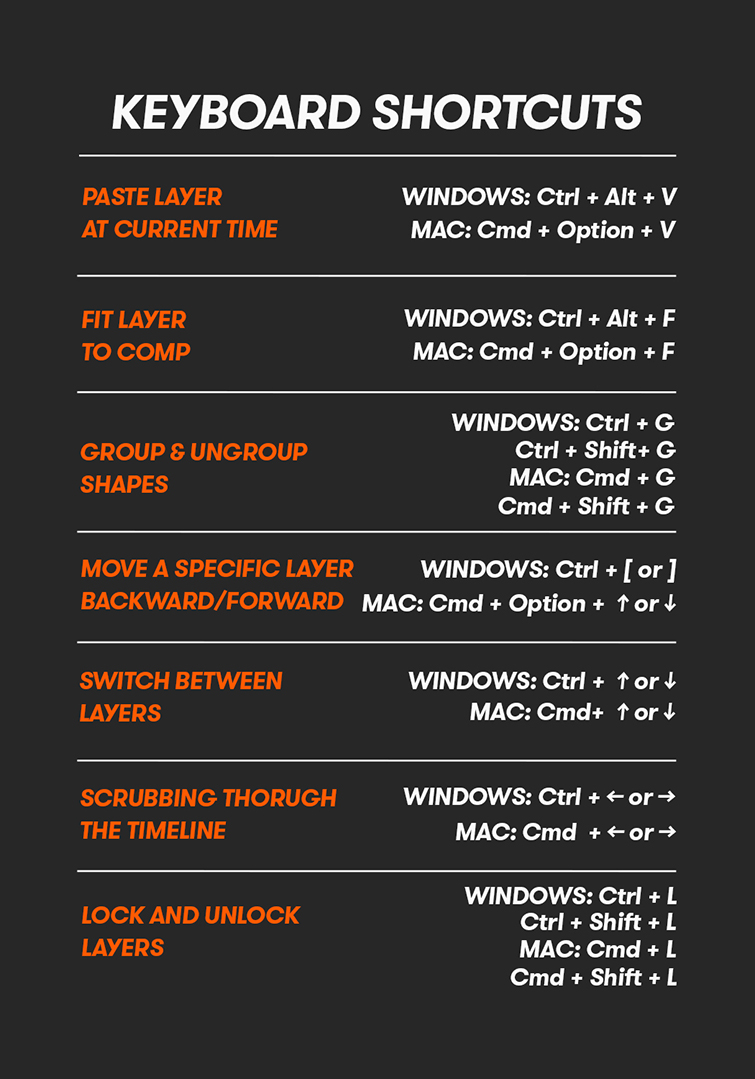
1. Paste Layer at Current Time
- Windows: Ctrl + Alt + V
- Mac: Cmd + Option + V

When you normally copy and paste a layer, it’s positioned at the beginning of the composition. With this shortcut, the position of the time indicator will determine the paste location.
2. Fit Layer to Comp
- Windows Ctrl + Alt + F
- Mac: Cmd + Option + F

The old way to fit a layer to comp was to open up the layer, go to scale, and edit the parameters so it would fill the screen. However, with this shortcut, you can instantly fit any layer to the composition (within a few seconds) without any transform properties.
3. Group and Ungroup Shapes
Group
- Windows: Ctrl + G
- Mac: Cmd + G |
Ungroup
- Windows: Ctrl + Shift + G
- Mac: Cmd + Shift + G

Staying organized is important when working in After Effects. Within some shape layers, you’ll have multiple groups that you can pair together. This shortcut is a great way to make sure you keep your project clean and efficient.
4. Move a Specific Layer Backward/Forward
- Windows: Ctrl + [ or ]
- Mac: Cmd + Option + ↑ or ↓

Paired with the next shortcut, this is a great tip for cycling through a project. Instead of clicking and dragging layers everywhere, use this shortcut to move any layer through your composition.
5. Switch Between Layers
- Windows: Ctrl + ↑ or ↓
- Mac: Cmd + ↑ or ↓

When I’m working in After Effects, I always run into the problem of clicking a layer and accidentally moving it. This shortcut allows you to cycle through every layer and find what you’re looking for. Once you find it, use the previous shortcut to move it up or down among the other layers.
6. Scrubbing Through the Timeline
- Windows: Ctrl + ← or →
- Mac: Cmd + ← or →

This one is huge for me — I use it all the time. When I’m doing any frame-by-frame animation, I use this shortcut to make it more efficient (instead of scrubbing through with the mouse). Constantly going through the timeline and reaching for the mouse every other second gets old fast. This shortcut is, by far, my personal favorite.
7. Lock and Unlock Layers
To Lock
- Windows: Ctrl + L
- Mac: Cmd + L
To Unlock
- Windows: Ctrl + Shift + L
- Mac: Cmd + Shift + L

Finally, this is a quick way to lock or unlock any clip. If you have a large project with a number of layers you want left alone, highlight them all and use this shortcut to make sure they stay untouched.
Learning all of these will take some getting used to, but not only will they improve your workflow, they’ll also free you up to think creatively.
Need an easy way to reference these shortcuts? Here’s a roundup of all the shortcuts and their keys.
Looking for more After Effects tips and tricks? Check these out.
- Tutorial: Getting Started with Content-Aware Fill in After Effects
- Adobe Releases New Content Aware Fill Tool for After Effects
- 5 Ways to Animate with Trim Paths in Adobe After Effects
- How to Create a Mid-’90s DV Camcorder Look in After Effects
- How to Export with Transparency from Adobe After Effects