How to Get Better Color Grades Using Opacity Blend Modes
Here’s the post-production guide (and photo tour) to how and why you should incorporate opacity blending into your next project.
Opacity blending isn’t something I hear editors or colorists talk about all that much. The 27 opacity blend modes in Premiere (or those found in any other NLE, for that matter) each interact and affect footage in radically different ways — not to mention the near-infinite possibilities that arise from adjusting the blending controls and looks.
I have found tremendous success with my grades by incorporating a toolbox of opacity-blending tricks. In this guide, we’re going to examine three of my most-used opacity tricks when grading.
To do this, we’ll work with a still from a film I shot on 16mm several years ago. My main focus with the adjustments and grade I applied to this footage was not the quality of my grade but, rather, what I could achieve by combining basic grades with adjustment and opacity layers.

1. Grading with Color Mattes

The first trick I’m going to show you is using color mattes. We’re creating a color matte from the Add Item menu and setting the color to an orange that will work as a healthy skin tone for our subject. From here, we’re just adding it to the timeline on a higher video track before heading to the effect controls panel. Now, I’m selecting the Darken blend mode and setting the opacity to 50 percent.

I can fine-tune the results by selecting the color matte and going into the Lumetri panel. Depending on what you’re blending, the blend mode (and blend percentage) of each of the sliders in the Basic Corrections tab alters the image in a different way. For this correction, I was mostly aiming to recover some of the exposure we lost when applying the darken blend.

Now that we have our basic levels adjustment on our clip and blend layer, I am adding an adjustment layer over both. I’m using this adjustment layer to bring us back to acceptable exposure without altering the results of our color matte blend. You can “blend up” opacity in the timeline as well.

For this next step, we’re going to add a blue color matte underneath the source video. We’ll be doing this so you can lower the percentage to an acceptable range. This is just another way you can add steps, mattes, and layers to your image.

With a good blend dialed in, I am popping over to the Lumetri panel to begin making tweaks to our underlay color. After you’ve done this, you’ll need to dial down the highlights. We’ve got to get the exposure under control.

Perfect. We’ve brought our exposure back in line and have really enriched the skin tones of the subject. Because we darkened the image a bit more, I am going to raise the opacity on our orange overlay to enhance the look we’ve given to the shot. I know that I’ve introduced a little bit of noise to the shot, but I’m not too worried about it at this point.

2. Controlling Color with Black and White Adjustment Layers
An incredibly powerful trick for controlling color levels is to add an adjustment layer and desaturate before applying one of a couple blending modes. The first thing I’m doing is nesting all of the video, adjustment, and opacity layers that we just worked on. Then we’re going to the Saturation slider in the Basic Correction panel and reducing it to 0 percent. Then set the blend mode to Soft Light.

Using the Soft Light blend mode in conjunction with a black-and-white adjustment layer is going to give us good control over the color contrast in the scene for a classic “bleached” look. We can adjust the strength of this effect by making adjustments in Lumetri or by adjusting the blend percentage.

I’ve duplicated my adjustment layer, reset Lumetri, and changed the blend mode to Luminosity.

Using the Luminosity blend mode with a black-and-white adjustment layer gives us direct control over the color luminosity levels in the shot, allowing us really granular control.
And then, go crazy with the curves!

Now just apply a couple of quick adjustments to the Basic Corrections sliders, and I think we’re looking good. Also, I’ve duplicated and reset my adjustment layer and am applying the Overlay blend at 30 percent.

However, since we’re not going for the bleached look, I’m making some adjustments to bring the contrast a little back in line. Remember that it’s okay to backtrack and change things up. Its all about finding an image that looks good to you and fits the story.

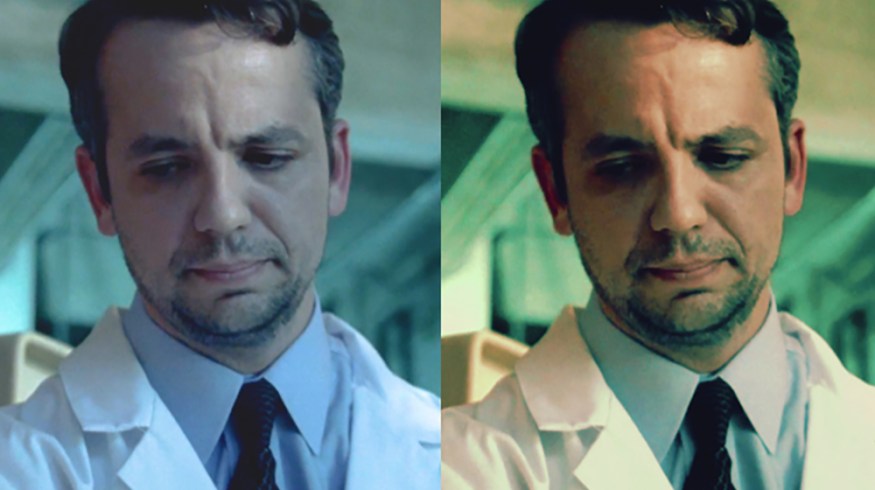
To finish this out, I am previewing the shot with and without our “bleach” layer. I’m definitely liking it with all of the corrections we did. The bleach layer really helps to bring some of the magenta out of the skin tones. We’ve lost a little bit of exposure and brought our noise up a little more, but I like the feel of our footage a lot more now.

3. Separating Highlights and Shadows

One of the most useful ways to apply grades to the lows and highs of your clip separately is through a combination of blend modes with HSL selection.
I’ve once again nested the previous results, but this time I have duplicated our source video twice. The bottom video layer will remain our unaltered “blender,” the second layer is our shadows, and the third is our highlights.

For our second shadow layer, I’ve set the blend mode to Darken and the opacity to about 75 percent.

Now, I’m in the HSL panel of Lumetri, where I have deselected the Hue and Saturation qualifiers and have selected only the shadows on the Luminosity qualifier. Then, I’ve moved to the top (highlights) layer, where I have selected the Lighten blend mode and kept the opacity at 100 percent.

I enabled the Color/Gray check box to see my selection and then selected the mids and highs of the image with the Luminosity qualifier. After that, it is just a matter of a few adjustments to the basic correction sliders. All that’s left for me to do is compare the final correction with the uncorrected clip to see if I’ve done anything horrible to the footage.

Overall, I really love how much I could make this shot pop. Sure, we’ve raised the noise levels in the shot quite a bit, but luckily I’ve got a trick for that.
Opacity blending can be intimidating in Premiere since not everyone understands the blend modes and how each one differs. However, I hope this article inspires you to dust off some of your old footage, load it up, and get blending.
Looking for more articles on color grading and post-production? Check these out.
- Post-Production Tip: Isolating and Hiding Noise in Your Footage
- Improve Your Masks with Hue, Saturation, and Luminance Qualifiers
- Color Grading Tips: The Ins and Outs of Correcting for a Pink Sky
- Color Grading: Working with the Hue vs. Curves in DaVinci Resolve
- Post-Production Tips: How to Save Corrupted Footage