Elgato’s Master Mount System Is a Must-Have Piece of Kit
With multiple accessories and different ways to mount your camera, the Elgato’s Master Mount System is a content production essential.
Gamers may be familiar with the Elgato brand, as they make a variety of products that focus on streaming. While the brand may have built up its reputation with its top-notch capture cards, it’s since gone on to make everything from webcams and microphones to key lights and macro keypads capable of just about anything.
Suffice it to say, Elgato is a full-fledged manufacturer of products for content creators. But, one of its best products, the Elgato Master Mount System, uses no tech at all.
Elgato Master Mount: What Is It?
While it’s nowhere near as flashy as Elgato’s other gadgets, this device does something simple: It allows you to mount your camera, whether it be a mirrorless or a smartphone, in various configurations.
So far, I’ve used it so much that it’s the most important piece of gear in my kit, besides the camera itself.

The Master Mount is the central piece, coming in a small (21 inches) or large size (49 inches). Its attachment point is a clamp with a twisting handle that you need to rotate to clamp down. The clamp expands to 2.35 inches, which should fit the edges of most counters, tables, desks, or bookshelves.
In tight spaces, where the handle is bumping up against the wall, you can pull the lever down to disengage the crank and rotate it away from the wall to begin cranking again. I’ve used it more times than I can count, and the Master Mount would be pretty useless in some situations without that feature.
On its own, the Master Mount goes straight up. It has a 1/4”-20 screw on the top where you can mount your camera. It’s quite simple, but it’s all you need for a streaming setup. It’s also good for making talking head videos or other videos where you’re capturing the subject dead on.
You can pick up the Master Mount starting at $45 (for the small one) or $50 (for the large one), which is the one I recommend. You won’t find another product like this, and of this quality, at this price point.
However, the base model is extremely limited, and I wouldn’t have bought it if that’s all it did. To truly make the Master Mount a key part of your kit, you have to check out the accessories.
The Accessories
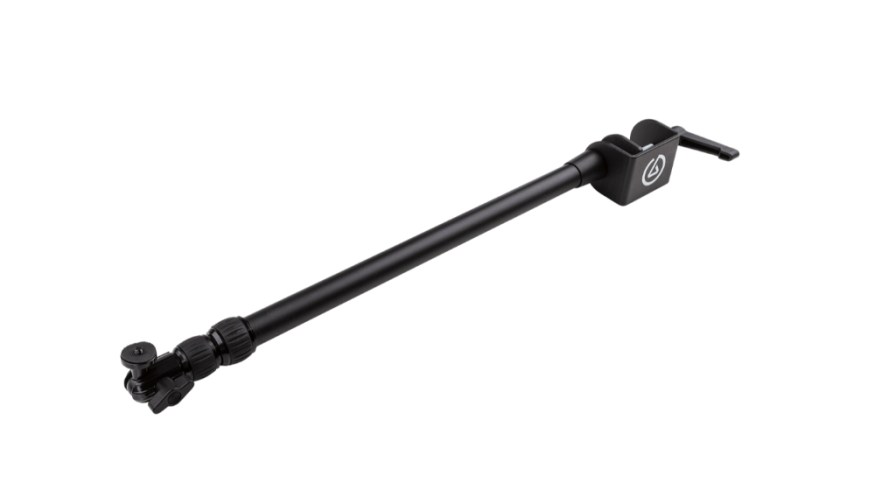
There are a handful of accessories for the Master Mount, with not a dud in the bunch. Though, which one is worth picking up depends on what you’re doing. In my case, I decided to pick up the small Flex Arm ($25)—the larger version costs $40—for one major reason: it lets you point your camera downward. You wouldn’t think that’s hard to do, but I had difficulty finding another product that does this exact thing.
The flex arm has ball joints that allow it to be configured however you want, making it possible to extend away from the Master Mount and place a camera facing down. So, why is this useful?
For me, it’s about shooting product shots, which I do quite often for product reviews. You can point it down to shoot cooking videos or videos where you’re building something. I did the latter, which I shared a video of below. Streamers, for example, could use it to set up a second camera to capture keyboard and mouse movement. Additionally, the flex arm can be used for cameras, but it can also be used to mount lights and other gear with a 1/4”-20 mount. Those are just a few ways to use the flex arm—there are undoubtedly more creative ways to use it.
If you don’t need the versatility of the flex arm but want something similar, the Solid Arm is essentially the same thing, except rigid. It’s definitely easier to set up, and it’s less expensive ($30).
Another accessory is the Phone Grip that lets you attach a phone to the mount. It’s affordable and worth having around, even if you don’t plan on using it all the time. If anything, it could come in handy when you want to use your phone as B-cam.

One problem that may come up is that the clamp is not big enough for whatever you’re clamping it to. If the item you’re planning to attach to is too thick, you’re pretty much out of luck. Elgato’s solution: the heavy base ($40) accessory.
Instead of the clamp, you can attach the Master Mount to the heavy base and place it on any flat surface. If you want to set up a camera behind your monitor, for example, you can get the heavy base back there, or you can place it on a kitchen counter as you work your way through a recipe. With how big (10.25 inches) and heavy (10 pounds) it is, it’s not the type of thing you’ll be throwing in your bag. Still, it should get plenty of use in your studio or office.
The final accessory is arguably the most useful, depending on the content you’re making. The $30 wall mount is the least mobile of the bunch, requiring you to screw it onto your wall. What it offers in return, though, is a reliable, stationary mounting option you can have set up in your studio space at all times.
The best part is it basically acts like the Master Mount system and is compatible with other accessories like the Flex Arm, Solid Arm, and Phone Grip. You can also attach the Master Mount to it for extended range.
If there’s a favorite spot you like to shoot videos from, or if you want to place a light, the wall mount is the one accessory you hardly have to think about. It’s just there when you need it.
The Essentials
I wanted a mount that would allow me to point my camera downward, but all the options were either too expensive or were not exactly what I was looking for. A PremiumBeat article required building an overhead mount out of wood, which was more affordable, but it needed a lot of work and was too big to store in my apartment or take with me.
Finally, I came across Elgato’s Master Mount, and it was exactly what I was looking for. It made it possible to record my Gundam plastic model build below. I also used it to record myself modding an arcade stick for TikTok.
Unlike other Elgato products, the Master Mount won’t improve your stream’s audio or video quality. However, it will allow you to set up quickly, with plenty of options on where to mount. Purchasing the entire system is quite expensive, no doubt, but you only need a few pieces, depending on what you’re doing.
For me, the large Master Mount itself and the Flex Arm are just what I need. If your desk, table, or counter is too thick for the clamp, the heavy base is a solid option. Meanwhile, the wall mount gives you a permanent mounting option that you can place discreetly on any wall.
Whether I need to Zoom using my mirrorless camera, record an overhead video, or shoot product images, the Master Mount is the Swiss Army knife of my kit. I couldn’t imagine not having it.
A few more gems for your toolkit:
- The 7 Best Audio Interfaces of 2021 + Bonus Video
- High-End Audio in Budget-Friendly Field Recorders
- Easy Audio: The New Deity Pocket Wireless Microphone
- URSA G2: The New Workhorse for Realtime Capture and Indie Filmmakers
- Classic Cinema Cameras at Bargain Basement Prices
Cover image via Elgato.