How to Use Calibration Tools for Footage, Sound, and Monitors
Here’s a quick introduction to the four main types of tools you need to know in order to calibrate footage, sound, and monitors.
Whether you’re in the field or the in editing bay, your eyes and ears alone are never enough to accurately judge the fidelity of your images — or sound. In this article, we’re taking a look at the four main types of tools you’ll need to know how to use to properly calibrate your footage, sound, and monitors.
First, you need to calibrate all of the cameras and monitors on-set and in the editing studio in order to be certain that all alterations made to the footage aren’t based on improperly calibrated recorders — or monitoring devices.
Proper calibration starts before you roll the cameras. Everyone knows how to hold a card in front of the camera for White Balance, but let’s take a look at the three main types of balance cards, and what they do best.
Balance Cards

Image via ChromLives.
White
White cards are — well — white. Pure white to be exact. When setting the white balance to a white card, the camera (or processing software) should be able to properly calibrate the ambient light of a shot, along the blue-yellow axis of the color wheel. White balancing the image against any color, other than pure white, can alter the accuracy of the colors in the image, introducing headaches to the post pipeline (unless you’re doing it on purpose).
Using a pure white card also aides in exposure. If the card is blown out, it’s likely your shot is overexposed. To use a white card, hold it in the key light of the shot, navigate to the manual white balance setting on your camera, aim the crosshair (or indicator) at the card, and set the white balance — it’s that easy.
Gray
For exposure, grey cards are the better tool. Gray cards are a specific hue and brightness referred to as neutral gray — or 18% gray. The “18%” or “neutral” refers to the luminance value of the gray, which is essential for a number of important filmmaking tools.
The luminance of the average light in an average scene, averaged together, results in a value of 18%. Because of this, camera sensors are tuned to produce proper exposure at 18% gray. The power of the gray card is its utility in dialing in contrast ratios, lighting setups, and other exposure applications.
To use gray cards, have someone position the card in important areas of light (in the scene) while you adjust camera settings, meter the light, or otherwise instruct your crew. Through the viewfinder, you know that you are looking at an 18%, neutral grey reference. Therefore, dialing in an accurate look is as simple as adjusting light in a given area, or simply stopping up or down.
While contentious on the internet, white balancing on a gray card can skew the final balance of the shot. The inaccuracy might not be immediately obvious. However, when setting the white balance, the camera (or software) is outputting results based on an assumed input of white, or the closest thing to white in the frame. Even though neutral gray won’t skew your color balance significantly, it will affect the output of the pixels on the other side.
Color Chart

Image via X-Rite.
Color Charts are commonly referred to as color chips, passports, or checkers, even though they serve a similar function to the balance cards. Although they are the most expensive of the three (at about $100), a color chart can largely replace gray and white cards, if it also has proper white and grey palettes.
Color charts are comprised of 16 color palettes — pure black, pure white, and 18% gray portions — in addition to a number of other various tools, depending on the model.
To use a color chip most effectively, roll with it positioned in the key light of the shot (for a few seconds). If someone’s holding it, have them rotate it from left to right a few times, making sure to get multiple frames without any glare on the chip.
With each lighting setup, if you capture a few seconds of footage of the chart in the key light, you can save dozens (if not hundreds) of hours in the post-production process. The DIT, or colorist, loads the footage into DaVinci Resolve by simply lining up the boxes on the color chart with an overlay. Then, Resolve automatically matches the colors in the chart (in the footage) with their known values. This essentially bypasses the tedious correction phase of the grading workflow, while ensuring highly accurate colors.
Test Tone
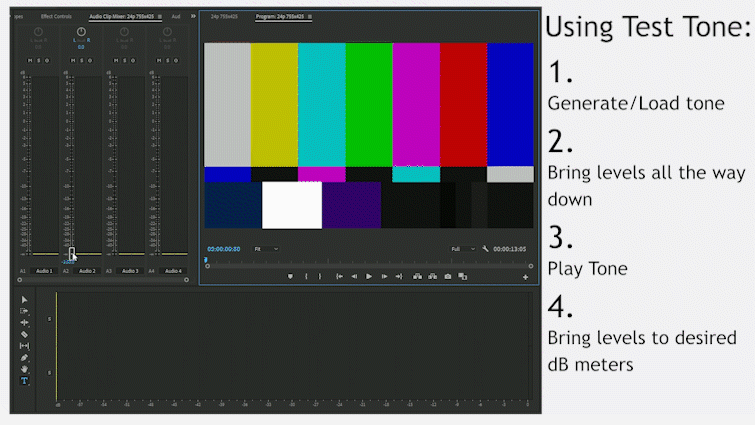
One of the simplest and most useful calibration tools is the Audio Tone Generator. Although there are a myriad of tones for specific sound applications, the most commonly used for calibration in video production is 1000 Hz at -20 dB.
Tone calibrates the recording and playback devices to a standard loudness rating that ensures consistent sound levels, regardless of the final playback device.
To use reference tone, simply play it (or otherwise generate it) and raise the levels until they reach the desired level on the meters. This is usually 0 dB, but different generators and programs have different target thresholds. Premiere, for instance, generates its bars at -12 dB. Regardless of where you set your levels, the point remains the same — tone ensures that your playback devices are set with enough headroom in the mix to not clip and cause uncomfortable crackling in the speakers during playback.
SMPTE Color Bars

Color bars are one of the most easily recognizable calibration tools through their widespread use in televisions, cameras, and other recording and playback devices — since 1956. Though modern color bars have added a few features, their form and function have largely remained the same for 63 years.
Color Bars break down into three vertical sections, but all of these sections are used for calibrating color, contrast, and brightness. While the color bars are simple enough to understand, there are a few sections of the bars that might not be intuitive without prior experience calibrating with bars.
PLUGE Bars
The three, small rectangular stripes below the red bar are referred to as the “PLUGE” bars. PLUGE is short for Picture Line-Up Generating Equipment, and you use them in conjunction with the white square in the bottom portion of the bars to properly adjust the shadows and black levels of very low exposure levels on the screen.
-I and +Q
The other portions of the bars worth mentioning are the dark blue and purple squares in the bottom left of the pattern. You use these blocks to decode the color portion of a video being broadcast for television using NTSC (North and Central America, Japan). -I is an abbreviation of “-In-Phase,” while +Q means “Quadrature.” For most people using color bars, these portions can be skipped.
Here is a video showing the full process of calibrating a monitor using SMPTE Color Bars from Lynda:
If you prefer a written walkthrough, PremiumBeat’s Rachel Klein has a fantastically detailed article on calibrating monitors using color bars. We’ll list the steps here as well:
- Generate or load Color Bars
- Dim the lights and make sure there are no reflections on your monitor
- Set “Contrast” or “Picture” to the middle
- Bring “Chroma” or “Color” to zero
- Adjust “Brightness” until the middle PLUGE bar just barely disappears (the far right PLUGE bar should just barely be visible)
- Bring “Contrast” or “Picture” up to 100, then lower until the white square in the bottom right just begins to be affected
- Bring “Chroma” or “Color” back up until the colors no longer bleed, and the edges between rectangles are clearly defined
- Adjust “Hue” until the yellow bar is lemony and the magenta bar is pure magenta (not skewing red or purple)
With a basic understanding and application of these four tools, you can rest soundly after a long shoot, knowing that when you load your picture and sound into your editing program in the morning — everything will look and sound just the way you wanted.
Cover image via antb.
Looking for more articles on film and video production? Check these out.