FCPX Essentials: How to Import and Organize Your Footage

Let’s get to the basics. In this first episode of the FCPX Essentials, we are covering the ways of importing and exporting footage in Final Cut Pro.
For our FCPX Essentials series, we’re going to take a look at some of the basic, and most essential, features of FCPX. Whether you’re a brand new editor or seasoned vet switching to the program, these videos will give you a foundational understanding of the program. We’ll look at its unique design and layout. We’ll discover how to import, edit, cut, and deliver a project all within FCPX.
This isn’t necessarily a masterclass. More so, it’s an entry-level approach to explore and set the groundwork for your career-long journey within the program as a filmmaker and an editor.
Why Final Cut?
Final Cut is one of the top professional editing programs. Arguably, if you’re on a Mac, it can be the fastest, most efficient, non-linear editing software available to you. Many people edit on it simply because of its intuitiveness, organizational capabilities, and speed.
Personally, I learned how to edit on Final Cut Pro 7. For that reason, the program has always had a sense of nostalgia to me. After switching over to Premiere for a few years, I’ve now found myself back editing in the program.
FCPX did have a tumultuous start in 2011, but the NLE has recovered and has become a respected editing powerhouse. Check out the feature-length documentary, Off the Tracks, which is all about Apple’s transition from Final Cut Pro 7 to Final Cut Pro X.
What Do I Need to Get Started?
FCPX is an Apple exclusive software, so you’ll need a Mac. Fortunately, and because of this, Apple has been able to optimize the program’s effectiveness and speed to deliver the best possible program. The program is offered for $300 on the App Store, but there’s an education discount offered.
We’re going to begin learning by understanding the interface and terminology used within FCPX. We’ll start by learning how to open a Library, create an Event, import footage, then edit within a Project. First, we’ll look at the different terminology within FCPX and how it relates to Premiere.
Library
Every project within FCPX begins with a library. For a Premiere user, consider Libraries to be the same as Projects. Every unique, real-world project will begin with a Library or, essentially, your master collection of footage. Libraries are where you source your files from and begin your work. It’s the home base, or storage location, for your footage.
Events

The next level in the FCPX organization hierarchy is Events. Events are most like folders in FCPX. They serve as a means to organize and categorize your footage. For example, if you needed a dedicated folder of B-roll consisting of a certain person, then you’d begin by using Events to organize and sort that footage into one commonplace.
Ultimately, Events helps an editor quickly make sense of a larger project by means of organization.
Projects

Projects are essentially just Sequences, in the Premiere world. You can categorize your Projects any way you’d like that best fits your project. For example, you may only want one Project for your entire video. Or, you may want separate Projects for every single Event folder you have where you edit together all of your selects.
Now that we have an understanding of how Libraries (a.k.a. Projects in Premiere language) are organized within FCPX, we’re ready to import our footage.
How to Import
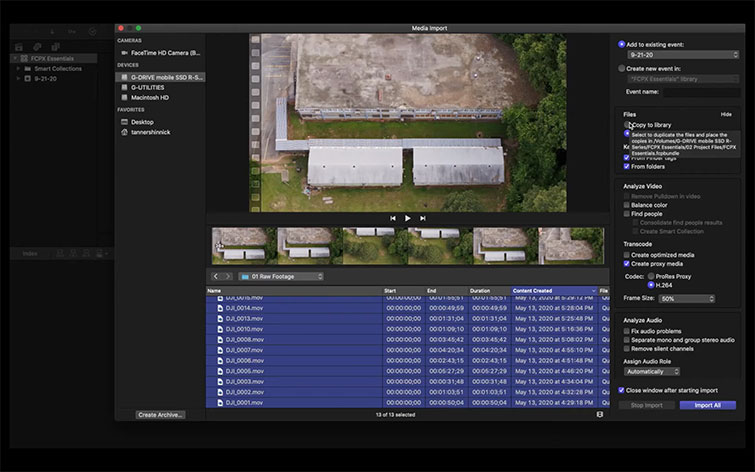
We can import our footage in a couple different ways. We can either select File>Import, press the import footage icon or simply press Command + I. This will bring up our import window. The import window has a variety of options to choose from. For today, we’re going to Leave Files In Place as we already have them on an external drive.
On Import, you can also choose whether you want to create proxies for your imported files. With FCPX 10.4.9, they vastly improved how to create proxies for your project. For our purpose today, we’re going to do H.264 at fifty percent. Once you’re ready, press Import.
You’ll quickly be reverted back to your editing screen. However, in the top-left, you’ll see your background task icons. Here, all of your proxies will be rendering in the background as you continue to work and edit your project.
And, that concludes our first walk-through of FCPX. We learned the organizational structure of FCPX, what Libraries, Events, and Projects are, and how to import footage. For our next lesson, we’ll learn the basics on how to start cutting your own footage in Final Cut.
Cover image via Joanne Laskey.