Why LumaFusion Is the Best Video Editing App for iPads
Learn why LumaFusion’s intuitive interface, optimized performance, and superb mobility make it the best editing app on iPad.
Available to use on iPhones and iPads, LumaFusion is a mobile video editing powerhouse with an intuitive, easy-to-understand UI/UX. From cutting a video to exporting directly to YouTube, LumaFusion offers a whole video editing experience that you can easily use anywhere. Video editors that want a lean and portable editing app should give LumaFusion a try. And, beginners wanting to learn how to edit video should seriously consider it before jumping off the deep end with more advanced software.
At first, it may seem like editing video on a mobile device is a bad idea—too slow, cumbersome, and lacking advanced features. That may be so for the dozens of video editing apps on Apple’s App Store, except that LumaFusion is actually good.
LumaTouch’s premium $30 video editing app is on the higher end of iOS apps, but it’s still several magnitudes more affordable than Premiere Pro, Final Cut Pro, and DaVinci Resolve Studio. While professional NLEs offer advanced features, LumaFusion punches above its weight at a much lower price point, offering a competitive alternative with comparable features found in expensive NLEs.
My Experience with LumaFusion
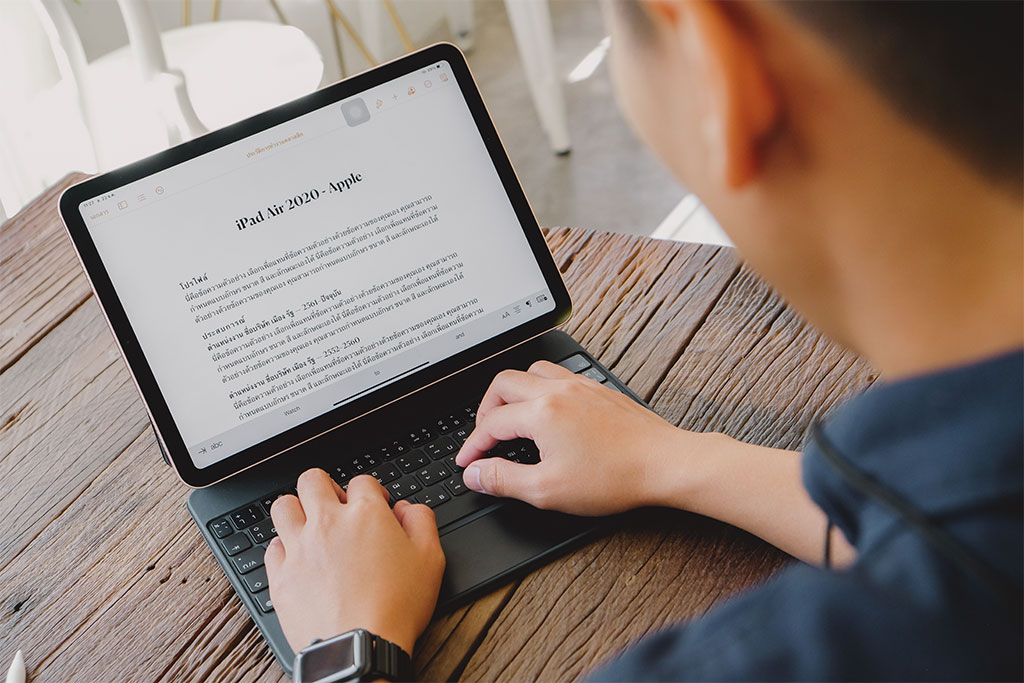
I recently upgraded to the iPad Air 4th Gen, which uses Apple’s brand-new A14 Bionic chip. The iPad is great, sure, but my experience with LumaFusion has been eye-opening.
I haven’t had to wait for the timeline to load, even when opening the app after it’s been closed for several hours or days. Scrubbing the timeline is also incredibly fast, and I haven’t experienced the waiting, freezing, or crashing that’s common on other video editing software. Rendering and exporting is also fast, and it’s possible to upload the video directly to YouTube, eliminating a whole step in my workflow.
After editing two videos on LumaFusion during the past few weeks, it’s quickly become my favorite way to edit video. I can cut the video together, edit, color correct, add special effects, adjust the sound, and more from my iPad, which I never thought I could do from a tablet. And, by using a keyboard, I can switch between touch controls and keyboard/trackpad.
LumaFusion has many nice features. Although, it’s not as robust in some areas as I’d like, it’s been my favorite editing experience so far. It’s easy to use and understand, affordable, mobile, and, when learning to use it properly, it can be just as good as computer-only NLEs. I’ve yet to learn everything about LumaFusion, but, so far, there’s a lot to love.
LumaFusion’s Best Features
Importing from SSD and Cloud Storage
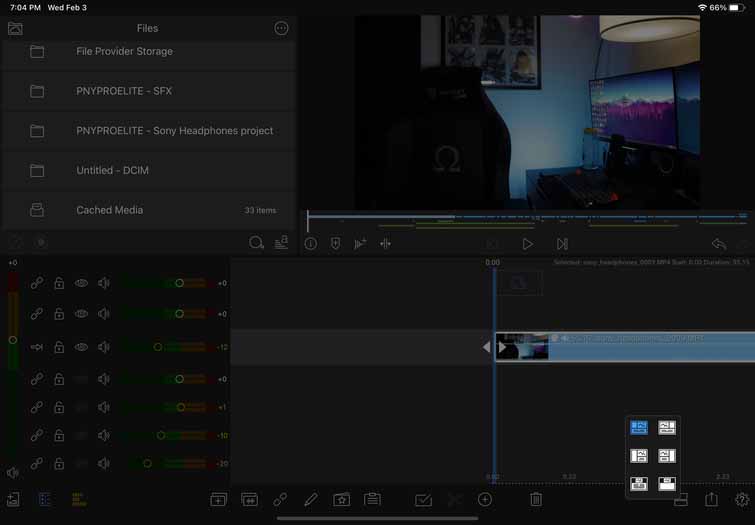
When I got my iPad, I didn’t think I’d be editing many videos on the device. But, that’s changed now, so I’ve had to get creative to work around my modest 64GBs of storage. Luckily, LumaFusion allows you to playback media from an external SSD, which I’ve been doing. I’ve been storing all my footage on a PNY 500GB portable SSD that I got explicitly for this purpose. However, there’s a catch.
Instead of working off the SDD, which is what I thought would happen, LumaFusion saves the entirety of each clip that’s used on the timeline. For example, if you use a few seconds of a minute-long video, LumaFusion saves, or caches, the whole video on the iPad’s internal storage. The only real way to work off an SSD is by using a Gnarbox or Western Digital’s Wireless SSD, which is all done wirelessly. Those two options, though, can be as expensive as an iPad.
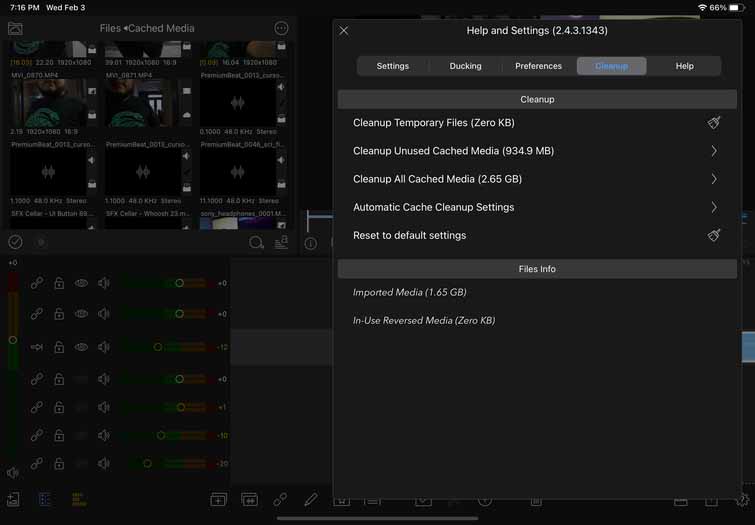
Although I’d have preferred to work directly off the SSD, LumaFusion does simplify the process of importing clips. You don’t have to import media from an SSD, as the app handles it for you when you add a clip to the timeline. After you have edited and exported the video, you can delete the media saved in the “Cached Media” folder within LumaFusion.
If you ever need to open the project again, you can connect the storage device containing the files, and the app will re-download the necessary files. With LumaFusion, you never have to save manually, but the app frequently makes backups of your project. Alternatively, you can archive and export your project package, saving the project file and the media used.
Whether you’re importing media from an SSD, SD card, or a cloud storage service, LumaFusion makes it easy to import whatever file you want. As long as you back up your files securely, you can always access them via the cloud with LumaFusion. This is especially important for a videographer working remotely, allowing them access to edit files from anywhere with an internet connection.
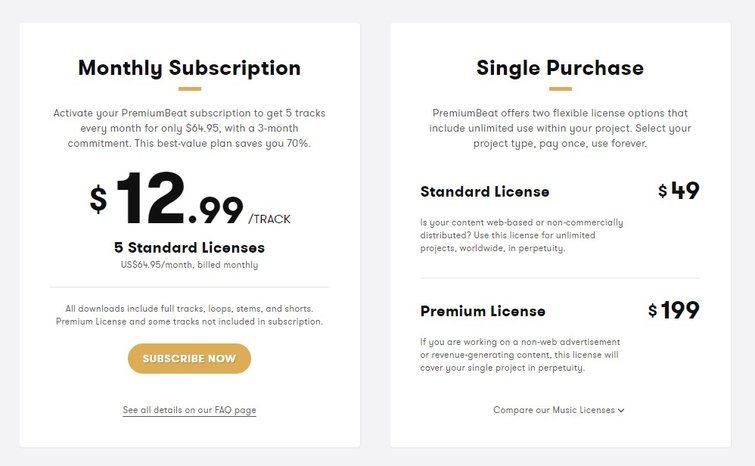
I use PremiumBeat music for all my videos because they have a gigantic selection of music available based on mood, genre, length, and various other filters. It’s really simple to find exactly the right song you’re looking for. Once you’ve made an account, you can choose to either license a track individually or sign up for the monthly subscription, which includes five song licenses for the price of $64.95.
It’s super simple to get the song onto your LumaFusion timeline, and there are a few ways to do it. The easiest way is to download a track via the browser on your iPhone or iPad and store it in the Files app. From there, open LumaFusion, click on the icon in the top-left corner, and choose Files. Then, choose the option named Add Link to Folder, which opens a window to the Files app, and choose the folder containing the track you previously downloaded from PremiumBeat. Once within LumaFusion, you can playback the song and drag it down to the timeline.
Alternatively, if you decided to download the song on your computer, you can upload it to any cloud services supported by LumaFusion. This time, select the ellipsis icon in the sources box, select Import Media, and choose the cloud service you want to use. From there, choose the song you want to import, and that’s it. The last option is to put the song on a storage device and import it to LumaFusion. If your storage device is compatible with your iPhone or iPad, select Add Link to Folder once again, and it should pop in the Files app, where you can select it. Then, all you have to do is find the song and import it.
If your video feels a bit stale or lacks rhythm, adding a song will only make it better. Thankfully, LumaFusion makes the importing process simple, and PremiumBeat has the right song to complement your video.
Extremely Fast Loading
I first built my PC in 2019, and I’ve slowly been upgrading part by part. As of right now, I have a PC with these specs:
- CPU: AMD 8-core Ryzen 7 2700X (4.3GHz Boost Clock)
- GPU: AMD Radeon 5700XT with 8GBs of VRAM and 1980MHz Boost Clock
- RAM: 32GBs (4x8GB sticks) of Corsair Vengeance 3200MHz
- Storage: 3TB HDD for long-term storage, 500GB SATA M.2 SSD for the OS, 1TB M.2 NVMe SSD for games and video files
- MOBO: ASUS Prime X-470 Pro ATX
- PSU: Corsair RMx 750W 80+ Gold
That’s all to say, I have a nice rig, but it doesn’t matter. Editing on the iPad with LumaFusion is much faster than editing on DaVinci Resolve with my PC. I truly can’t comprehend the performance disparity, given that the iPad uses integrated graphics and 4GBs—FOUR!—of RAM.
Maybe Apple’s chip leverages its resources better to get the most performance. It could also be that LumaFusion, which only works on iOS and iPadOS devices, is optimized to run on those operating systems. The most likely scenario is that AMD GPU drivers are literally garbage, and they’re screwing with Resolve, which, in recent weeks, many people have complained about in forums.
Either way, it’s incomprehensible how I can scrub the timeline so effortlessly in LumaFusion without so much as a hitch. Even after minimizing or closing the app, the timeline loads incredibly fast. At first, I thought it was a fluke because I was only editing 1080p footage. But, no, it’s the same with 4K footage. And, you don’t even have to optimize the media—this is LumaFusion’s way of making proxy files. Though I haven’t tested 4K footage yet, two YouTube channels—Everyday Dad and TechGear Talk—both have edited 4K files using the same iPad I have. Their timelines were buttery smooth—to be clear, I’m talking about the whipped kind that spreads easily.
How is it possible? Well, Apple’s A14 Bionic processor found in the iPad Air 4th Gen is the likely culprit. The processor’s performance is so good that I’m starting to think Apple may be a better choice for creators, especially now that they’re using their silicone on most of their devices.
Though I wish I could speak to LumaFusion’s performance across all compatible Apple devices, editing on the iPad Air has been a refreshing experience. I think I’ll be editing primarily on my iPad instead of my PC. Go figure.
Intuitive UI/UX
This section’s title sounds like the kind of buzzwords tech companies like to throw around, but it’s true in this case. LumaFusion’s design makes sense, especially if you have prior experience working with other NLEs. If not, I highly recommend reading the reference guide, which manages to get across how to do everything on the app without being overwhelming. You can also learn the basics from the video below.
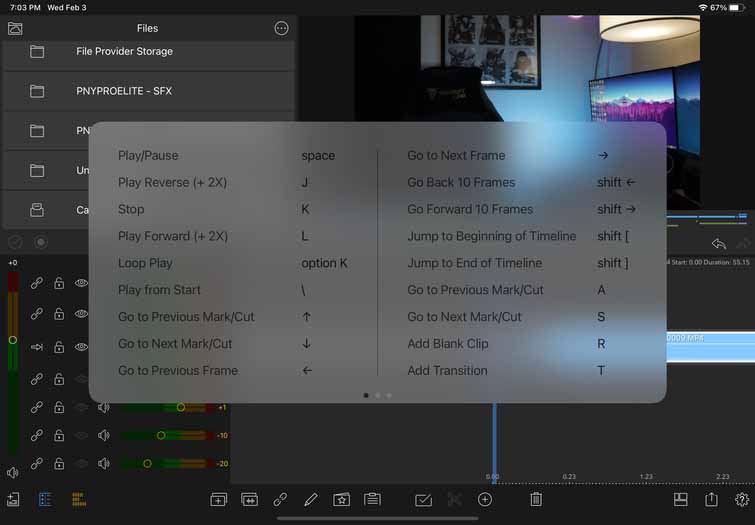
Using prior video editing knowledge from Premiere Pro and DaVinci Resolve, it took me no time to get used to LumaFusion’s way of doing things. A lot of the shortcut keys are similar to other popular NLEs, too. For a refresher, you can hold the Command key to bring up the full list of shortcuts, a feature I discovered accidentally after resting my finger on the aforementioned key.
Although I much prefer using the keyboard to edit, LumaFusion is designed to work without it. I sometimes use my finger if I want more control when moving a slider or dragging a clip, and I love that I can use both my fingers and the keyboard to achieve this. When the trackpad isn’t as precise as I’d like, I can switch instantly, which isn’t something that I can do when working on my PC.
Users can also use a stylus pen for added precision, such as the Apple Pencil or the Logitech Crayon. I don’t have a stylus, so I haven’t been able to try this feature, but I’ve seen it work.
Different Ways to View and Edit
LumaFusion works in portrait and landscape mode, giving editors the option to choose their preferred way of editing. Landscape mode feels natural to me, but I do like that I have a choice between the two. To tailor the app layout to your liking, you can change it by choosing the Layouts button. There are several options, each shifting the section of the app to another location or expanding them. Though you can’t drag-and-drop the sections wherever, choosing between different layouts is a welcome compromise.
I also enjoy that I can hook up my iPad to an external monitor to edit and preview my video. This works in two ways: via an HDMI cable, which requires an adapter, or via AirPlay. I used an Apple TV to stream content, and was able to AirPlay LumaFusion to my TV by turning on Screen Mirroring.
If you don’t have an Apple TV or other Apple device, the HDMI route is fine, too. Just make sure to get the right adapter. LumaFusion recommends using a USB-C Digital AV Multiport Adapter or an Apple Lightning Digital AV Adapter. Whether going wired or wireless, there are special layouts you can use when connected to an external monitor.
Simple Color Correction and Other Effects
I’ve already gone over how easy it is to import media on LumaFusion, and the next step is cutting the video together. With six audio and video tracks and another six audio tracks, LumaFusion has plenty of flexibility. Right under the Preview window, you have a bird’s-eye view of the timeline called the Timeline Navigator. As your timeline grows bigger, you can click any part of the Timeline Navigator to move the playhead.
The Track Header can be used to control the timeline, allowing you to mute, link/unlink, view, hide, or lock tracks. The Audio Mixer is a fantastic tool for controlling audio levels, making it possible to adjust each track or the master track by sliding the levels up and down. The app also has an auto audio ducking feature to gradually lower and raise background music when a subject begins speaking.
When you’re ready to add effects, titles, and color correct your footage, it’s time to head to the Clip Editor. To do this, double-tap or click the clip to open the Clip Editor. Under the Clip Editor Preview window, you’ll notice four different editors, each represented by a distinct icon.
The first is the Frame and Fit Editor, which is where you can crop, zoom, and create keyframe animations. The Speed Editor changes the speed of the clip or reverses it. The Audio Editor is where you can apply audio effects and adjust levels. And, finally, you can color correct and apply LUTs to your footage in the Color and Effects Editor.
Frame and Fit Editor
The Frame and Fit Editor is surprisingly useful, making keyframe animation accessible to beginners. Applying a gradual zoom to a clip gives your video a more cinematic quality, but there’s so much more you can do. I used this tutorial to create a few title presets within the Frame and Fit Editor, which I can now use in future videos.
Audio and Speed Editors
The Audio and Speed Editors both have their uses, but I didn’t spend too much time with them. All my clips had a standard 24fps framerate, so there was no way I could slow it down without making it look choppy. The Audio Editor’s lack of a denoise feature is one of my few complaints about this software, offering the least utility. Unless I have a specific audio problem—e.g., plosives, unwanted noise, or clipping—I can adjust my levels with the audio mixer left of the timeline.
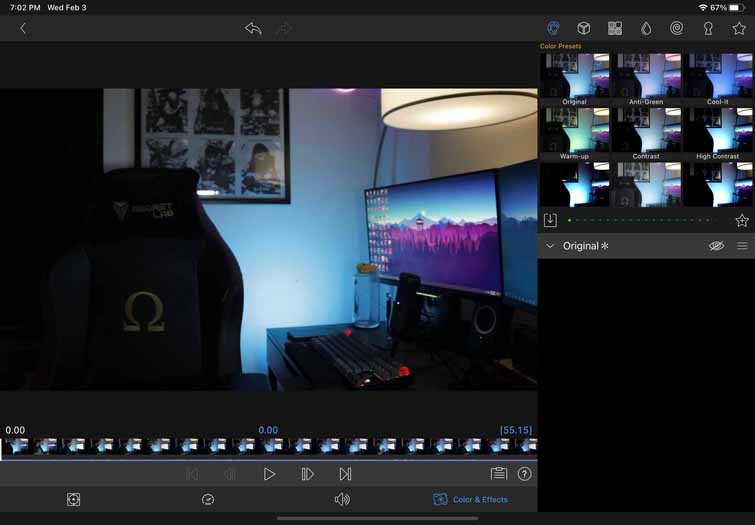
Color and Effects Editor
Where it gets interesting is the Color and Effects Editor, which is where you can make the most impactful changes. After primarily using DaVinci Resolve to edit videos over the past few months, I’ve gotten used to their color correction and color grading tools, which are undoubtedly the best in the business.
Switching from Resolve to LumaFusion was a shock, as the latter simplifies the color correction process to a significant degree. There are no color wheels, video scopes, auto white balance, nodes, or any of the settings I’ve slowly learned to use.
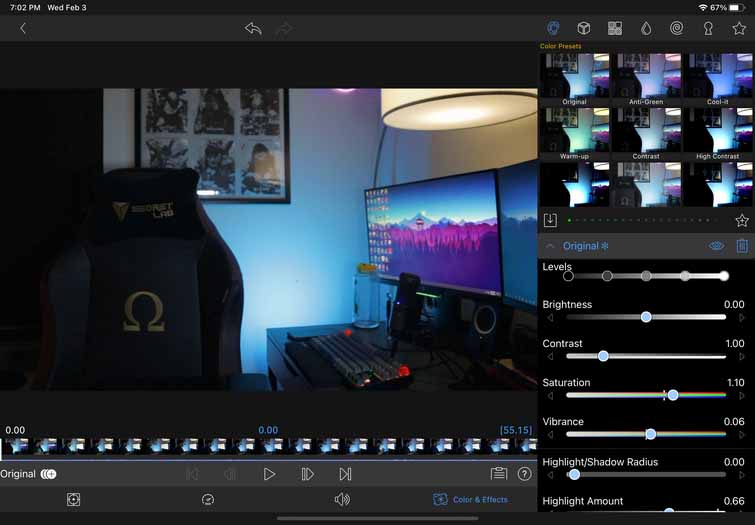
Instead, you get a handful of color presets and some sliders. I wasn’t impressed, but it grew on me pretty fast. I wish the color correction were better, but you can color correct your footage to a good enough level if you know what you’re doing.
When you’re done color correcting, you can click over to the LUTs tab and choose one or import your own—LumaFusion supports .cube or .3dl LUTs. The Chroma and Luma Key tab is also useful for masking. The Color and Effects Editor can help you change your video’s look and tone, and it’s where an editor can flex their creative muscles.
The Best Video Editor for iPads
I’m sure LumaFusion is also fine on iPhones, but, with a bigger screen and better battery life, the iPad is the best way to edit video on LumaFusion. Higher-end iPads, such as the Air and Pro models, will undoubtedly have better performance when editing with LumaFusion, but even recent standard iPads work well.
When I first got my iPad Air, I never thought I’d consider it a legit video editing machine, but I’m happy with the turn of events. I will most-likely continue using LumaFusion as my primary video editor for the foreseeable future, not only because it’s easy but because I can take it with me anywhere. As powerful as it is, my PC is neither as portable, as easy to use, nor as fast as my iPad. Words which, to be honest, dear reader, I never imagined I’d be typing.

My advice to those wanting to learn the ropes of video editing is simple: Buy an iPad, download LumaFusion, and make videos.
Cover image via sergey causelove.
For more video editing tips, gear reviews, and filmmaking, check back in with The Beat and take a look at these articles, as well:
- 10 FREE Motion Graphics Templates for Premiere Pro (Animated Titles)
- The Curves Tool: An Introduction to Color Correction Curves
- The Best Mobile Filmmaking Gear for Making Videos on Your Phone
- Fusion vs. After Effects: Which One Is Right for You?
- Filmmaking Gear Highlights of 2020 – Indie Edition