3 Ways to Store and Share Grades in DaVinci Resolve
We’re going to take a look at the three ways to store and load looks in DaVinci Resolve, along with the advantages and disadvantages of each.
In this post, we’ll cover:
Blackmagic Design’s powerhouse application DaVinci Resolve makes it easy to store, load, and share your color grades. There are three approaches you can take: LUTs, PowerGrades, and Memories.
Let’s dive in and figure out how each can fit into and benefit your workflow.
LUTs

Pretty much everyone who works in filmmaking and uses a camera has heard about Look Up Tables, commonly known as LUTs. A multi-million-dollar industry has grown up around buying and selling them, partly because LUTs are compatible across platforms. You can use them in most editing and grading software, as well as in a growing number of cameras and monitors.
What’s not as widely known is that LUTs only carry some of the color information of a grade, and not always the most critical. LUTs are essentially a blueprint about color that affects brightness, hue, and saturation.
A LUT tells a camera or display how to change each color input in these three ways, and that’s the extent of its ability. While this makes LUTs small and easy to share, it leaves out a lot of other tools in the colorist’s arsenal like sharpness, power windows, nodes, and changes over time.
How to Create a LUT in DaVinci Resolve
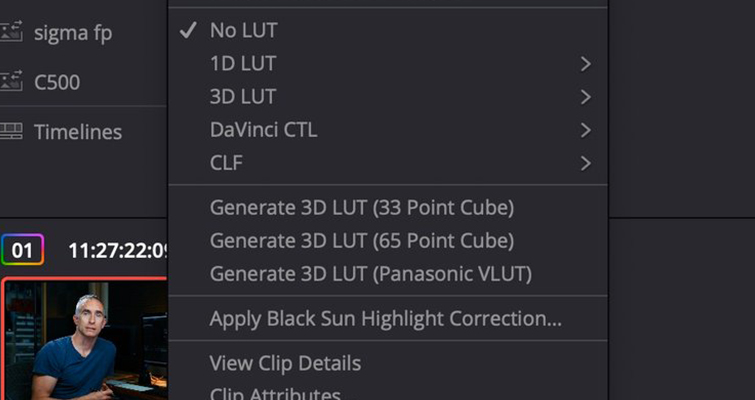
To create a LUT in DaVinci Resolve, open the Timeline in the Color panel, and right-click on the clip you want to use as a source. Select one of the options of Generate 3D LUT (33 Point Cube is the most universally compatible) and, when the dialogue box appears, choose where you want to save it.
This will export the color, saturation, and brightness information from your entire node tree, while not exporting the nodes themselves.
PowerGrades

Resolve’s native format for storing and sharing grades is called “Stills” and “PowerGrades.” The difference being that Stills are specific to a particular project, whereas PowerGrades are shared across all projects of a user.
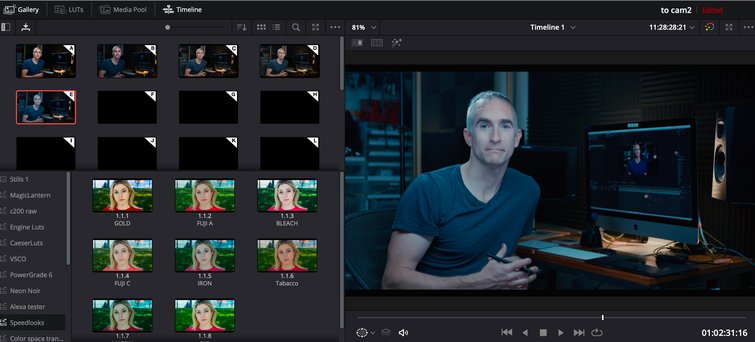
If you click the Gallery window in the Color tab, you can see the directory called Stills, and below that are folders that can be customized. If you right-click in this area, you can choose to create a new Stills or PowerGrades album, which is a collection of grades.
You store a Still by right-clicking on the viewer and selecting Grab Still. If you have the Stills folder selected in the gallery, it’ll be stored as a Still, and if you have a PowerGrades folder selected, it’ll become a PowerGrade.
Stills and PowerGrades are able to store much more information than a LUT. They collect the entire node tree, including sharpness, denoise information, power windows and gradients, OpenFX filters, as well as Raw information. They are a much more complete way of capturing a grade.
How you export and import PowerGrades and Stills is slightly more complicated than LUTS, but not prohibitively so. You right-click on the image of the still in the Gallery, select Export, then select the folder in which you wish to store it. Resolve will output two files: the .DRX file, which is the color settings, as well as a .DPX file, which is the thumbnail. You need both in order to reimport them or send them to a colleague.
To import a grade, right-click in the empty space in the Stills or PowerGrades album of your choice and select Import. You can then select the .DRX file where the grade is stored, BUT there must be an accompanying .DPX file in the same folder or the grade won’t import.
Memories
The final way to store and reload grades in Resolve is called “Memories.” These store all the information that Stills do, but appear in a different window and are linked to the 1-9 keys on the keyboard. They are designed to quickly store and retrieve variations of grades, rather than long-term storage.
You can store a memory by pressing Command + the number you want to store it in, such as Command+1. You can then retrieve these looks by pressing Option and the corresponding key, such as Option+1.
By using Memories, you can save slight variations of the grades you’re working with and quickly try them out. They also appear as viewable thumbnails above the Stills and PowerGrades in the Gallery, and you can export, but not import, them in the same way as Stills.
The More You Store
Given the advantages of PowerGrades and the increasing popularity of Resolve, it shouldn’t be long before your favorite YouTuber is selling PowerGrade packs right next to their newest LUTs.
For more tips and tricks for utilizing LUTs, as well as some awesome color grading tools, check out these articles.
- 29 Free LUTs for Video
- Blackmagic Design Releases New DaVinci Resolve 16.2
- The Best Built-in Color Grading Tools in FCPX
License this cover image via Creative Travel Projects.