
New Filmmaker Tips For Using The Blackmagic Pocket Cinema Camera 4K

If you’re a new filmmaker taking your new Blackmagic Pocket Cinema Camera 4K out on its first shoot, here are a few settings and tips you need to know.
The Blackmagic Pocket Cinema Camera 4K has begun finding its way to users who have been eagerly awaiting it. Our take on the camera was 50/50 — gorgeous footage but with a few internal flaws. However, since the cost of admission for this camera is relatively low, it lends itself really well to those who’ve been waiting to dive into filmmaking. But as with any new camera, even if it’s as easy to use as the Pocket 4K, you can find yourself wishing you knew a few more things before you headed out to film.
So what do you need to know?
Batteries and Storage

As I mentioned in the review, the Pocket 4K eats battery power. With a fully charged LP-E6 battery, you’ll get just under an hour of on-time, but whether or not you’re actively recording during that hour will cause the overall battery span to vary. You’re going to need extra batteries. At least four to be safe. Thankfully, the LP-E6 is a low-cost battery, and there are plenty of third-party brands to choose from. I know it seems obvious to recommend batteries since most filmmakers carry an abundance of them anyway. However, I’m suggesting that you get even more than you think you’ll need.
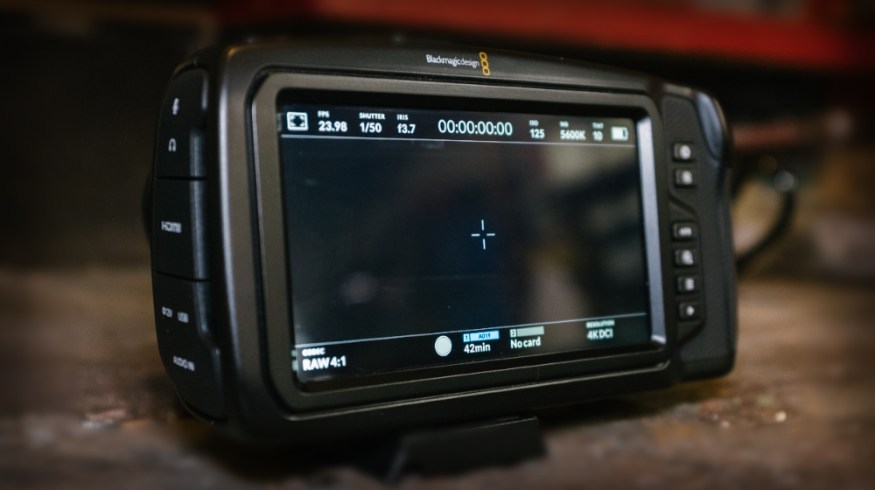
Media storage is a different beast altogether. Filming at 24fps at 4K DCI with CinemaDNG RAW recording format, you will only get 18 minutes of footage on a 256gb card — and that will vary depending on the card’s manufacturer. Like the Ursa, we do have the option of switching to lossy RAW (which is the 3:1 and 4:1 setting), which dramatically increases the available recording time. Changing to cinemaDNG 3:1 will nearly double the available recording time from 18 minutes to 34 (from 18 to 43 minutes if switching to 4:1).
I would argue until the sun comes up that 3:1 is a generous and mild compression — and it wouldn’t be a massive disservice to the RAW data if you were to use 3:1 or 4:1. Ultimately, it will come down to the amount of storage on your card, but you don’t have to limit yourself to just a few minutes of recording time because you feel like you need to use RAW.
It is important to note that, when recording in RAW, typically because of the fast data rate, Cfast 2.0 cards are a better idea than SD cards.
Dual Native ISO Settings
The Pocket 4K has dual native ISO: at 400 and 3600. If you’re unsure about what dual native ISO is, you can find a clear explanation here, but in short . . .
. . . normal sensors have a circuit for each pixel, sensors in cameras with dual native have two.
Let’s say our imaginary camera now has a second ISO rating of 3200. As we gain up from 400 ISO, we see an expected increase in image noise. A strange thing happens once we pass 3200, however — the noise disappears. At 3200 ISO, the second circuit’s native capacitor takes over, resetting the noise in the image (or the “noise floor”).
Some of the higher ISOs will appear less noisy in low-light situations than a lower ISO. In the case of the Pocket 4K, the camera switches to the upper gain circuit at 1250. Therefore, you would receive a cleaner image using ISO 1250 in a situation when you might be using ISO 1000. Of course, when switching to 1250, you’re going to have that slight increment of exposure to account for.
Dynamic Range Settings
There are three settings on the Pocket 4K that will change how the camera interprets the dynamic range: Video, Extended Video, and Film.

Video offers a baked-in look similar to REC 709’s color standard. This gives you a faster turnaround when you need to capture and deliver footage with little to no post-production processing. This is perfect if you’re using the camera just to record home footage.
Extended Video is the in-between setting. It offers a wider dynamic range than the video setting, but it also applies a slight contrast. This setting is helpful when you would like to grade but not extensively (perhaps because you don’t feel confident grading such flat footage as you’ll find in the film setting).
Film is the setting you need to be working with if you want to capture filmic imagery. However, when using the dynamic range film setting, especially in RAW, you may find the image looking uninspired, which leads us to the next section.
Viewing Film and RAW
RAW is obviously one of the main selling points of the camera, and as I said above, it would be criminal not to use it. However, if the BMPCC4K is your first introduction to using the RAW format (along with the film setting), you may find yourself a little miffed seeing a lifeless image through the LCD screen. This is completely normal. The following video from Learn Color Grading explains why.
However, a common mistake among new filmmakers using RAW is overexposing the image, thinking that it will help brighten it up. Yet in post, with a LUT applied, the highlights have long been blown out. There are two things you can do to improve the process of recording in RAW using the film setting.
First, you can activate a stored 3D LUT. A display LUT doesn’t affect the recorded RAW footage (although you can indeed turn on Record LUT to Clip), but it will give you an idea of what your footage will look like when it has been graded, as it simulates standard contrast. To do this, select the LUT you want to display in the LUT menu. Return to the LCD home screen, and press the middle (second button) function button to display the LUT.

Alternatively, if you don’t want to display a LUT but want to monitor your footage correctly, you can get a histogram in the lower left of the monitor. At first, you may only see the codec and resolution information, but you can quickly change that in the monitor settings page.
Hit the menu button on the Pocket 4K, and head to monitor menu. On the second page, select LCD, and then change the display from codec and resolution to meters.

Although it’s jam-packed with professional features, the Blackmagic Pocket Cinema Camera 4K is an excellent camera for new filmmakers. Keep an eye on The Beat, and we’ll continue to bring you more Pocket 4K tips and tricks.
Looking for more production gear tips and tricks? Check out these articles.


