Video Tutorial: How to Stitch 360 Footage in After Effects
In this easy-to-follow video tutorial, we take a look at how to manually stitch dual-lens 360° footage in Adobe After Effects.
If you own a consumer-level 360° camera (which usually have two fish-eye lenses), you may have realized your options for manually stitching the footage are quite limited. Most consumer 360° cameras include some form of basic stitching software that will automatically stitch your footage. However, the results are often less than desirable and almost always have noticeable seamlines. (And in some cases, the stand-alone software can actually degrade your 360° footage even more.)

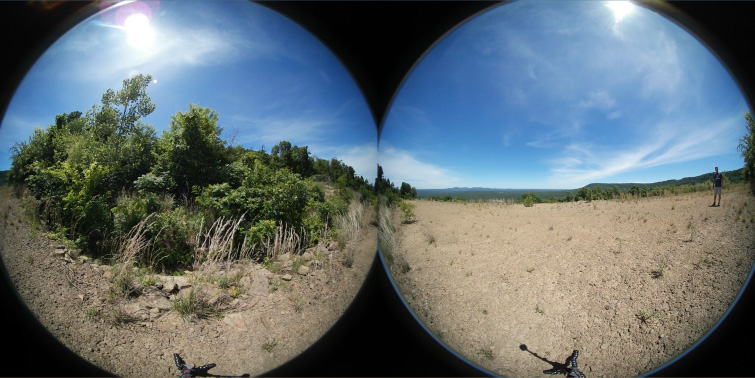
In this tutorial, we’ll look at how we can manually stitch dual-lens 360° footage entirely in Adobe After Effects with the new Immersive Video tools. This can benefit people who don’t own an expensive stitching program but do have After Effects. With this method, users can now stitch their own footage, which often yields much better results than the basic stitching software that comes with consumer-level 360° cameras.

Ready? Let’s dive into the tutorial. (Make sure you download the free unstitched 360° footage clips to follow along!)
Download the FREE Unstitched 360 Video Footage
How This 360° Stitching Method Works
As mentioned earlier, this method is ideal for any 360° camera that has two fish-eye lenses and allows you to access the unstitched footage from the camera. (Some cameras will save each view as their own file. Others, like the Samsung Gear 360, will save both views into one file. Either way is fine.)
The first step is to separate each fish-eye view into their own composition. We’ll then add both views into a new “output” composition that has a 2:1 aspect ratio. A 2:1 aspect ratio is ideal for the stitched equirectangular 360° footage. (Resolution size of your output composition will depend on the original size of your footage, but the aspect ratio should be 2:1.)
Next, we will use the Immersive Video effect VR Converter on each of our fish-eye views, changing their output to equirectangular. (This will convert each view so that it covers up 180° of the equirectangular composition.) From there we can add masks and adjust the VR Converter FOV (field of view) to blend/stitch both views together. You can continue to make refinements using the VR Comp Editor, which can be used to remove seamlines.

Keys to Remember During Stitching
- Turn on GPU Acceleration in the After Effects Project Settings, which is required for the Immersive Video effects.
- Each shot composition needs to be 1:1 aspect ratio. (Each shot composition will be perfectly square.)
- The output composition needs to be 2:1 aspect ratio, which is ideal for the equirectangular 360° format.
- Adjust the FOV of VR Converter to make both shot compositions overlap. Feather one of them with a mask so they will blend together.
- Use the VR Comp Editor after you have stitched your footage to paint out seamlines.
- Render your equirectangular 360° output from After Effects. After that, you can compress that file to H.264 format in Adobe Media Encoder. (Make sure you check “Video is VR” before exporting from Adobe Media Encoder.)
Looking for more After Effects tutorials? Check these out.
- Video Tutorial: How to Loop an Animation in Adobe After Effects
- How to Export Illustrator Icons to Use in After Effects and Premiere Pro
- New 360 Video effects in After Effects and Premiere Pro CC 2018
- Precision Editing with Adobe Premiere Pro’s Trim Mode
- Make Dynamic Montages with This Easy Video Editing Technique


