Build Your Own Car Rig for Thirty Dollars + 10 Production Tips
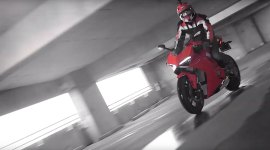
Shooting a car scene in your next film or video project? Check out this DIY car mount build — and some tips for your scene.
Mounting a camera on a car requires some creative problem-solving, and safety must always come first. Searching “grip car rigs” will yield some crazy results, but you should still check them out for inspiration. So how does one begin learning car-rig techniques without spending a fortune?
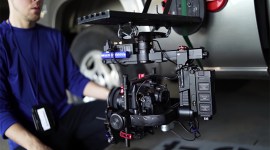
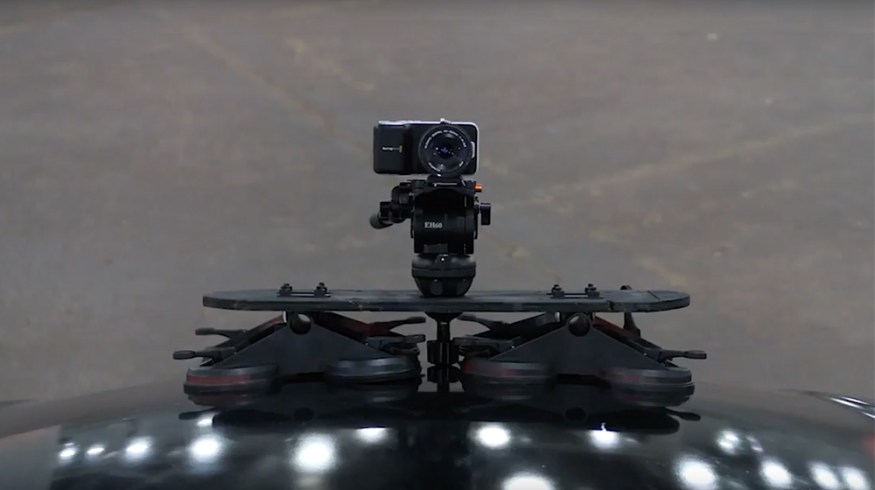
Dent or glass pullers (suction cups) can solve this issue. The idea is nothing new, really, but most examples out there mainly focus on smaller camera systems. I became interested in building a car rig after I purchased my gimbal, which isn’t exactly lightweight. Previously, simply shooting out of the window or the back hatch of an SUV had been enough. Then one day I scrolled past an image of Jeremy Cai’s car-mount build on Facebook. The build was very impressive, but it looked simple enough to piece together — and it looked like it could support a camera like the FS700. Using U-bolts allowed me to rotate the handle, which offered more flexibility when attaching the mount. (Check out my build in the video below.)
My gimbal also came with a drone mount, which was just gathering dust. With a very small investment, I expanded the potential of gear I already owned. So, here are some recommendations on what you should purchase to get more out of your gear — and some safety measures to protect yourself and your equipment.
1. Safety First
You can’t concentrate on what you’re doing while watching a monitor and driving at the same time. So, find some friends that you can rely on. Have a backup plan for each your shots (especially if you haven’t done any pre-production testing), and never put a shot before the safety of yourself or your crew. In my opinion, leave your driver alone so they can concentrate on driving — he or she will make decisions about adjusting the shooting plan, should the backup become necessary.
2. The Hardware Store
If you don’t have access to tools or materials, don’t fret: your local hardware store has a lot of options. They can usually cut material in-store and sometimes offer discounts on leftover material from pervious customers. In some instances, you can even get demonstrations of how to use a tool.
3. Plan Your Route

Plan your route, know the road conditions, and have a plan to get back to the starting point. If you impede traffic in any way, you will need to get a permit, the requirements for which will vary based on your location. However, you can easily test your rig in vacant parking lots and public spaces. If you’re shooting in a parking garage, make sure your camera clears all overhead architecture.
4. Prep Your Surface
Clean your surface for the suction-mount and add a thin layer of beard wax. Beard wax has a great consistency, and it improves suction without damaging your car. The wax helps create a liquid-like layer that doesn’t evaporate, which helps seal the air displacement that causes the suction.
5. Be Gentle
Don’t press too hard while attaching your mount. If you bend the metal under the cup, you’ll only get weak suction, if any at all. A nice, even surface is more important than how hard you press (I learned this the hard way). Further, you may get different degrees of suction from each cup. While not ideal, four good suction points is usually enough. You could even purchase a dual suction cup puller and swap them out based on your rig and your mounting surface. Tow straps are also be a great addition for safety.
6. Follow Focus

Get a follow focus system and an HDMI transmitter. There are many options out there for both pieces of equipment. A focus system is a necessity for gimbals, and I found a very cheap prosumer HDMI transmitter for gaming. This gives you better control and improves your cinematography.
7. Use Your Camera App
Does your camera have an app? Controlling camera settings over WIFI or Bluetooth will give you even greater control over your shot without ever leaving the car.
8. Use a Spotter
Have a spotter for traffic. It’s unlikely that you’ll have full control over a location, so be in constant contact with your crew by using speaker phones or a walkie system. Again, if you plan to stop traffic or film any type of stunt, you will need to get a permit. Certain buildings in your area might be prohibited altogether, so do your research.
9. Results May Vary
Not all cars, roads, and materials will yield the same results. Don’t be discouraged if your first few attempts aren’t perfect. Keep experimenting with locations, and try out a different car.
10. Higher Frame Rate

Shoot at a higher frame rate. This will cut down motion blur and improve the results of warp stabilizer in post-production. (Check out the video below for more warp stabilizer tips — it’s going to be your best friend.) I like to begin in Premiere and then import into After Effects if I want better results. You may even want to set your own tracker.
Rigging a camera mount for your car can become daunting very quickly when you look at the examples of full grip-made rigs, but hopefully this article helps pull back that curtain a bit. Perhaps you’ve got an old tripod on hand or a quick release plate that needs a new purpose. If you’re shooting a car scene, give that gear some new life.
Looking for more video tutorials? Check these out.