
Video Tutorial: Create the Cheshire Cat Look in After Effects
In this tutorial, learn how to quickly create an eerie stare and smile effect during a fade out transition.
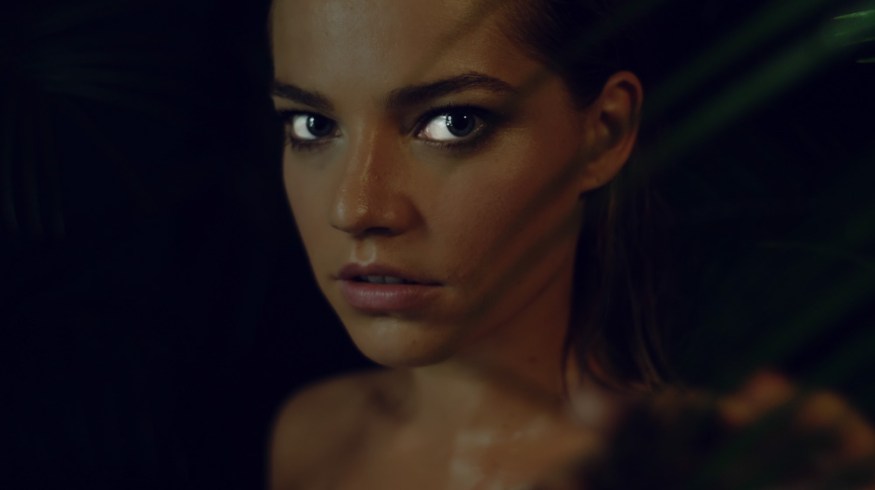
In this video tutorial, we’re going to learn how to create an effect that I call “The Cheshire Cat Effect.” This is because it gives our subjects a eerie stare and smile, similar to that seen on the Cheshire Cat in Alice in Wonderland. The effect occurs during a fade out shot, in which the eyes and smile fade out more slowly.
The best part? We can accomplish this effect with minimal rotoscoping by using RotoBrush 2.0 in After Effects. Let’s get started!
Using RotoBrush 2.0
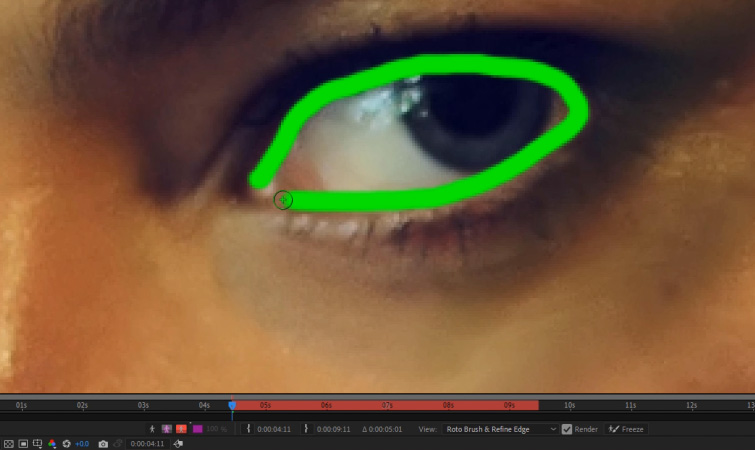
The first thing we need to do is mask out the eyes of our actor. You can choose to do this frame-by-frame, but a much faster method is by using the RotoBrush in After Effects. This will allow us to draw an outline of each eye, and then After Effects will automatically create an animated mask for them. It’s okay if the mask isn’t perfect, as we can refine it more later on.
If you’re brand new to using the RotoBrush, check out Jason Boone‘s tutorial 5 Ways to Fix a Boring Shot with the Rotobrush in After Effects.
Adjusting the Eyes
Once you have completed masking the eyes with RotoBrush, we can now refine them using the RotoBrush Matte Settings in the Effects Panel. I recommend adding some Feather around each eye, but feel free to adjust the settings to best fit your shot.
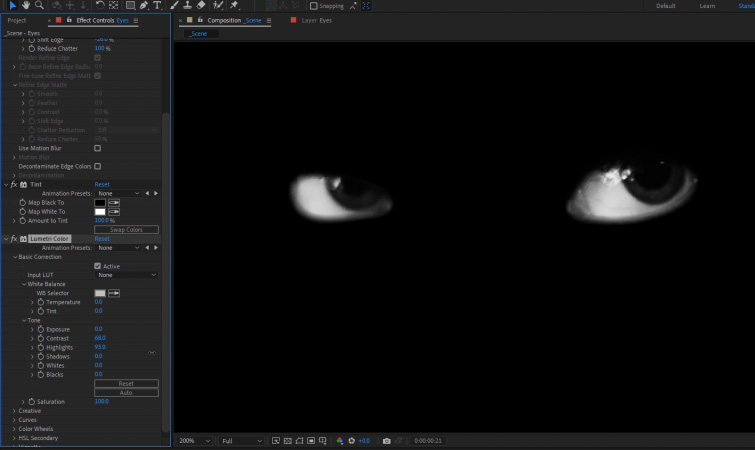
To make the eyes “pop” more, first apply a Tint effect. This will make the eyes black and white. Next, apply the Lumetri Color effect to the eyes, and increase the Contrast and Highlights, as needed. The goal is to really make the white areas of the eyes stand out.
Luma Matte the Eyes
To finish up the look of the eyes, duplicate the footage of the eyes, and set the bottom copy of the footage to a Luma Matte. This will effectively leave only the white areas of the the eyes visible. The darker areas, such as the eye iris and pupil, will become transparent.
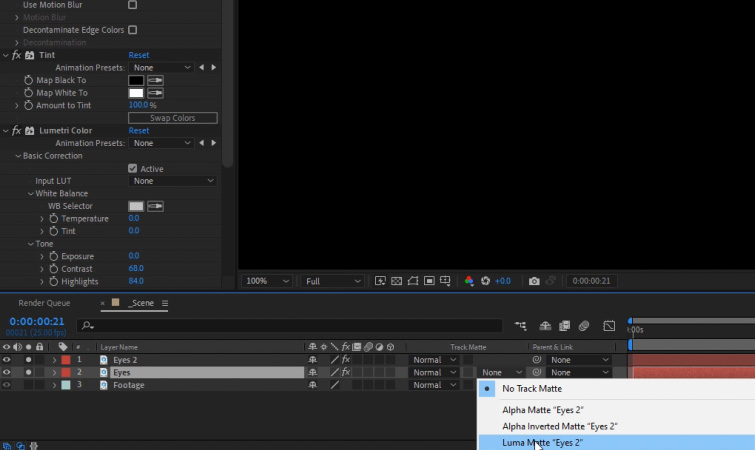
Finally, I recommend precomposing both eyes’ footage layers into one composition. This makes the eyes much easier to work with, as a single comp layer.
Fading out the Footage
Now all that’s needed is to fade out your original footage along with the “eyes” composition. Place the eyes comp below your original footage, then keyframe the Opacity of both layers from 100% to 0%. I suggest doing this over a timespan of about 3 to 5 seconds.
You should now see the effect of the the “Cheshire Eyes” visible during the middle of the fade out.

Feel free to experiment with the Opacity keyframe times of both layers to create different looks. You can go with a subtle look, all the way to a more extreme stylized look.
Adding in the Smile
If your actor is smiling during the shot, you can also have their teeth fade out slowly with their eyes. This can create a more sinister appearance, especially if their facial expression changes during the fade out.
To do this, just repeat the same RotoBush and Luma Matte process done previously for the eyes, but for their smile.

Then, simply keyframe the Opacity of the teeth composition in the same manner as the eyes composition. If the teeth are too bright compared to the eyes, you can lower their initial opacity a bit, to something like 80% to 50%, and then have them keyframe down to 0%.
Recreate the Ending from Alfred Hitchcock’s Psycho
If you’ve ever wanted to recreate the ending shot from the Alfred Hitchcock‘s Psycho, it uses a similar fading out technique we used for the Cheshire Cat effect. You can see the effect @1:30 in the clip below.
To do this, simply place a picture of a skull behind the footage of your actor. (You’ll likely need to track the skull image to your actor’s face if they’re moving.) Then, simply keyframe the Opacity of the skull image to fade out at the same time as your main footage.
In doing this, you’ll be able to slightly see the skull through the footage during the fade out!

More Scary Themed Tutorials
Looking for more scary-themed tutorials? Check out 8 Ways to Build Tension in a Scene, which can tie in perfectly for setting up a shot with the Cheshire Cat Effect.
And, if you’re looking for another After Effects tutorial, check out How To Create Retro Horror Movie Titles In After Effects.
Interested in the royalty-free tracks we used to make this video? Give them another listen:
- “Roadgame” by Nicholas Ripamonti
- “Dream Waves” by Cymatix
- “True Professional” by Ricky Bombino
- “Miami Nights” by Ben Beiny
- “Thrills” by Harrison Amer
A few more tutorials to peak your interest:
- Voxel Art Video Tutorial: What it Is and How to Create It
- Create Halloween Voxel Art with MagicaVoxel: FREE Models Included
- Video Tutorial: How to Use Modulation After Effects Plugin
- 14 Effects Tutorials Inspired by Marvel’s Loki, WandaVision, and More
- 10 Top Audio Editing Tutorials Every Video Editor Should Watch


