
Color Grading: How to Change the Seasons in Premiere Pro

Learn how you can change the color of the leaves in your footage with this easy-to-follow Adobe Premiere Pro color grading tutorial.
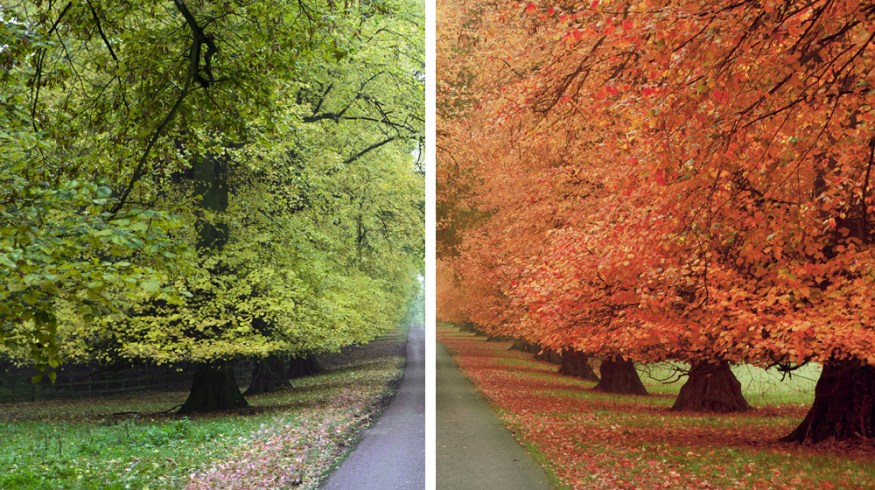
Top image via Shutterstock.
One of the most frustrating aspects of being pressed for time with a shooting schedule is the lack of wiggle room for shooting whenever you’d like. Often, you’re rushing toward a deadline with no days or hours to spare. You have to take what you can get when you can get it.
However this doesn’t necessarily mean you have to settle for a shot you don’t want. Here are a few ways to alter the time or place of your shot during post-production. In this particular example, we’ll learn how to change your shot from summer to fall — all in Premiere Pro. For DaVinci Resolve users, check out our previous coverage here.
Let’s get started.
Step 1. Use HSL Secondary

As Justin Odisho points out, it’s best if your talent is wearing something with a different color than the background so you’ll avoid changing their clothing too drastically (especially if you want any continuity in your film). So, create an adjustment layer, and put the clip on top of your original. Then open up the Lumetri color Panel, and then open HSL Secondary.
Step 2. Capture the Right Color

To distinguish the color you’d like to change in the scene, grab the Ink Dropper tool and drag it over to the image and pick a point (in this case, it’s a bright green tree). Since the trees are changing in color due to the different light, grab the Plus Ink Dropper and drag it over the area of leaves to capture the range of brightness in the green leaves. You can pull the sliders in or out to refine your adjustment and see exactly what color you’ve selected.
Step 3. Open the Color Wheel

Now we’re going to change the colors, so open up the color wheel. If you want to use the tri color adjustment with Shadows, Midtones, and Highlights, you can, but Justin Plays with the one Color Wheel for this example. He recommends just playing around with the colors so you can easily decide what shade works best for your shot. Also, try not to go too saturated with your colors due to how fake the final product might look.
Odisho recommends, since you’re already working with the Adjustment Layer, to just go ahead perform the basic color grading you need to while you’re already in Lumetri (thus saving you time down the road).
Want to learn more about how color grading can save your shot? Check out our past coverage.


