How To Create An Explosion Scene + Free Action Compositing Elements

In this epic video tutorial, learn how to do 5 different special effects shots using these free action compositing elements.
Creating action compositing and special effects is definitely not for the faint of heart. You can stare at something for hours and decide that it still doesn’t look quite right, and no matter how much you play around with glow settings, timing, or color correction, without the right elements, it might never look the way you want it to.
However, if you’re lucky — and a bit industrious — over time, you can create an impressive library of action compositing elements that will help you build any type of scene you might need. Luckily enough, our friends over at RocketStock have created an extensive library for just such occasions.
In the following tutorial (a somewhat epically long one, jam-packed with info) learn how to build an explosion scene from the ground up using these elements.
Want to follow along? Download the raw footage from the short film and try it yourself!
DOWNLOAD NOW
There are quite a few free elements mentioned in this video, but the main one is a freebie pack put out by RocketStock called Action Pack Lite. This is a pack of free samples from each of the various action packs that RocketStock has released. This way you can give all of the packs a try and figure out which ones you think you might need for your next project. Check them out!
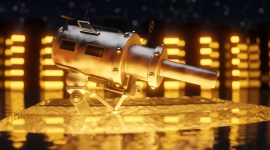
Shot 1: Muzzle Flash

The first shot is a very quick shot wherein the gun falls off of the barrel and hits the ground (causing the gun to misfire), and a muzzle flash explodes out from the gun — leaving some smoke behind.
To achieve this, we have multiple muzzle flash options to choose from (but nowhere near as many as what’s available in the full Ricochet pack). We also have the option to add some smoke underneath the muzzle flash. I like to have muzzle flashes on screen for a two frame fade-out. This feels more natural, in my opinion.
After we’ve thrown our muzzle flash in, we can go ahead and track the quick scene. Even though there isn’t a ton of motion, it will still help the shot feel more natural, due to the slight movement to the camera.
Now, duplicate one of your muzzle flash layers, scale it up to fill almost the entire frame, and add feathered masks to areas that appear reflective. Move this layer one frame back from the others, to provide the feel of an aftershock. Add some subtle glow to the entire scene to bring it all together.
Shot 2: Spark Fall

Yet another quick shot. This one is very easy, using some more free elements from RocketStock.
In this shot, we’re going to use the Spark pack. This pack includes 65 completely organically shot spark and ricochet elements. These were created by shooting zirconium-filled paintballs at a black wall — this way you can add them quickly on top of your footage, using the add or screen transfer modes.
First, track the shot. It’s another really quick track, but you still want to add that slight bit of motion to all of your elements.
From there, all you need to do is add your choice of ricochet elements from the spark onto an area that looks metallic enough to spark. Add some glow to your spark elements, and parent them to your tracked null.
The last task here is to animate a single spark falling to the bottom of the frame. To do this, isolate a single spark from one of your spark elements, and draw a quick mask around it to single it out. Then go to Layer > Time > Freeze Frame. This will allow you to animate the spark using position keyframes.
Shot 3: Gas Ignition

Now we’re getting into the nitty gritty. Although, with elements like these, it’s much easier than usual.
One unique aspect of the Ignite pack from RocketStock is that there is such a big selection of elements to choose from that they even include quite a few elements that appear to be reflecting off of water. This is perfect for this scene wherein we need to create fire on top of a puddle of gasoline.
First, we’ll need to track the scene again. Just get used to that.
From there, you need to animate the single spark from the previous scene to fall into the gasoline puddle. Follow the position of the female character’s eyes through the scene and try to match the timing of the spark’s fall accordingly. Once the spark hits the puddle, just use some scale keyframes to make it disappear.
Now you can start adding some fire elements to the scene, starting with the initial flames. Using mask path animation, animate the fire growing quickly and consuming the entire scene. Use as many fire elements as you need to make this convincing.
Shot 4: The Explosion

Contrary to what you might believe, this shot is actually one of the easier ones. Using just a few elements, I was able to just fill the scene as quickly as I could. With some glow, it really only took a few elements.
Just start by placing some fire around the scene and find ways to make it all blend. This will take plenty of masking and color correction, but with some fine-tuning, the scene will quickly start to take shape.
Finish the scene with three big explosion elements — with plenty of glow on each. Stagger them frame by frame so that they appear to be one explosion growing larger.
This scene required some post-camera shake. In order to make the compositing much easier, we decided to shoot this one locked off on a tripod.
Lucky for you, PremiumBeat has a pack of 15 Free Camera Shake Presets that we used to pull that organic looking post-production handheld camera motion.
Shot 5: The Last Shot

This final scene is one where you can really go as crazy as you want with the compositing elements.
To start, I darkened the entire scene considerably to create the vibe of soot and ash, giving the set a dark layer of grunge. All you can do from here is experiment. Start placing fire elements around the scene, adding glow and color correction to each one as needed. It may be necessary to duplicate and flip (and blur) to create the feel of a reflection.
You also need to add some embers to the air. For this, we’ll use some free dust elements from the 16 Free Volumetric Light Overlays pack from RocketStock.
With these dust elements, you can quickly add a curves adjustment effect and add a bit of green and red. Follow that up with a strong glow effect, and voilà — you have burning hot embers floating through the scene.
Add some camera shake again using the camera shake presets, and finish the whole scene out with a bit of glow to bring it all together.
Looking for more video tutorials? Check these out.