Glowing Results: Grading Skin Tones in DaVinci Resolve
We’re going to use DaVinci Resolve to get balanced, glowing skin tones in just a few easy steps — without affecting your other edits.
First, you need to isolate the skin with a selection so you can work with it without affecting the rest of the image. Then, you can even out the skin, unifying the tone so it’s a universal color, without making the person look like they’re wearing too much foundation. Next, decrease the mid-tone density so that small imperfections disappear. Finally, add a layer mixer node so that the skin color you’ve just worked on is protected from other grades you might make. Let’s look at them in turn.
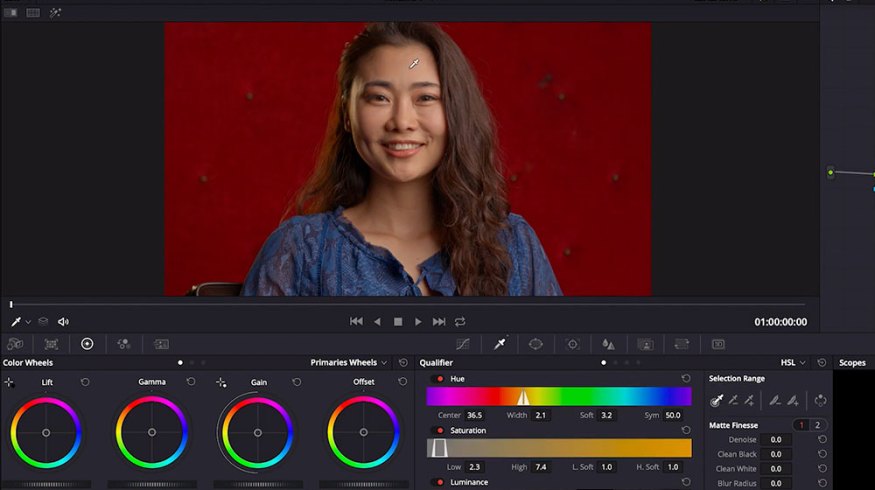
Make a Mask
In a new node, select the qualifying tool, and drag it across the most even and representative part of the face. You’ll need to use the + brush to increase it, as well as the + feather tool. I’ve also found that increasing the clean white helps a lot.
Unify Tone
Once you have the skin isolated, increase the contrast and look for yellow, red, or green areas that don’t fit with the overall skin tone. In the Curves menu, select Hue vs. Hue, then select those colors using the curve up or down to shift the problem colors back to the central color.
Once you’ve done this, you can change the overall color with offset, or temperature/hue to get the look you want.

Color Contrast.
Pairing Imperfections
In the color tab, there’s a slider marked MD for Midtone Density. Turning this down gets rid of contrast in the skin, effectively hiding imperfections. You can also turn it up for a grittier, more weathered look. You may want to also increase sharpness so the face retains a natural look, rather than looking defocused.
Separate
The last step is to add another node, then hit Option+L to turn this into a layer mixer node. Dragging the blue alpha arrow of the skin mask to the input on the lower of the two mixed nodes means that your skin grade will “pass around” anything done in the latter nodes. This lets you cool down the background — or desaturate it — without also affecting the skin.
Interested in the songs we used to make this video?
- “Sky and City” by Remember The Future
- “Opulence” by Julian Bell
- “Murmurs” by Biba Dupont
- “Tape” by Simba Music
- “Chilling Groove” by Ulas Pakkan
Want more on working with DaVinci Resolve? Check these out.
- Working with Different Frame Rates in the Same File in Resolve
- Everything You Need to Know About Chroma Key and Green Screen Footage
- NLE Showdown: DaVinci Resolve vs. Adobe Premiere Pro — Text Effects
- Harnessing The Power of Facial Refinement in DaVinci Resolve
- Learn How to Fix a Variable ND Filter Vignette in DaVinci Resolve