Video Tutorial: Time-lapse Workflow for the GH5 — Part 2
One of the most exciting features of the GH5 is its ability to shoot a high-resolution time-lapse, in-camera without any additional gear or software.
Note: This timelapse tutorial is based on GH5 Firmware update v. 2.4
In the second part of our tutorial on the time-lapse workflow for the GH5, we’ll go over how to ingest and organize photo sequences in Adobe Lightroom, create an .mov of your time-lapse in After Effects, and output that file for editing and a final grade in Premiere.
In this workflow, we’ll use three separate applications to create a final time-lapse:
- Lightroom: used for media management, clip naming, and color grading.
- After Effects: used for generating the time-lapse sequence and applying stabilization.
- Premiere: used for editing and applying a final grade.
To learn the entire post-production workflow for creating time-lapses from the GH5, check out our tutorial:
Since you’ve already checked out part one of this tutorial, you’ve already captured a time-lapse photo sequence with your GH5 and are ready to ingest your media for post-production. To begin, make sure that you back up your shot footage in at least two locations to prevent potential media loss.
Step 1: Organize Your Time-lapse Folder
Create a folder to house all of your project’s time-lapse files. Within this folder, create two subfolders, and name them accordingly:
-
Source: this folder houses your original media shot on the GH5. (Note: dump all of your time-lapse photo sequences within this folder. You can manage media within Lightroom in Step 3.)
- Created-TIFFs: this folder houses the TIFFs that you’ll output from Lightroom.

Step 2: Create a Project in Lightroom Classic CC
Note: This tutorial uses Adobe Lightroom Classic CC, Release 8.0
Create a new Lightroom catalog by navigating to File > New Catalog.
Navigate to the location where you’d like to save the catalog, and name it using a descriptive name (such as “Mountain Time-lapses”) and select “Create.”

(Note: for quick reference, save your Lightroom catalog in your time-lapse project folder next to the subfolders you created in Step 1.)
Step 3: Import and Organize Photo Sequences in Lightroom
With the catalog created, import your photo sequences into Lightroom by navigating to File > Import Photos and Video.
Lightroom will open a dialog box so you can import your desired photos. Navigate to your project folder, and select your photo sequences from the “Source” subfolder.
Select “Import.”

Once the thumbnail previews generate, organize your photo sequences by location and shot.
Create a subfolder within the “Source” folder for each shot you captured. For example, if you shot three separate time-lapses on a recent project, you should create three separate folders within your “Source” folder — one for each shot.
Name your shot folders using a logical description such as “subject_fieldOfView.”
Step 4: Create a Look
At this point, you have the option to create a look for your time-lapse. Some shooters edit and color grade a single photo and apply the look across all of the photos in their sequence. This is a traditional post-workflow for time-lapses, usually performed at this point.
The strategy for color grading a time-lapse photo sequence is simple:
- Color-grade a single image from the time-lapse photo sequence.
- Paste those attributes across all photos in the sequence.
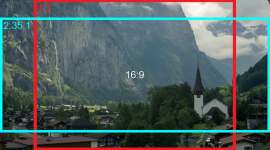
Resize and adjust your shot however you want. If you shot your time-lapse at a 4:3 aspect ratio, you’ll need to crop the photo for 16:9 — or whatever aspect ratio you’re using in your larger Premiere project.

Once you’ve created your desired look, right-click the graded photo and select Develop Settings > Copy Settings. A dialog box will open asking which attributes you would like to copy. Select all that apply, and click “Copy.”
Next, select all photos in your photo sequence, excluding the image you’re copying. With the photos selected, right-click and select Develop Settings > Paste Settings. The thumbnail images in your sequence will begin to update.
The process for color-grading a photo varies greatly depending on the subject, the lighting, and the photographer’s intentions. The video tutorial accompanying this article offers step-by-step instructions for color-grading an image in Lightroom.
With the GH5’s firmware update v. 2.3, shooters with the V-LogL activation code can now shoot photos with the V-Log photo style. Not only does this give shooters more flexibility in grading their images, it also lets them postpone grading until they ingest a time-lapse .mov into their non-linear editing software.
Step 5: Export
Adobe Lightroom includes a powerful export feature that allows for batch exporting photos with set parameters for file destination, naming, and quality or compression settings.

When you’re ready to export the photo sequences of a particular shot, select all the photos within that shot’s subfolder, and navigate to File > Export.
Export Location
In the export dialog box, designate an export location within the “Created-TIFFs” subfolder you created in Step 1. For each shot, create a matching subfolder in your “Created-TIFFs” folder by checking the box “Put in Subfolder” and naming it accordingly.
If you’re working with multiple time-lapse shots, do this for each shot.
Ensure that the “Created-TIFFs” subfolder structure matches the structure of the “Source” subfolder. This is especially important for large projects that include many time-lapses.
File Naming
Furthermore, under the File Naming tab, check the box “Rename To,” and select “Edit” from the dropdown menu. In the dialog box, input a naming structure:
Sequence # (0001) – Original filename – Version #
For instance, the first photo in my time-lapse sequence might read:
0001-P1044967-v01.jpg
File Settings
Lastly, under the File Settings tab, select “TIFF” from the “Image Format” dropdown menu.
Under the “Compression” dropdown menu, select “None,” and specify the “sRGB” Color Space. This is to preserve the highest-quality image for export and ingest into After Effects.
Otherwise, if space is an issue, select “JPEG” from the “Image Format” dropdown menu, and select 100 from the “Quality” slider.
Select “Export.”
Step 6: Import Images into After Effects
Once the export is complete, open After Effects, and import the sequence by navigating to File > Import > File.
Navigate to the shot subfolder folder within your “Created-TIFFs” folder, and select the first photo of the sequence.
With the first photo selected, check “TIFF Sequence” and “Force alphabetical order.” Click “Open.”
With the image sequence in your After Effects Project Panel, right-click the sequence and navigate to Interpret Footage > Main.
Select the “Assume this frame rate,” and select your desired frame rate.
24fps is appropriate for most projects. For a faster speed, select 48fps. Select “OK.”
Step 7: Create a New After Effects Composition
Create a new composition by navigating to Composition > New Composition.
Name the composition to match the shot name, and set your desired parameters for resolution and frame rate. Generally, the UHD 4K 23.976 preset in After Effects will work for most projects.
Set your desired composition duration and select “OK.”
With the composition open, drag the TIFF sequence to your After Effects timeline.

Step 8: Stabilize Your Footage
Remove jitter from your time-lapse sequence by applying the Warp Stabilizer VFX to your composition.
Step 9: Export .MOV
Set output settings to QuickTime format using the Uncompressed 10-bit 4:2:2 codec, specify a destination within your time-lapse project, and export the composition.
You can also choose the ProRes 422 codec to save time and hard drive space. Regardless, if you’re editing your time-lapse in Premiere, you’ll want to export the least compressed file possible.
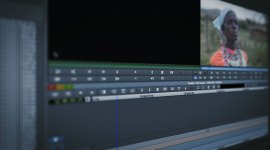
Step 10: Import the .MOV into Your Premiere Project
Once the composition has finished exporting, import the .mov into your existing Premiere project.
Apply a final grade using a LUT or by adjusting the grade in your Lumetri Panel. Edit the time-lapse as you would any other clip in Premiere.
If you’re working with an uncompressed UHD .mov, you may need to create an ingest setting in Premiere. The 1280×720 GoPro CineForm preset works for most 16:9 projects.
Interested in the tracks we used to make this video:
- “Rise and Rhyme” by Eternity Bro
- “Weeknight Jammies” by Eternity Bro
- “The Speed of Life” by Vincent Tone
- “Telesto” by Bedlake
- “Midnight Coup” by Bedlake
- “All From You” by Simba Music
- “What You Got” by Luciano Music Co.
For more information on getting the most from your Panasonic GH5, check out these articles: