Top 10 Things I Wish I Knew Before Using LumaFusion
With robust, user-friendly features, LumaFusion is perfect for aspiring videographers. Here are 10 things you should know first.
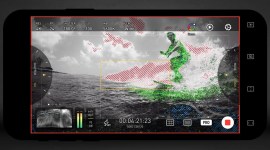
No other mobile video editing app is as affordable, feature-packed, and user-friendly as LumaFusion. We’ve written about how LumaFusion is the best video editing app for iPads, highlighting the app’s inclusion of features found in more expensive non-linear editors (NLEs), while keeping costs to a one-time $30 payment. More importantly, the app works across most iOS and iPadOS devices, making it an excellent choice for anyone on the move.
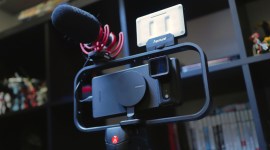
The accessibility of the app, both in its ease of use and price, as well as its availability across mobile Apple devices, lowers the barrier of entry for beginners, indie filmmakers on a budget, and anyone who needs to splice a few clips together. Better yet, it acts as a teaching tool for learning the distinct language of editing videos. While the app is good enough for producing client work, it can also be a stepping stone for more advanced software, such as Premiere Pro, DaVinci Resolve, or Final Cut Pro. But, more on that later.
But, as easy as it may be to use, newcomers who have never operated an NLE may have a hard time understanding how to navigate the app. Conversely, users who have some experience editing videos will find their way in no time. Still, there’s a lot to uncover under LumaFusion’s beginner-friendly façade, if you’re willing to look. Admittedly, the $30 price point is on the higher end of the App Store, but, after using it for the past few months, I believe it’s worth every dollar. If you wish to make videos of any kind, LumaFusion is the on-ramp to making that happen.
Below are the top ten things I wish I knew before using LumaFusion. If you’re not sure about the app, whether it’s because of money or lacking in specific features, I recommend you take a look below. Maybe you’ll change your mind. And, if you do, these ten facts should help you have a better grasp of LumaFusion before you even open the app.
1. Using an SSD Still Takes up Internal Storage
Clips and files are visible from LumaFusion when connecting a storage drive to the device—in my case, an iPad Air 4—but it isn’t possible to edit off the drive. Instead, using any part of the clip, regardless of length, automatically triggers its download.
I didn’t plan to use my iPad as a video editing machine, and now my paltry 64GBs of storage—more like 30GBs after downloading apps, games, and media—limit what I can do. While my iPad Air 4 is powerful enough to edit 4K clips seamlessly, the storage hinders me from doing so, as 4K files are astronomically large. I can live with that, though, so long as I wipe my drive of all clips after each edit. If you plan on editing long videos or using 4K files, do it on a device with plenty of storage. Alternatively, there are two drives that you can edit off of—the Gnarbox and WD My Passport Wireless Pro/SSD—but their high price undermines the app’s affordability.
2. Exporting to Final Cut Pro Is Possible Now—for a Fee
I’ve never used Final Cut Pro X, but I know a huge community of dedicated users exists. One of my favorite YouTube videographers, Daniel Schiffer, makes absolute magic with the Apple-only NLE. What does Final Cut Pro have to do with LumaFusion? Well, you can export projects as FCPXML .zip files to work on Final Cut Pro. Essentially, this makes it so you can start doing a rough cut of your footage remotely from your iPhone or iPad and transfer that over to your macOS device when you’re ready to edit on Final Cut Pro. Overall, the process is pretty seamless. You can transfer the FCPXML file containing the timeline date without the media to save on storage and export time. You can then re-link the media back to the timeline when loading Final Cut Pro.
If you do decide to export the file with media, there are a few hitches. Assets like photos, titles, and music aren’t re-linkable on Final Cut Pro, so you’ll need to add them again. Regardless of exporting with media or not, many effects, such as LUTs, Chroma Key, and audio effects, aren’t supported on Final Cut Pro, meaning you’ll have to add all that back. A full list of what’s supported can be found on the reference guide, which contains more information on this topic and more—more on that later. The video below has a hands-on guide on exporting from LumaFusion to Final Cut Pro.
All this is nice, but it’s the one feature not included with LumaFusion. Instead, you’ll need to fork over another $20 for the privilege of exporting FCPXML files. Not ideal, really, but considering how much other NLEs cost, it’s not a bad deal.
3. You Can Export Directly to YouTube or Vimeo
No need to worry. This comes included with the purchase of LumaFusion. Once you’re done editing, you have a few options to export. If you want to upload the video manually, you can choose to export the video to your File folder. Or, you can choose to export to YouTube or Vimeo. I’ve done the former twice at this point, and had no issues.
Exporting directly to YouTube isn’t without its faults. While you can set the title, description, category, and tags, doing so is tedious. If you plan on writing a lengthy description with time codes, affiliate links, and all the other stuff YouTubers cram in there, don’t. It’s best to sign in to YouTube and edit the video’s description instead. If you need to get the video out there immediately, doing a direct YouTube export is an option.
4. Color Correcting Is Dead Simple
Cameras these days produce rich colors, but they can always use a touch-up. Whether it’s increasing the exposure to lighten a darker shot or increasing the saturation to make colors pop, color correcting does just that—it corrects the color that’s already there. Color correcting on other NLEs can be complicated, but the color correcting in LumaFusion is not.
Color correcting footage starts in the Color Presets tab of the Color & Effects section. There are several presets to choose from. These presets are stylized, and I wouldn’t use them on my videos, but they’re there. You can adjust any of the presets to your liking, though so it’s possible to tone down some of the more exaggerated ones. Purists can color correct their raw footage without any help from LumaFusion by selecting the Original preset. From there, it’s as simple as moving the sliders until the color looks right. There are sliders for exposure, contrast, highlights, shadows, and midtones (Gamma), as well as for saturation and hue. For a more heavy-handed approach, the color sliders are there. Be careful, though. The sliders are sensitive, and it’s easy to get carried away. Just mess around with the sliders until it looks right to you. And, if you don’t like it, hit the trashcan to bin it and start over.
5. You Can Import LUTs
Whereas color-correcting fixes the color, color grading changes the shot’s color to change the mood or vibe. On LumaFusion, the only way to achieve that is by messing with the color sliders in the Color Presets tab, but it’s not exactly the best way to do it. As I said, the three sliders are sensitive, and they’re limited, too. LumaFusion is just not built for color grading, and that’s okay. Thankfully, it’s possible to apply LUTs in LumaFusion.
The LUTs tab includes two dozen LUTs that you can apply to your footage as a one-click color grade. If you’re not familiar with LUTs (look-up tables), they’re basically a color preset. You can adjust the intensity of the LUT by moving the slider.
LumaFusion’s batch of free LUTs includes FiLMiC LUTs for color grading FiLMiC Log V2 and V3 footage from the FiLMic Pro app—this is a big deal for phone videographers. The remaining LUTs are okay to start with, but they’re not great, which is why importing your own LUTs is such a tremendous feature. While you can create your own LUTs or buy them from your favorite YouTuber, we’ve got 13 free LUTs for you to download. It’s worth mentioning, though, that not all LUTs are for all cameras or situations, so keep that in mind as you’re applying them to footage. And, make sure to color correct before applying a LUT, as it’s important to have good color before color grading.
6. Hands-off Audio with Audio Ducking
Of the four effects tabs, the audio one is probably the weakest. The effects and filters work well enough, but applying the different filters and effects is often tedious. Using the audio makes me want to switch to Resolve, but there’s one silver lining. The audio ducking feature automatically adjusts sound levels, lowering music and other sounds when a subject speaks and returning to normal after. If you’ve never done any audio ducking, it’s the practice of adjusting audio levels when a subject speaks.
Typically, you’d have to manually adjust audio levels on other NLEs, but on LumaFusion, you only need to set the track with the speakers as the Master track and the music track as the Auto track in the Audio Editor. LumaFusion will then automatically detect when subjects speak and adjust the levels automatically. To tweak the speed, threshold, and start and end time, visit the Ducking tab in the Settings menu—it’s on the bottom-right corner of the app and looks like a question mark inside a gear.
7. Creating Unique Effects with Keyframes Is Easy
Animating effects by adding keyframes sounds like an advanced technique, and it can be on other NLEs, especially with more complicated effects. However, the keyframes feature on LumaFusion is easy to grasp, and you can start making effects right away. You can even save those effects to use on future projects. You can re-create the famous Ken Burns effect in the Fit & Frame effects tab by selecting a clip, placing a keyframe at the beginning, zooming in, and placing another keyframe at the end. When you play the clip back, you’ll see it gradually zooms in on the image.
Almost all of the effects on the app can be animated with keyframes, opening up the possibility for more creative edits. I wanted for my title to make an entrance on a video I was working on, so I animated it to slide by following the tutorial above. Because I saved it, I can use it on my next project. It’s worth messing around with the keyframes to see what you can come up with. I, for example, took the Gaussian Blur and faded it in slowly to bring attention to the title. There’s so much else you can do with keyframes, and it routinely blows my mind that the app is $30.
8. You Can Change the Layout and Work in Landscape or Portrait Mode
This sounds like boilerplate marketing copy, but it’s true—you can work however you want. You can use LumaFusion on iPhones and iPads in landscape or portrait mode, with your finger, pen, keyboard, trackpad, or mouse. You can even change the layout of the workspace by selecting any of the six available workspace layouts.
Look, working in vertical mode on an iPhone isn’t something I would do, primarily because I don’t own said iPhone, but you can. Go for it. And, if you don’t like where the media window is, change the layout. It’s that simple. I prefer to work on the iPad using my Logitech Folio Touch case, which includes a keyboard and trackpad, but I’ve been known to use a mouse. And, I frequently use the touchscreen for finer control of the timeline or sliders. The level of interactive control LumaFusion gives the users should be the rule, not the exception.
9. Pulling up the Keyboard Shortcuts Guide Is a Pro Move
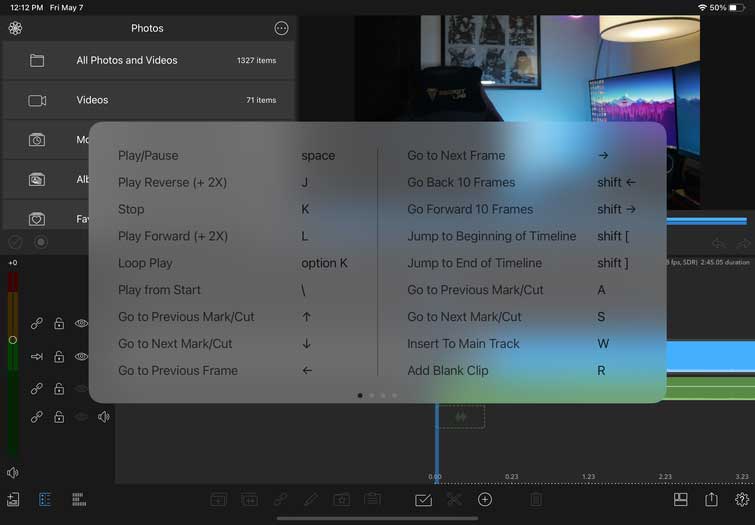
For touchscreen users, LumaFusion does a nice job of making everything accessible with touch—you’ll just need to learn what each icon does. There’s also a ton of touch gestures. Most of the icons are easily decipherable. Keyboard and trackpad/mouse users can click on those same icons or use the keyboard shortcuts. With a limited amount of storage space in my neocortex, I, too, dread learning new software shortcuts. Luckily, LumaFusion has a handy cheat sheet of sorts.
Holding the Command key for a few seconds brings up an overlay with three pages worth of keyboard shortcuts. Everything you need to know is on the cheat sheet, so use it often. I haven’t memorized every shortcut, and I probably never will, so I’m glad the keyboard shortcuts guide is a click away.
10. Unlock the Full Potential with the Reference Guide
If you think the shortcuts guide is useful, to quote BTO’s famous song, “You Ain’t Seen Nothing Yet.” I don’t make a habit of reading software manuals, or listening to BTO, honestly, but this one you should read from cover to cover. It’s not long, and they make sure to cover everything while keeping it concise. There are two versions of the guide, a PDF and an online version, both of which you can view here. There’s also this version, which is just slightly outdated but has a better format. The former is perfect for downloading to view on your device’s PDF reader, while the latter is better if you want to be able to search and view tutorial videos.
Regardless, both of them have the same information and reading it will make you a better editor. Maybe you don’t need to read the whole thing, but if you’re having trouble with anything, check out the guide before going to YouTube for the same answers.
For more editing tips, tricks, and advice, check out these articles:
- Why LumaFusion Is the Best Video Editing App for iPads
- From Filming to Editing: Should You Still Be Shooting in 1080?
- The 5 Best Free Audio Editing Programs Available
- The Visible Art of Editing with Thelma Schoonmaker
- Why Luminar AI Will Change Photo Editing for the Better
Cover image via Vectorium.