
DIY Filmmaking: How to Build Your Own Dolly for $50

In this step-by-step video tutorial, we show you how to to build a durable, customizable dolly for your next video project — for next to nothing.
Whether you’re just starting out as a filmmaker or you’ve moved into the big leagues, you can never underestimate the value of a good dolly. The beauty of building a quality dolly yourself is that you don’t have waste your budget on rental fees — now, or on future projects. So, let’s take a look.
What to Buy

For this tutorial, we went with the most basic build we could to save as much money as possible. So, if you want a thicker PVC pipe, smoother wheels, or stronger brackets, you can spend a little more money. However, even with basic components, this build turned out solid.
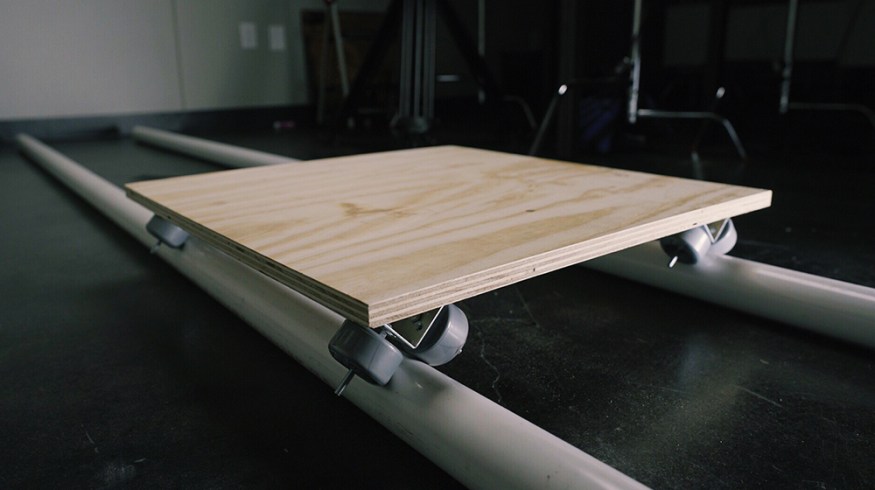
First, you need a 2′ x 2′ board — just big enough to support your tripod.
For the wheels, you can use either rollerblade wheels or skateboard wheels. For this video, we just went to a department store and bought a pair of child-sized rollerblades. Wheels are wheels.
Next, you’ll need 4 “L” brackets that have enough holes for you to screw through the bracket to attach it to the piece of wood. You might need to drill a hole in the “L” bracket toward the top of the corner if your bolt is too thick to fit through the holes.
Finally, find the right size nuts and bolts for the wheels you bought. In our case, the right size bolt was 1/4″.
Shopping List:
- 1/4 inch hex bolts (8)
- 1/4 inch nuts (16)
- 1/4 inch washers (8)
- 2′ x 2′ plywood board
- L brackets (4)
- Wheels (8)
- PVC Pipe (2)
Building the Dolly

First things first: you want the brackets equal distance from their respective corners. I measured them to hit 2 inches by 1 inch away from the corner. Then you’ll want to drill a hole in the bracket about an inch away from the corner. Once you’ve done this, you can slide the bolt up through the hole then place the washer down onto the bracket. Then slide a nut down and tighten the bolt to the bracket. Now you’re ready to screw the bracket into the wood. Once you’ve got the bracket tight and secure, you can slide the wheel down the bolt, then tighten it up with another nut. (If that sounds complicated, refer back to the video. It’s not that difficult.)
After you’ve done this, you’re pretty much on autopilot. Finish the other three brackets and you’re good to go. Throw the dolly on the tracks, place your tripod accordingly, and watch your production value climb.
Fun fact: If the PVC pipe you bought isn’t long enough, you can buy a smaller PVC pipe, and connect the two bigger pipes with the smaller one to bridge the gap.
Looking for more filmmaking tutorials? Check these out.


