Post-Production Lessons from a Star Wars Restoration

Learn how you can master post-production techniques by reworking older movies in this detailed, shot-by-shot video tutorial.
If you’re a fan of the original Star Wars films, you probably aren’t a fan of the later releases of episodes 4, 5 and 6 — the ones that included additional CGI effects.
If so, you might want to throw your support behind people like Petr “Harmy” Harmacek, a visual effects artist who is restoring his own version of the original trilogy from scratch (for the third time!).
After getting noticed for his work online, Harmy recently landed a job at Prague-based VFX house UPP and has worked on films like Blade Runner 2049 and Wonder Woman. (So internet dreams can come true!)

In this post, I wanted to break down a few of the techniques that Harmy uses in the following tutorial to restore a single shot from his Despecialised v3.0. He’s working on version three of each film because his skill-set has improved dramatically over the last eight years, when he began the project with no post-production experience.
In this recent tutorial over at Harmy’s YouTube channel, you can see just how much work goes into each shot he restores, which demonstrates that this project is truly a labor of love.
Problems Harmy had to fix:
- Scratched and grainy footage.
- Shot stabilization.
- Re-compositing matte paintings.
- Rotoscoping moving elements.
- Color Correction.
The best thing to do first is to sit back and enjoy the 24-minute tutorial (above) and then work your way through the resources to learn some of these techniques for yourself.
The tutorial embedded above is part 2 and you can watch part 1 here, which details his workflow for fixing certain shots from The Empire Strikes Back version 2.0 to bring them up to version 2.5 standards.
This offers an interesting and highly detailed look at a VFX workflow when preparing assets, tracking progress, directory and file naming conventions, and staying organized across a long project.
It’s also an interesting opportunity to compare and contrast the quality of the various sources Harmy is working from, such as the Blu-ray release and some very dirty 35mm scans.
Harmy uses the assets that he prepares in part 1 for the shot restoration in part 2.
Harmy is working in VFX and compositing software Nuke; you can download a non-commercial version of to try out for yourself, from The Foundry’s website here. There are a few limitations, such as no third-party plugins and an HD-limited output, but the intent is that “With Nuke Non-commercial, you get access to free, non-watermarked versions of Nuke, NukeX and even top-of-the-line Nuke Studio for as long as you like, so you can learn, explore and have fun on your own schedule.”
Shot Clean Up and Dirt Removal
Harmy uses Neat Video’s noise reduction plugin to clean up his 35mm scans in preparation for compositing them in Nuke. He goes into more detail on this in part 1 of his tutorial, but it’s worth noting that he applies the sharpen filter in Premiere Pro before applying Neat Video v4 to compensate for the softening effect of the de-noising.
This version of Neat Video can also do dust-busting, but because that can also introduce artifacts very easily, we will be careful with it, for this pass.
He then layers different plates of the same shot to benefit from the de-noise pass in the right places, to produce a clean plate for his final composite.
In the official Neat Video tutorial above, you can get a quick lesson on how to use the Neat Video v4 plugin to effectively remove dirt and scratches.
You can learn more about using Neat Video in After Effects.
For a deeper look into noise reduction specifically, you can watch this half-hour tutorial from colorist David Torcivia who does a great job of explaining the following:
- How noise reduction works in DaVinci Resolve Studio.
- How that compares to Neat Video.
- An interesting technique for “passable” noise reduction without using any plugins at all.
Shot Stabilization
![]()
Harmy uses shot stabilization in a couple of different ways: one is to stabilize the shot and remove any “gate-weave” from the original 35mm scans.
As part of his process, he chooses to leave in some of the shake that was in the original composite between the matte painting layer and the live action plates to maintain the authenticity of the original composite.
So he really is trying to restore the film to its original condition, rather than spruce it up for 2018.
If you want to learn how to stabilize footage for yourself, then both DaVinci Resolve and Premiere Pro have built-in stabilization tools, which you can pretty much drag and drop onto your clip.
This tutorial from Joshua Noel walks you through how to do it, and you can also get some tips on what Warp Stabilizer is doing under the hood.
Rotoscoping

One of the challenges that Harmy faced was that de-noising the shot reduced some of the frames of the “birds” that fly through the shot to ghosts of their former selves.
The solution to this was to rotoscope each one and animate those masks by hand to bring back the birds from the original plate. This obviously introduces noise back into the parts of the frame where the birds were scratched or dirty, which Harmy then had to paint out by hand.
Another technique that Harmy demonstrates while “dust-busting” this shot is using the Clone Brush tool to fill in gaps — as well as painting in parts of some frames with clean plates from other frames.

It’s worth noting that Harmy doesn’t have just one mask that is the outline of the bird; rather, he has several overlapping and some more simple shapes, which he can then animate as a group for a more efficient rotoscope.
https://vimeo.com/95000044
If you want a decent introduction to compositing, keying, rotoscoping, and animating masks, this 20-minute tutorial from PremiumBeat’s own Adobe After Effects Fundamentals course will deliver just that.
If you want some more in-depth tutorials on rotoscoping specifically, check out this edition of After Effects for Film Editors, which gives you a whole host to choose from — including this one on advanced rotoscoping techniques from Surfaced Studio.
Color Correction
Another Star Wars fan-restoration in the works is Mike Verta’s 4K Legacy edition, which I’ve written about previously. I bring it up because Mike’s video demonstrates some of the radical differences in the color grade between the Blu-ray releases and the original theatrical prints, which is something that Harmy also has to deal with in his restoration process.
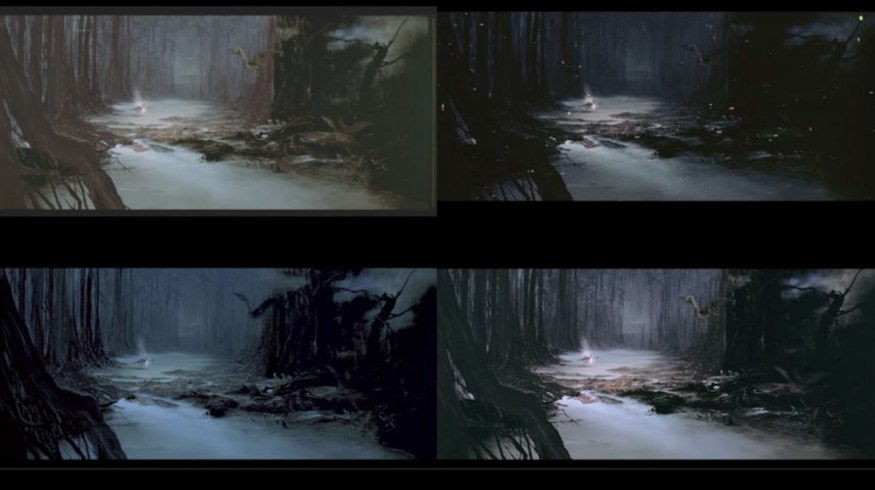
Harmy also uses color correction to blend together the differences between the matte painting in the background of the shot, and the live action elements (the birds, the ship) in the shot. He also removes much of the crushed and blue-toned darkness in the shot (check out the four-way comparison in the image at the top of this post.)
If you’re an absolute beginner to color correction principles and techniques then this post on Rocketstock.com offers a handy round-up of introductory tutorials.
Looking for more information on post-production? Check out these links.